Halloween Pumpkin Carving Contest · Starts October 1st · $500 in prizes
← Back to ideas
@ai_concepts
Sep 25, 2026
Crescent Moon and Sun Cutout Pumpkin CarvingAI
0

Report this carving

Tell us what is wrong. Reports are private.

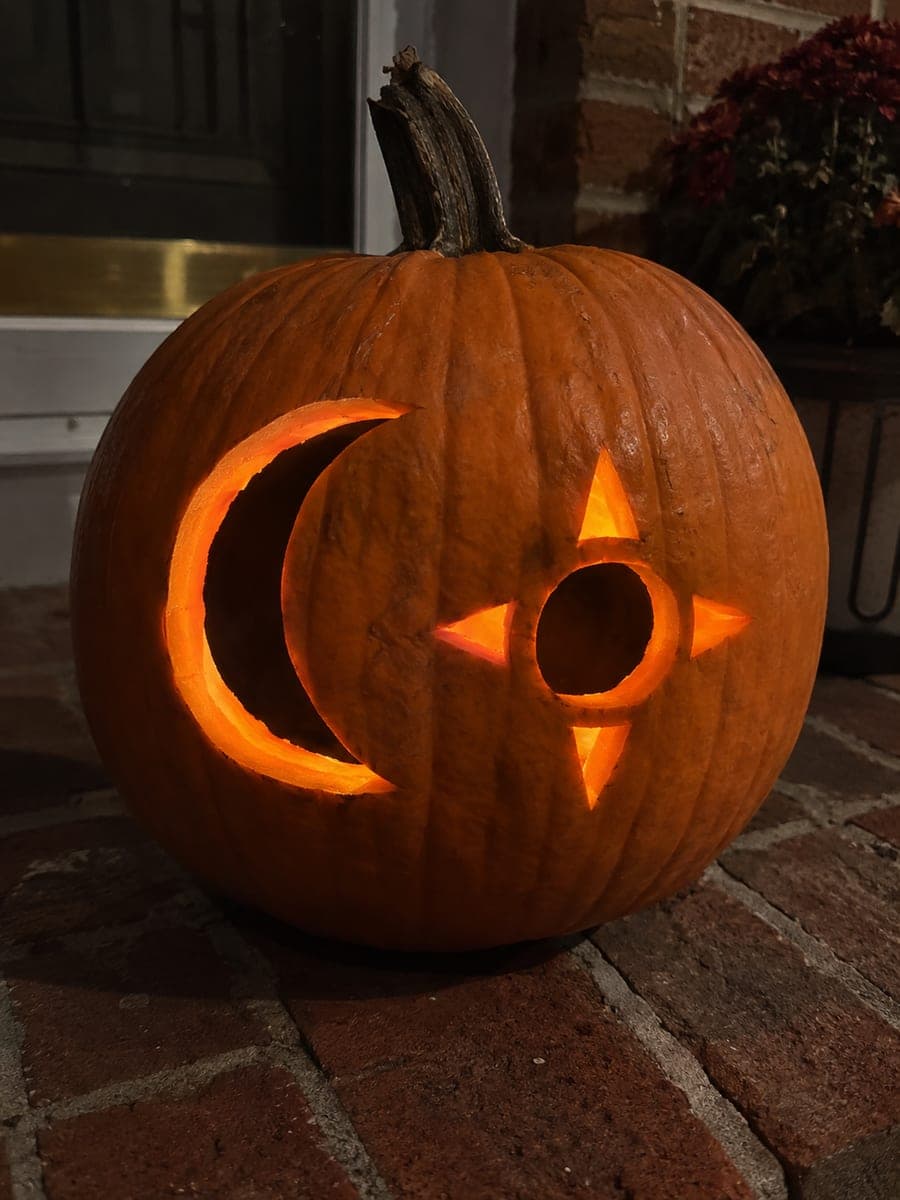
Crescent Moon and Sun Cutout Pumpkin Carving

An open crescent moon and a circular sun aperture glow alongside shallow backed triangular ray accents on this easy celestial pumpkin carving, with continuous rind kept between all elements for solid support. Cut the crescent and the sun circle first as full through-cuts, then use a detail tool to score the ray accents without cutting all the way through. The combination of fully lit and faintly glowing areas gives the design more visual depth than a simple easy pumpkin usually achieves. This celestial pumpkin carving idea looks especially striking next to a dark door or fence.

No ratings yet · Sign in to rate
Comments (0)

  • No comments yet — be the first.

Save without an account. Sign in to like or comment.

Our tips for carving a similar design

Two through-cut shapes, a crescent moon and a sun circle, do most of the glowing work, while shallow backed triangular ray accents add subtle depth without requiring full through-cuts. The rays are added after the main openings are complete, when the shell is still solid enough to support the detail work. The result has more visual depth than a typical easy-level design without significantly increasing complexity.

From pumpkin to porch

  1. Prep the pumpkin

    Cut the lid at the back and scoop the interior to a firm, consistent inch of wall thickness. Choose a smooth front face and wipe it dry before applying the template. The two main openings are far apart enough that wall thickness consistency across the full face matters for even lighting.

  2. Transfer and perforate the template

    Position the crescent moon on one side of the face and the sun circle on the other, with the triangular ray accent positions marked around the sun. Perforate both main opening outlines. Mark the ray accent positions with pencil but do not perforate them yet.

  3. Cut the crescent moon

    The crescent shape requires two arcs: a larger outer arc and a smaller inner arc that meet at both tips. Cut the outer arc first with a jab saw, then the inner arc to remove the crescent piece. Take extra care at the two crescent tips, cutting slowly to keep the points intact.

  4. Cut the sun circle

    Use a jab saw to cut the sun circle, following the perforated outline continuously around. Keep the blade perpendicular to the rind and the stroke even. Pop out the disc and confirm the surrounding rind is still solid on all sides.

  5. Score the triangular ray accents

    Use a detail tool or linoleum gouge to score the ray accent triangles around the sun circle without cutting all the way through the rind. Remove the outer skin and about a quarter of the wall depth. The thinned areas will transmit a faint interior glow that frames the sun circle in soft, warm light.

  6. Light and display near a dark door

    Place an LED tea light inside, positioned centrally between the crescent and sun openings. Display next to a dark door or fence where the contrast between the fully lit crescent and sun and the faintly glowing ray accents reads clearly. The combination of full and partial light gives the design a naturally celestial feel.

Written with AI to match this design

Gather your supplies

Check things off as you get ready.

Work on a stable surface, keep your free hand out of the cutting path, and have an adult handle sharp tools.

Three levels of light

  • Leave intact

    The broad rind between the crescent, sun, and ray accents stays solid and dark.

  • Peel & shade

    The shallow back-carved triangular ray accents glow faintly with a soft, diffused light around the sun circle.

  • Cut through

    The crescent moon opening and the sun circle are cut through for full bright backlit glow.

Learn the carving basics

Before you start cutting

How do I cut the crescent shape cleanly?

Cut the outer arc of the crescent from tip to tip in one smooth pass. Then cut the inner arc from one tip to the other, meeting the outer arc precisely at both points. Cutting both arcs in the same direction (both clockwise or both counterclockwise) makes it easier to control the meeting point at each tip. If the tips do not meet cleanly, a detail knife trim closes the gap.

Can I reverse the positions and put the sun on the left and moon on the right?

Yes, the design is fully symmetrical and either arrangement works equally well. If you have a particular preference for a traditional sun-on-right layout based on heraldic or decorative convention, feel free to match that. Otherwise, position the elements to best suit the natural contours and the flattest area of your specific pumpkin face.

How deep should the ray accent carving be to glow visibly?

Removing about a quarter of the wall depth on a standard one-inch wall produces a visible but subtle glow that clearly distinguishes the rays from the uncarved background without creating structural weakness. If your wall is thicker than an inch, go slightly deeper proportionally. Test the depth by shining a flashlight against the carved side from inside the pumpkin before the LED is in place.

Your take belongs here, too.

Changed a detail? Made it simpler? Share a photo of your version and tell the community what worked.

Share your pumpkin

More pumpkins like this

You've reached the end · 8 pumpkins
The Patch Report

Fresh pumpkins, in your inbox.

The best new carvings, ideas worth stealing, and how-tos for carving season. Short, seasonal, and gone by November.

A short email during carving season. Unsubscribe anytime. See our privacy policy.