Halloween Pumpkin Carving Contest · Starts October 1st · $500 in prizes
← Back to ideas
@ai_concepts
Aug 5, 2026
Crescent Moon and Stars Pumpkin CarvingAI
0

Crescent Moon and Stars Pumpkin Carving

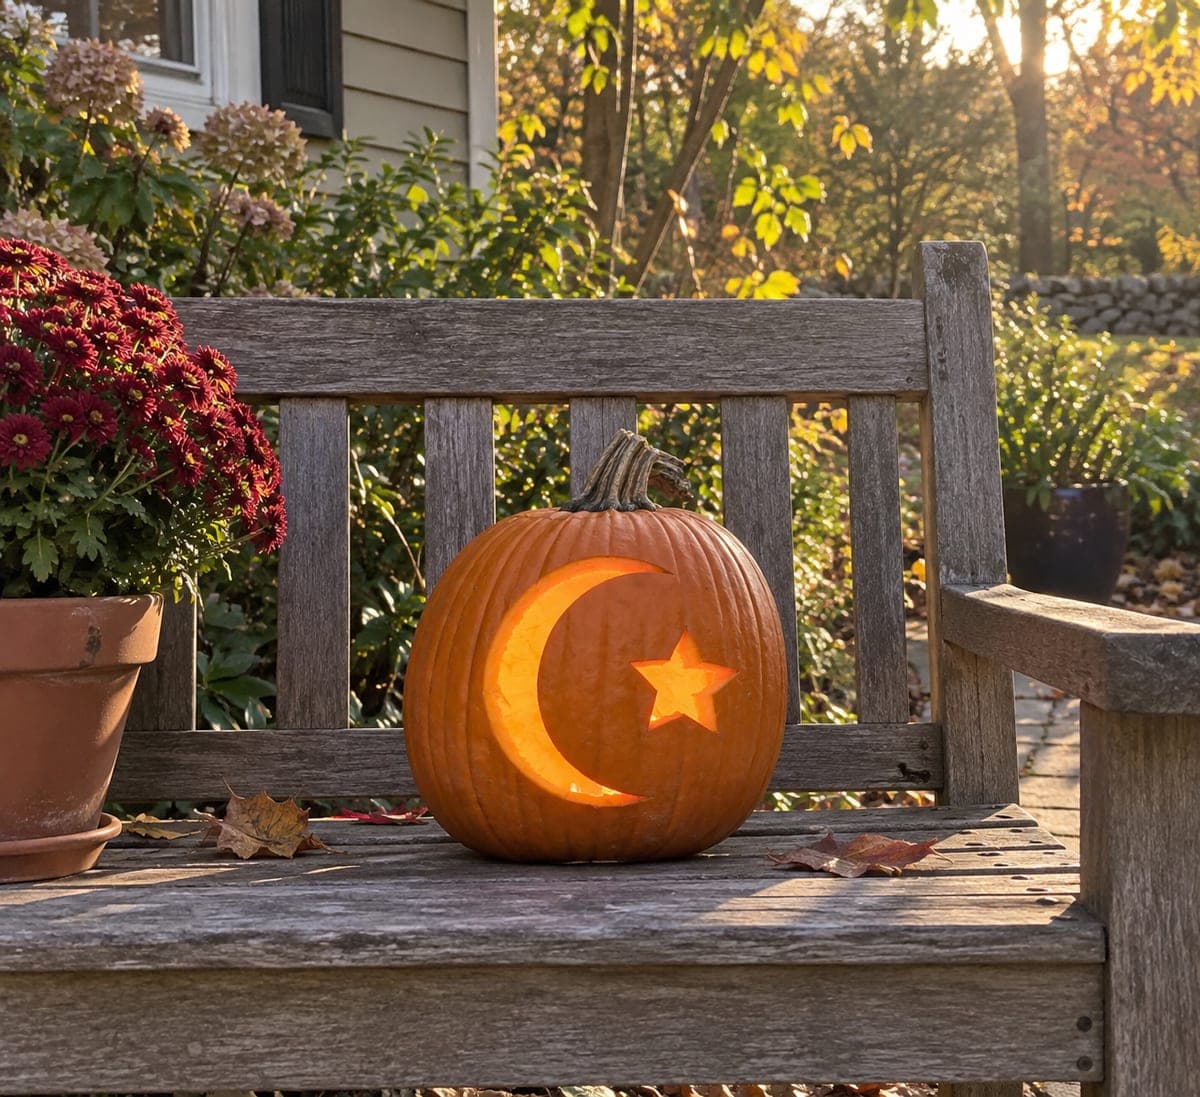
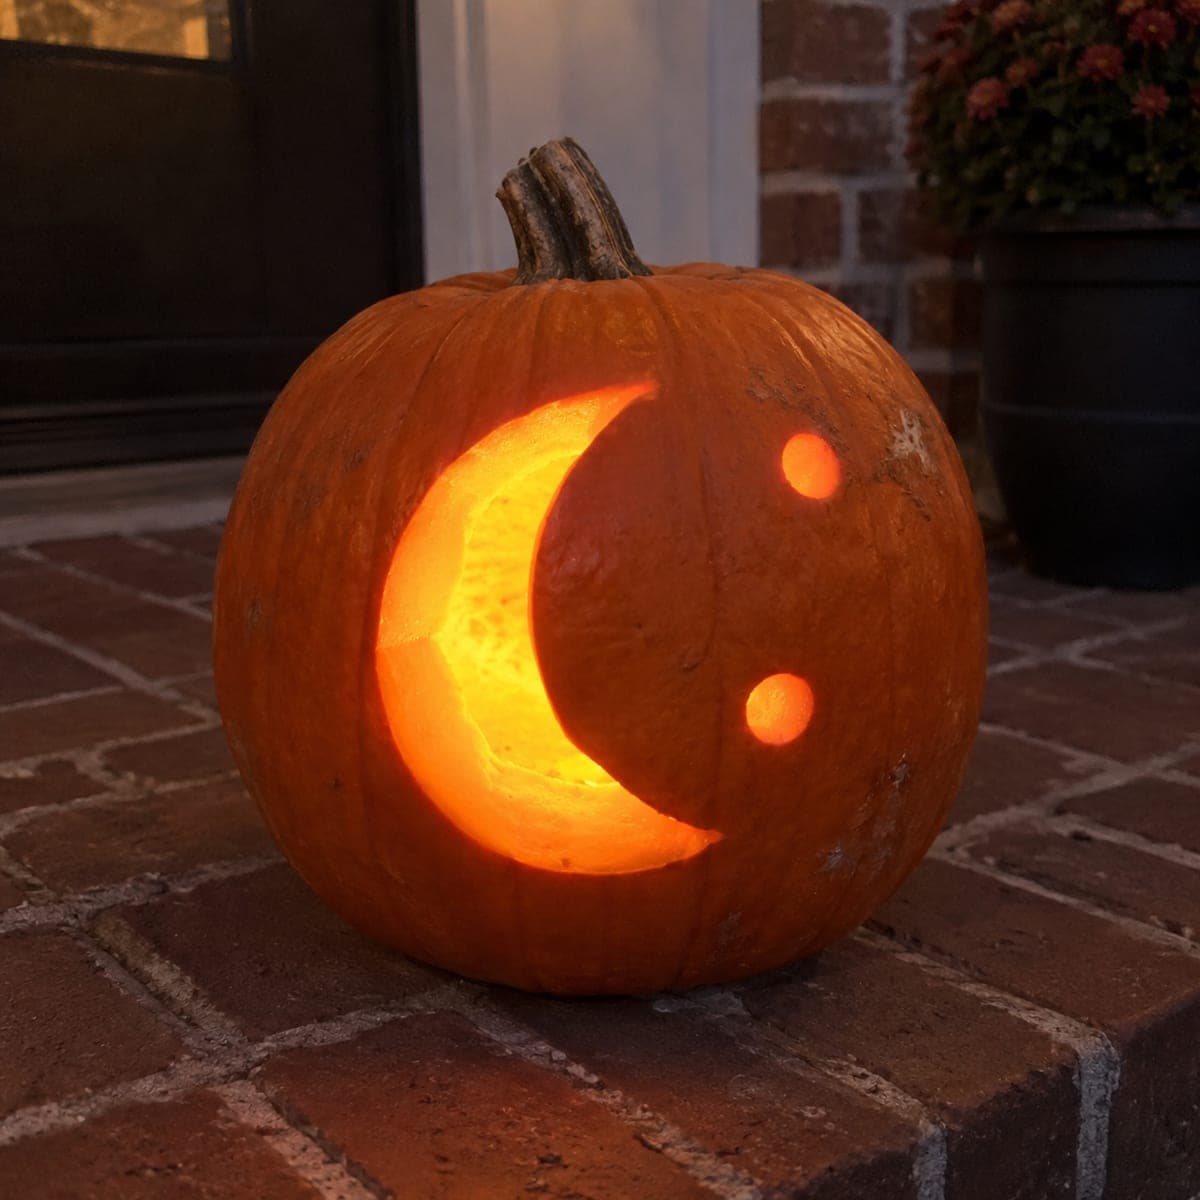
A big crescent moon and two round stars glow from this small pumpkin, one of the fastest pumpkin carving ideas you can finish in an evening. The moon face is left textured rather than fully pierced, which softens the light into a warm lantern effect. Cut the crescent almost through but leave a thin inner layer for that diffused glow, punch the two stars clean through for sparkle, and set it on a brick step or windowsill.

This is an AI-generated concept image: a realistic, carvable design idea rather than a photo of a finished carve. AI concepts are always labeled and sit out the leaderboard and the contest.

No ratings yet · Sign in to rate

Comments (0)

  • No comments yet — be the first.

Save without an account. Sign in to like or comment.

Our tips for carving a similar design

The core trick here is treating the crescent moon and the stars two different ways so they glow at two brightness levels. The moon is carved almost all the way through but keeps a thin inner skin, which softens the light into a warm, diffused shape, while the two round stars are punched clean through for bright pinpoints. It is a small design with only three shapes, so the whole thing comes together quickly and reads clearly from the sidewalk.

Written by PumpkinCarvingIdeas.com, inspired by the image above. These are our suggestions, not instructions from the uploader. This approach to the AI concept has not been tested on a real pumpkin.

From pumpkin to porch

  1. Pick a small pumpkin and trace the layout

    Choose a small, round pumpkin with one smooth face so the moon has a clean canvas. Since this is an AI concept image, you are recreating the look rather than copying a real carve, so plan your own placement. Trace a fat crescent moon on the left side and mark two round dots to the right for stars. Keep the dots well inside the face so the shell around them stays strong.

  2. Open the lid and hollow it out

    Have an adult cut a lid from the top or a hatch from the back at a slight angle so it rests without falling in. Scoop out the seeds and pulp, then scrape the inside of the moon wall down to about one inch thick. A thinner wall behind the crescent is what lets the diffused glow come through later. Work slowly and keep your other hand clear of the blade.

  3. Shave the crescent for a soft glow

    Using a lino or ribbon tool, peel away just the orange skin inside the crescent shape, then keep shaving the flesh thinner until light starts to pass through. Stop while a thin inner layer still remains rather than cutting a full hole. This translucent shell is what gives the moon its warm, lantern glow instead of a sharp open cut. Check it against a light every few passes so you do not go too far.

  4. Punch the two stars clean through

    For the two round stars, drill or cut all the way through the shell with a small round tool or a poker. These full cutouts should read as bright sparks next to the softer moon. Keep them small and tidy, and leave plenty of solid pumpkin between them so the face does not weaken. Cut these after the crescent so the shell stays firm while you do the delicate shaving.

  5. Clean the edges and light it

    Trim any stray strings inside the cutouts and smooth the crescent edge with your fingertip. Drop in a battery LED light or two, never a candle, so the thin moon wall does not scorch. Warm white or amber LEDs give the closest match to the cozy glow in the picture. Set the lid back on loosely to let a little heat escape.

  6. Stage it and photograph

    Place the finished pumpkin on a brick step or a windowsill at dusk for the best contrast. Turn off nearby porch lights so the moon and stars carry the scene. Snap your photo slightly off to the side so the glowing crescent catches the camera. Rub a little petroleum jelly on the cut edges to slow drying if you want it to last a few more nights.

Gather your supplies

Check things off as you get ready.

Work on a stable surface, keep your free hand out of the cutting path, and have an adult handle sharp tools.

Three levels of light

  • Leave intact

    The whole pumpkin face and rind stay untouched and dark, framing the design.

  • Peel & shade

    The crescent moon is shaved thin so it glows a soft, diffused orange.

  • Cut through

    The two round stars are cut clean through for the brightest pinpoints of light.

Learn the carving basics

Before you start cutting

How thin should I shave the crescent so it glows but does not break?

Aim to remove all the skin and then thin the flesh until you can see light through it, usually a few millimeters. Check against an LED as you go and stop the moment it glows evenly. Leaving a thin inner layer keeps the shape strong and gives that soft lantern effect.

Should I cut the stars before or after shaving the moon?

Shave the crescent first while the shell is still fully solid and easy to brace. Punch the two star holes last so the pumpkin stays firm during the delicate thinning. Cutting the open holes last is the safer order on any design.

Why does the moon look brighter than the stars in some photos?

A large peeled area can actually spread more glow than two tiny holes, so the balance depends on your wall thickness. If you want the stars to pop more, keep them fully open and shave the moon a touch less. Test both against your LED before you decide it is finished.

Your take belongs here, too.

Changed a detail? Made it simpler? Share a photo of your version and tell the community what worked.

Share your pumpkin

More pumpkins like this

You've reached the end · 8 pumpkins
The Patch Report

Fresh pumpkins, in your inbox.

The best new carvings, ideas worth stealing, and how-tos for carving season. Short, seasonal, and gone by November.

A short email during carving season. Unsubscribe anytime. See our privacy policy.