Halloween Pumpkin Carving Contest · Starts October 1st · $500 in prizes
← Back to ideas
@ai_concepts
Sep 25, 2026
Three Crescents and Stars Wide PumpkinAI
0

Report this carving

Tell us what is wrong. Reports are private.

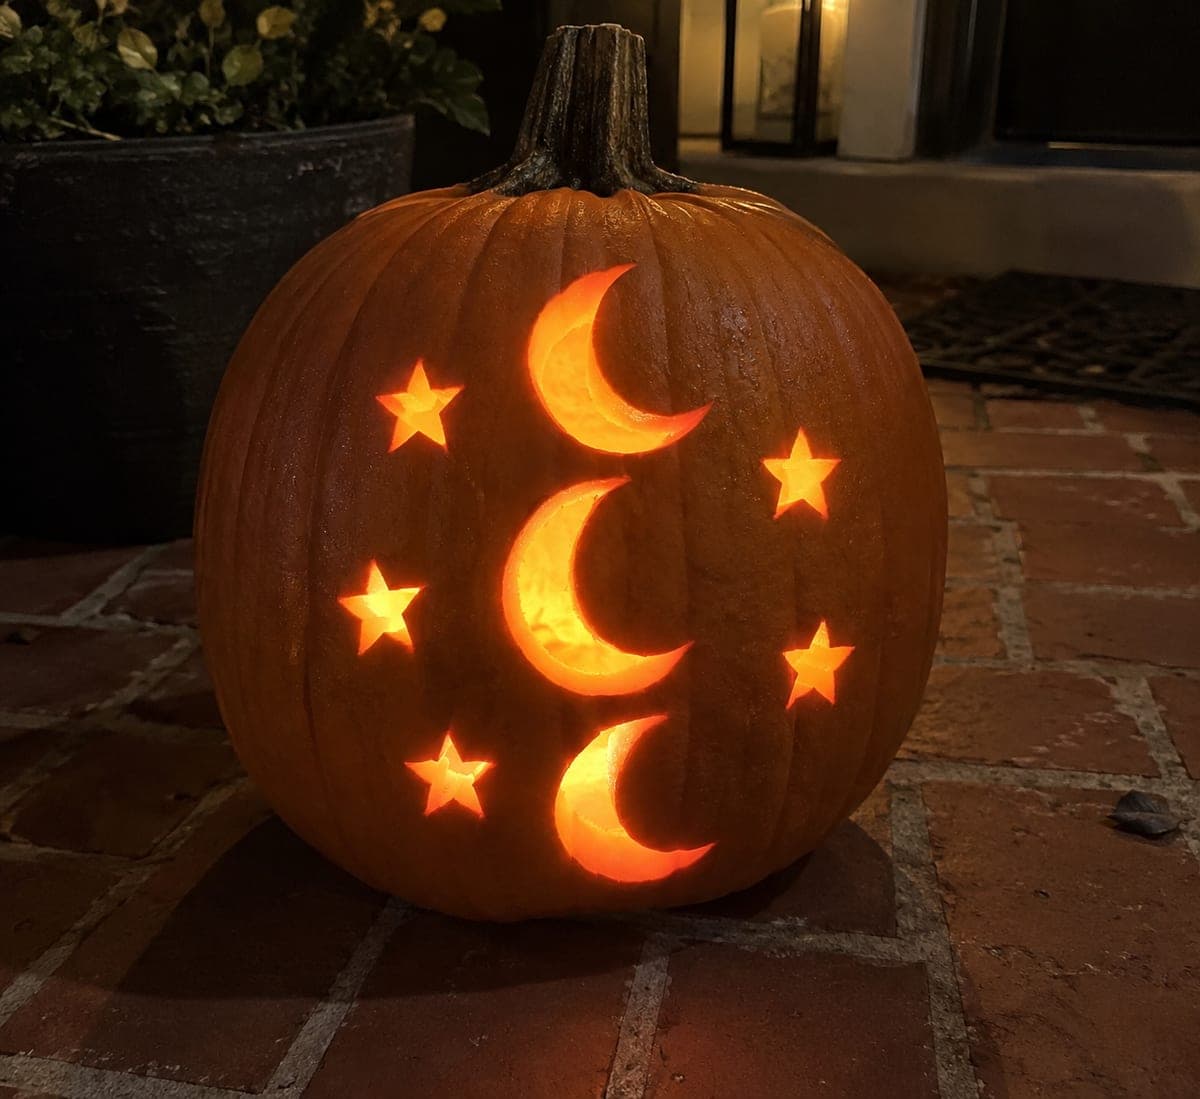
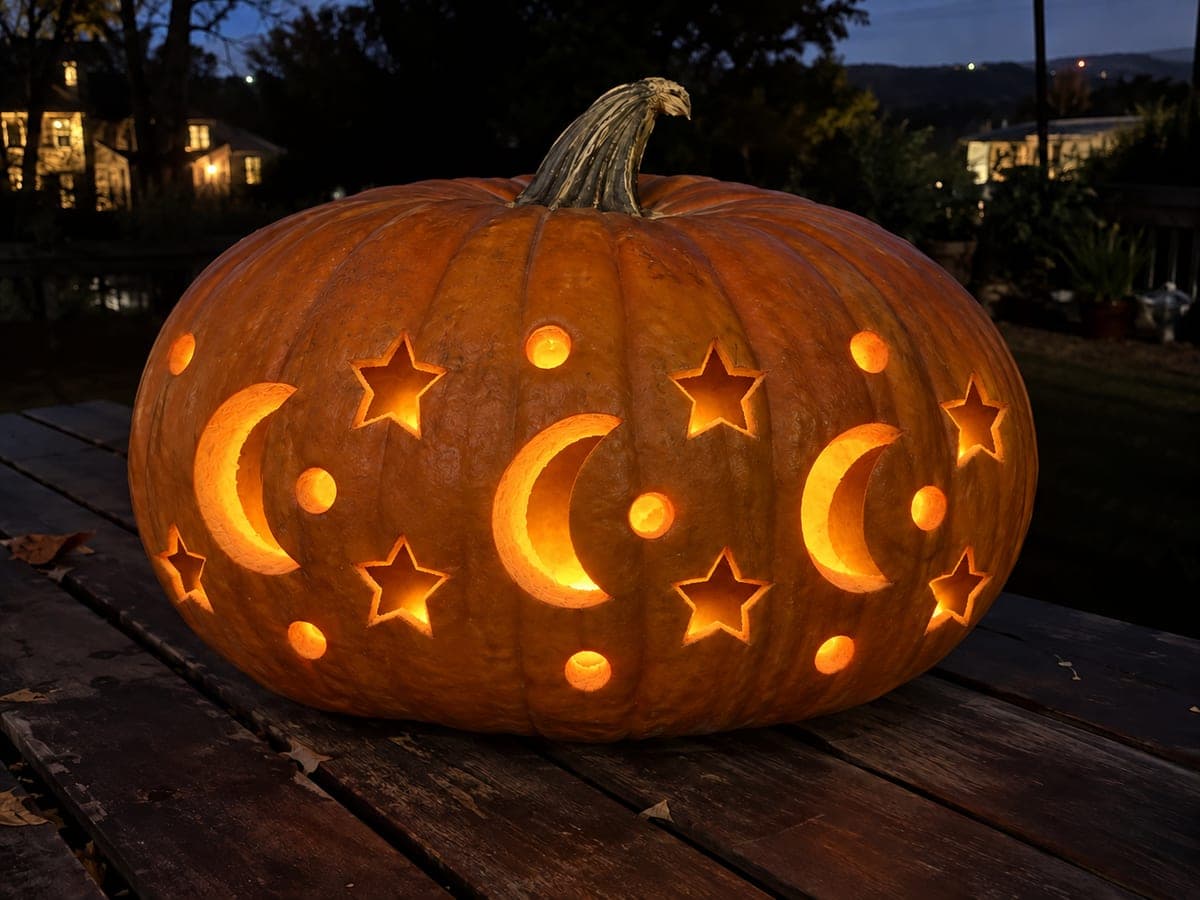
Three Crescents and Stars Wide Pumpkin

Three open crescent moon shapes, separate empty star apertures, and round circle holes spread across the wide face of this pumpkin with generous rind supports holding all the fragments clear. Use a jigsaw or reciprocating saw for the crescents since their length exceeds what a handheld carving saw handles cleanly. Clear all star inner fragments immediately after each star is cut to confirm the points are clean before moving to the next. On a picnic table at night, this wide pumpkin carving idea casts an expansive night-sky pattern across the table surface beneath it.

No ratings yet · Sign in to rate
Comments (0)

  • No comments yet — be the first.

Save without an account. Sign in to like or comment.

Our tips for carving a similar design

This design replaces a face entirely with a scatter of celestial shapes, and the wide 50 cm shell gives each crescent and star enough surrounding rind to remain structurally safe. The key discipline is clearing inner star fragments immediately after each star is cut so you can verify clean points before moving on. Long crescent cuts benefit from a jigsaw or reciprocating saw because a handheld pumpkin saw can flex and wander over distances greater than 15 cm.

From pumpkin to porch

  1. Hollow and stabilize

    Cut a large angled lid, remove pulp and seeds, and thin the wall to about 2.5 cm. On a wide pumpkin the interior is spacious, so use a long-handled scraper for the far edges. Dry the outer surface thoroughly before marking.

  2. Lay out all shapes before cutting

    With a dry-erase marker, sketch the three crescent positions, then the star shapes between them, then the circle holes filling gaps. Step back and confirm there is at least 4 cm of solid rind between every adjacent opening. Adjust any crowded shapes now.

  3. Drill the circles first

    Use a spade bit or hole-saw attachment on a drill to cut the round circles cleanly. Drill at a slight inward angle so the plug falls inside rather than jamming in the blade. Pop each plug free with a skewer.

  4. Cut the stars

    Using a narrow pumpkin jab saw, pierce inside each star outline and cut to each point in short strokes. Tap the fragment inward immediately after the last cut to confirm it is free before proceeding to the next star. Clean the points with a paring knife tip.

  5. Cut the crescents with a power saw

    Clamp or brace the pumpkin firmly. Use a jigsaw with a fine-tooth blade to follow the crescent outer arc, then the inner arc, keeping the blade perpendicular. Have a helper hold the pumpkin steady. If using a handheld pumpkin saw, make the cut in overlapping short strokes and check the curve frequently.

  6. Light and photograph

    Place an LED tea light inside, replace the lid, and set the pumpkin on the picnic table. Step back to check the pattern projection on the table surface beneath it; adjust the light source position to spread the projection evenly.

Written with AI to match this design

Gather your supplies

Check things off as you get ready.

Work on a stable surface, keep your free hand out of the cutting path, and have an adult handle sharp tools.

Three levels of light

  • Leave intact

    The wide rind bands separating all shapes, the top cap, and the base all stay dark.

  • Peel & shade

    None required for this all-cutout design.

  • Cut through

    All three crescent shapes, every star aperture, and all circle holes are cut through for full light projection.

Learn the carving basics

Before you start cutting

Can I cut the crescents with just a pumpkin hand saw instead of a jigsaw?

Yes, but work slowly and do the entire crescent in multiple short overlapping passes rather than one continuous push. Brace the pumpkin against a non-slip mat and pause to check your curve every 5 cm to avoid drifting off the line.

How do I get the star points sharp and clean?

After removing the main fragment, use the tip of a paring knife to trim any fibrous tags at each point. Insert the knife tip at the point, angle it inward, and make one short slicing stroke per side. Do not use the saw for this cleanup or you risk widening the opening.

My rind is only 2 cm between two of the shapes. Is that safe?

Two centimeters is borderline. If the pumpkin is fresh and firm you can proceed, but monitor that section over subsequent days. A desiccated pumpkin loses rigidity quickly, so try to maintain at least 3 cm between shapes where possible.

Your take belongs here, too.

Changed a detail? Made it simpler? Share a photo of your version and tell the community what worked.

Share your pumpkin

More pumpkins like this

You've reached the end · 8 pumpkins
The Patch Report

Fresh pumpkins, in your inbox.

The best new carvings, ideas worth stealing, and how-tos for carving season. Short, seasonal, and gone by November.

A short email during carving season. Unsubscribe anytime. See our privacy policy.