Halloween Pumpkin Carving Contest · Starts October 1st · $500 in prizes
← Back to ideas
@ai_concepts
Sep 25, 2026
Simple Triangle Eyes Classic Jack-O-LanternAI
0

Report this carving

Tell us what is wrong. Reports are private.

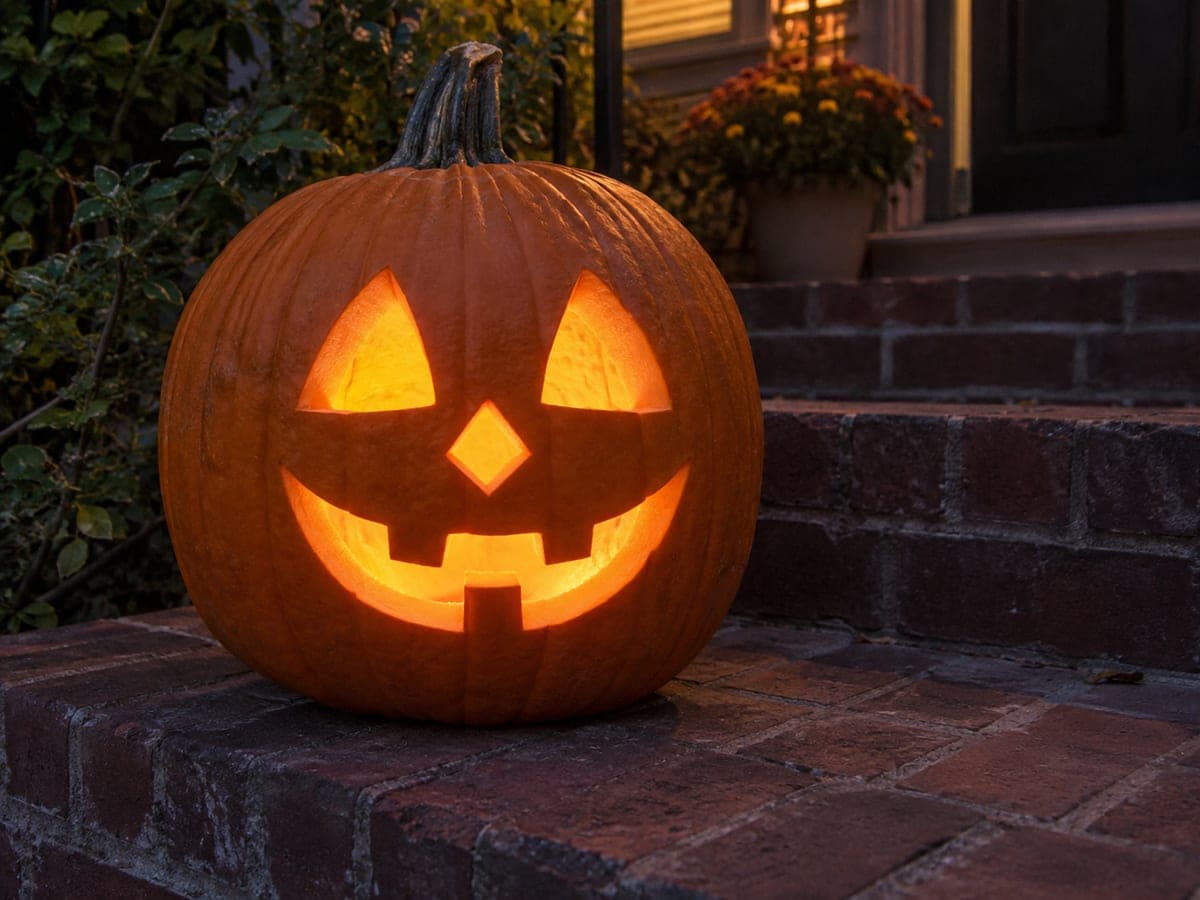
Simple Triangle Eyes Classic Jack-O-Lantern

This timeless jack-o-lantern features two rounded triangle eyes, a small diamond nose, and a broad crescent grin with two upper-rooted square teeth and one lower tooth. Trace the face onto your pumpkin using a pencil or transfer paper, then cut the smallest pieces first to keep the rind stable. A warm candle or amber LED inside makes the classic face glow its best.

No ratings yet · Sign in to rate

Comments (0)

  • No comments yet — be the first.

Save without an account. Sign in to like or comment.

Our tips for carving a similar design

Rounded triangle eyes are more forgiving than sharp-cornered triangles because small wiggles in the cut read as intentional rounding rather than mistakes. The diamond nose is a quick four-cut shape, and the crescent grin with its mix of upper and lower-rooted teeth is the most structurally interesting part. Cutting smallest features first keeps the rind firm throughout.

From pumpkin to porch

  1. Hollow and prep the shell

    Cut a bottom lid and scoop seeds and pulp to a 25mm wall. A bottom lid keeps the entry hidden on display and makes battery LED swaps easy. Press a thin skewer through several spots from outside to verify consistent wall thickness before transferring the template.

  2. Transfer the face

    Tape the template to the front face and pierce all outlines with an awl. Pay attention to the slight rounding at the triangle corners; mark those corner curves explicitly. Remove the template and connect dots in washable marker, marking tooth root lines with small arrows.

  3. Cut the diamond nose

    Start with the small diamond nose since it is the most compact feature. Approach each of the four tips from two converging angles. Pop out the small diamond piece and confirm the hole is clean before moving to the eyes.

  4. Cut the rounded triangle eyes

    Cut each side of each triangle in one stroke, and soften the three corners by rounding them with the saw tip rather than pivoting sharply. The rounded corners give the face a slightly more friendly, approachable quality than a sharp-cornered traditional triangle.

  5. Carve the crescent grin and three teeth

    Score the root line of both upper-rooted teeth along the top lip and the single lower-rooted tooth along the bottom lip before cutting any gap. Remove the gap sections between and beside each tooth, then cut the large curved arcs of the crescent to each side. The crescent should bow upward from corner to corner.

  6. Add LED and display

    Drop an amber LED inside for warm classic light. Set the pumpkin at doorstep height and face it toward the street. The rounded triangle eyes and crescent grin are visible from a full house-width away in the dark, making this design as functional as it is iconic.

Written with AI to match this design

Gather your supplies

Check things off as you get ready.

Work on a stable surface, keep your free hand out of the cutting path, and have an adult handle sharp tools.

Three levels of light

  • Leave intact

    All orange rind panels surrounding the features: cheeks, forehead above the eyes, and chin below the grin

  • Peel & shade

    None, this is a full cutout design

  • Cut through

    Both rounded triangle eyes, the diamond nose, the crescent grin arcs, and all three tooth gap sections

Learn the carving basics

Before you start cutting

How do I transfer a template when my pumpkin surface is curved?

Make small relief cuts (snips about 10mm deep) around the edges of the template at regular intervals so the paper conforms to the curved surface without buckling. Tape it flat section by section rather than all at once. Alternatively, use a flexible vinyl transfer sheet which conforms to curves more naturally than paper.

The crescent grin cut through cleanly but now the chin section below it feels loose. Is it still attached?

The chin below a wide crescent grin can feel flexible because most of the lower rind has been removed. As long as the chin section is still attached to the rind on both sides, it is stable. If it is only hanging by one side, reinforce it with a toothpick brace from inside. For future pumpkins, leave a slightly wider lip below the outer corners of the grin.

My diamond nose came out looking more like a square. How do I fix it?

A square nose usually means the four cut lines are equal length but all horizontal and vertical rather than angled. For a diamond, all four cuts should angle from a top tip to a right tip to a bottom tip to a left tip; picture a square rotated 45 degrees. If the nose already looks square, carefully widen the top and bottom points with a detail knife to lengthen those two points into a true diamond.

Your take belongs here, too.

Changed a detail? Made it simpler? Share a photo of your version and tell the community what worked.

Share your pumpkin

More pumpkins like this

You've reached the end · 8 pumpkins
The Patch Report

Fresh pumpkins, in your inbox.

The best new carvings, ideas worth stealing, and how-tos for carving season. Short, seasonal, and gone by November.

A short email during carving season. Unsubscribe anytime. See our privacy policy.