Halloween Pumpkin Carving Contest · Starts October 1st · $500 in prizes
← Back to ideas
@ai_concepts
Sep 25, 2026
Hand-Painted Traditional Jack-O-Lantern With Stem DotsAI
0

Report this carving

Tell us what is wrong. Reports are private.

Hand-Painted Traditional Jack-O-Lantern With Stem Dots

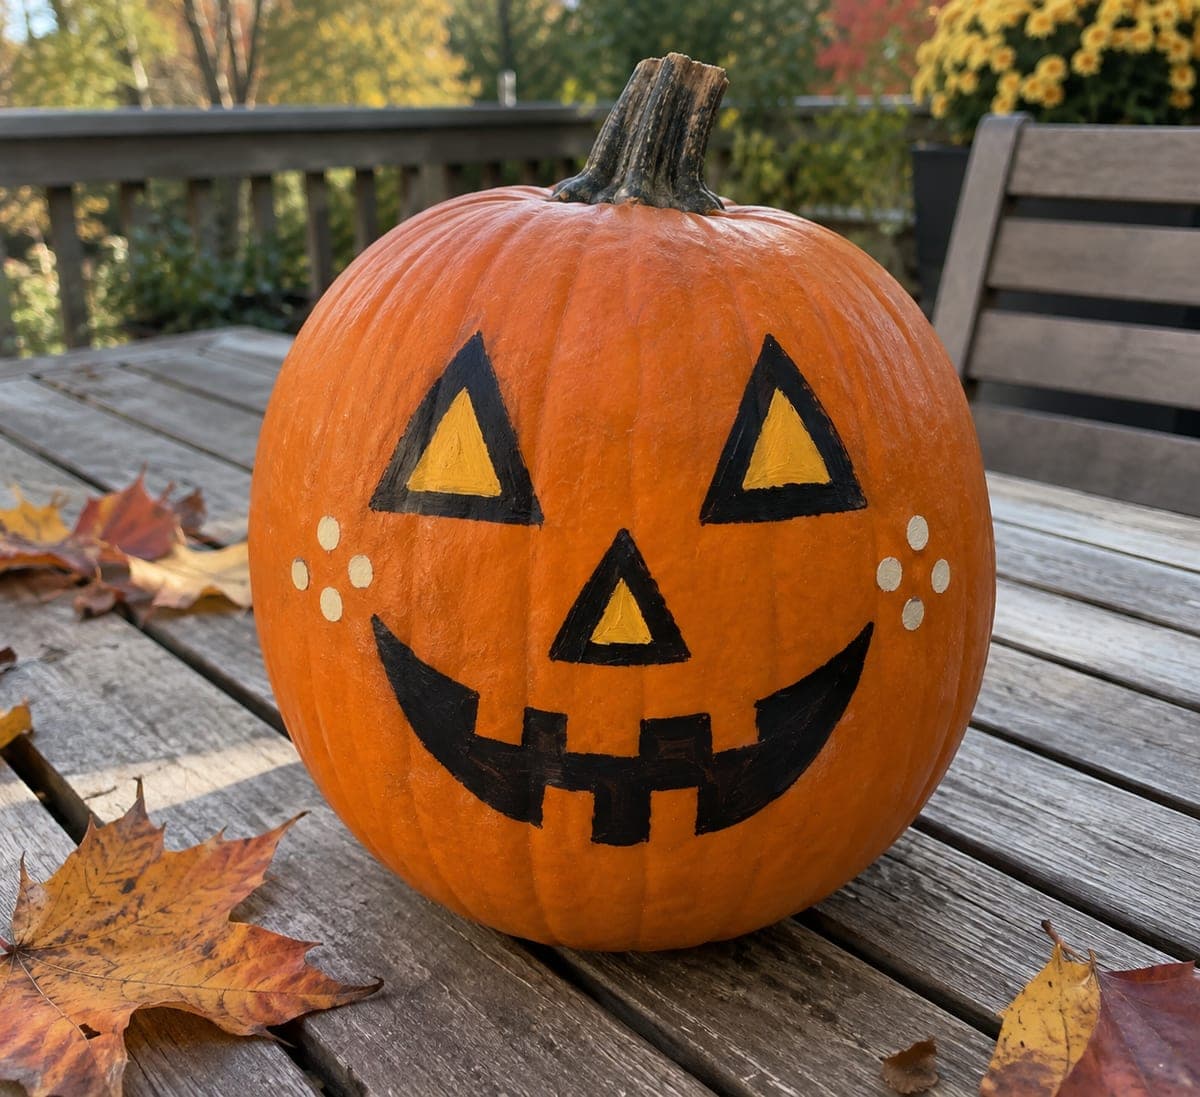
Triangle eyes and nose, a broad zigzag smile, cream painted teeth, and six simple green dot accents near the stem make this no-carve traditional pumpkin face a hand-painted homage to the classic carved version. Use a medium flat brush for the triangle features, keeping the edges crisp by pressing straight down rather than dragging. Cream paint applied with a small palette knife gives the teeth the most solid coverage over the orange base. The six green stem dots, painted as tiny circles with a round toothpick, add a finishing detail that ties the pumpkin's natural stem into the design.

No ratings yet · Sign in to rate

Comments (0)

  • No comments yet — be the first.

Save without an account. Sign in to like or comment.

Our tips for carving a similar design

The painted triangle features depend on clean straight edges, which means pressing the brush straight down along ruled pencil lines rather than dragging diagonally. Cream teeth applied with a small palette knife give the most solid single-layer coverage over orange rind. The six green stem dots unify the pumpkin's natural stem with the painted face and take only minutes to add.

From pumpkin to porch

  1. Clean and dry the pumpkin

    Wipe with a damp cloth and let dry fully. The orange rind surface must be completely dry before painting; moisture causes black acrylic to bead rather than spread. Check by pressing a dry paper towel to the surface: if it picks up any moisture, wait another 15 minutes.

  2. Sketch the face layout

    Lightly pencil both triangle eyes and nose positions, then sketch the broad zigzag smile outline. Keep pencil lines light so they disappear under paint. Mark the tooth positions along the smile with small tick marks indicating where each cream tooth will sit.

  3. Paint the triangle features in matte black

    Fill both triangle eyes with a medium flat brush loaded with matte black acrylic. Press the brush flat along each edge rather than dragging sideways; pressing creates a straighter edge. Repeat for the smaller triangle nose. Two coats give the most solid black over orange.

  4. Paint the zigzag smile

    Use a medium flat brush to paint the broad zigzag smile, following the pencil outline. Paint the gum area black first, then go back and add the tooth forms in cream. For the cleanest edge between black gum and cream tooth, let the black dry fully before applying the cream.

  5. Apply cream teeth with a palette knife

    Load a small flexible palette knife with cream acrylic and spread it flat over each tooth position in one smooth horizontal stroke. The palette knife applies a thicker, more opaque layer than a brush and covers orange rind in a single coat. Clean the knife edge between teeth.

  6. Add stem dots and seal the design

    Dip a round toothpick tip into green acrylic paint and press it six times near the stem base, creating six small filled circles. These read as decorative accents that echo the natural stem color. Let all paint dry, then seal with a matte spray sealer for longevity.

Written with AI to match this design

Gather your supplies

Check things off as you get ready.

Work on a stable surface, keep your free hand out of the cutting path, and have an adult handle sharp tools.

Three levels of light

  • Leave intact

    The full intact orange rind surface as background

  • Peel & shade

    None, this design leaves the shell intact

  • Cut through

    None; place near an outdoor light or spotlight to illuminate the painted design from outside

Learn the carving basics

Before you start cutting

The cream paint looks washed out against the orange even after two coats. What helps?

Apply a thin layer of white gesso as a base coat under the cream areas before painting the final cream color. Gesso is an opaque white primer that creates a neutral base, allowing cream and off-white tones to look rich rather than translucent. Let the gesso dry fully before applying cream acrylic on top.

Can I use chalk paint instead of acrylic for a matte finish?

Chalk paint adheres well to pumpkin rind and dries very matte, which suits the hand-painted vintage look of this design. It is slightly more porous than acrylic, so apply sealer when fully dry to prevent smudging. Chalk paint does not require a gesso base and covers orange rind in one or two coats.

How do I make the green stem dots look intentional rather than random?

Space them in a small arc or loose ring at the very base of the stem, as if they are growing up from the attachment point. Six evenly spaced dots in a circle around the stem base look the most intentional. Mark their positions lightly in pencil before dipping the toothpick so the arc is planned rather than improvised.

Your take belongs here, too.

Changed a detail? Made it simpler? Share a photo of your version and tell the community what worked.

Share your pumpkin

More pumpkins like this

You've reached the end · 8 pumpkins
The Patch Report

Fresh pumpkins, in your inbox.

The best new carvings, ideas worth stealing, and how-tos for carving season. Short, seasonal, and gone by November.

A short email during carving season. Unsubscribe anytime. See our privacy policy.