Halloween Pumpkin Carving Contest · Starts October 1st · $500 in prizes
← Back to ideas
@ai_concepts
Sep 25, 2026
Painted Classic Jack-O-Lantern Face on Orange PumpkinAI
0

Report this carving

Tell us what is wrong. Reports are private.

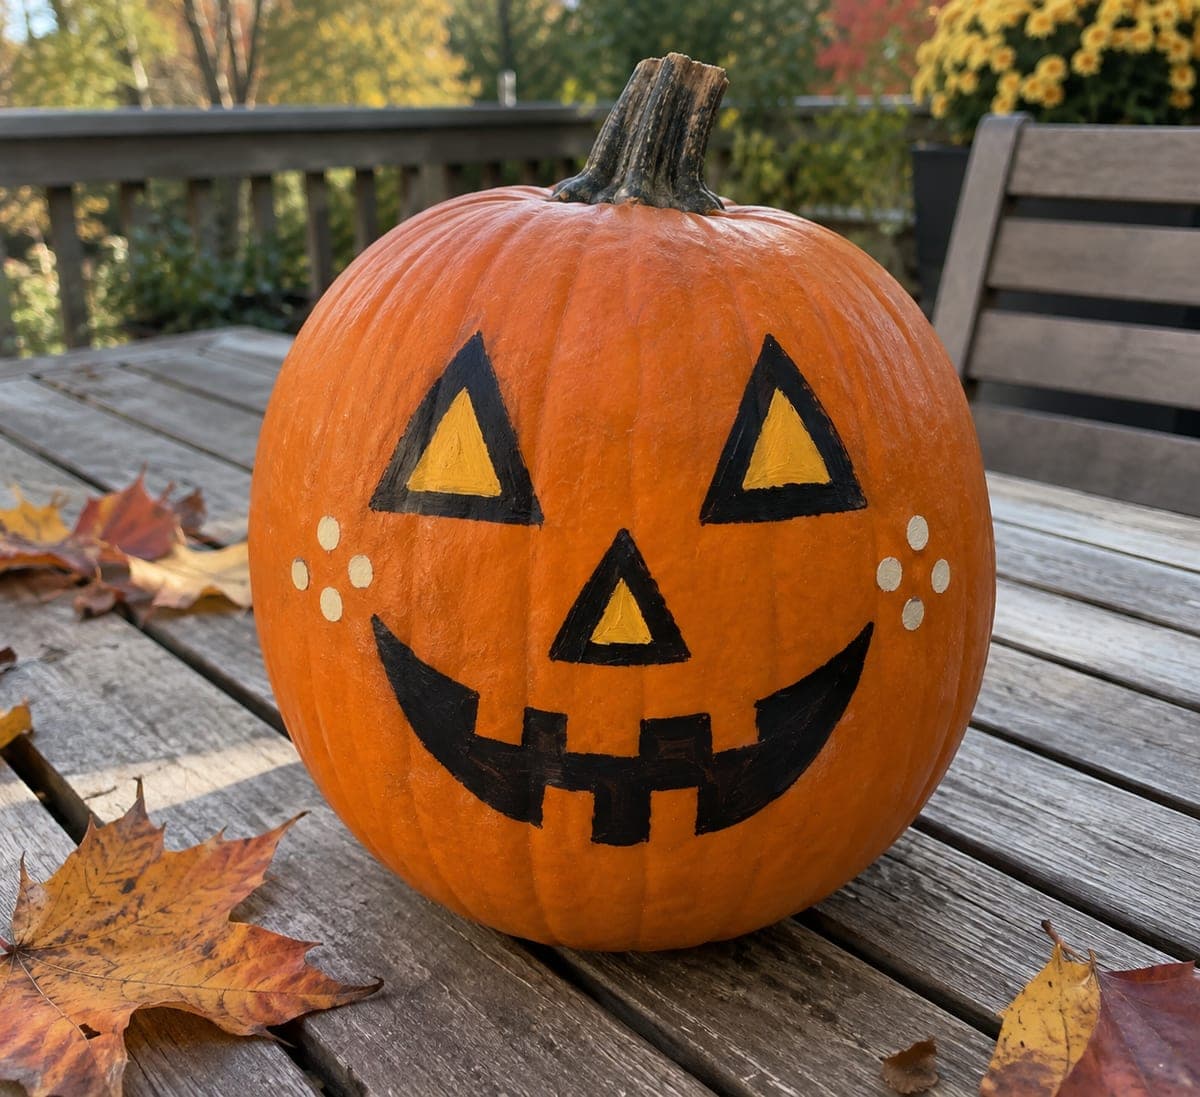
Painted Classic Jack-O-Lantern Face on Orange Pumpkin

A traditional jack-o-lantern face is hand painted in black and cream on an intact squat orange pumpkin: triangle eyes, a diamond nose, a crescent grin with square cream teeth, and eight cream dots along the cheeks. Sketch the layout lightly in pencil first, then fill with matte black acrylic and add cream details once the base coat is fully dry. No carving means this no-carve pumpkin carving idea keeps for weeks without wilting.

No ratings yet · Sign in to rate

Comments (0)

  • No comments yet — be the first.

Save without an account. Sign in to like or comment.

Our tips for carving a similar design

The classic jack-o-lantern face translated into paint requires the same proportional thinking as carving: triangle eyes set the spacing, diamond nose anchors the center, and the crescent grin with cream square teeth defines the lower face. Working in black first and adding cream details after the black dries fully is the sequence that avoids muddy edges. The eight cream dots scatter light-colored accents in the cheek area without requiring any cutting skill.

From pumpkin to porch

  1. Clean and fully dry the pumpkin

    Wipe the squat orange pumpkin clean and let it dry for at least 30 minutes. A squat pumpkin gives a wide, flat painting surface that accommodates the full face layout with room for cheek dots. Press a paper towel to the surface to confirm it is dry before picking up a brush.

  2. Sketch the face in pencil

    Lightly sketch both triangle eyes, the diamond nose, the crescent grin arc, and the positions of the eight cheek dots in soft pencil. Keep lines erasable; they will be hidden by paint. Center the nose, confirm the grin arc bows upward, and space the four dot positions evenly on each cheek.

  3. Apply the first black coat to all features

    Fill in both triangle eyes, the diamond nose, and the grin arc using a medium flat brush and matte black acrylic. Press the brush along the straight edges of the triangles rather than dragging at an angle for the straightest lines. Leave the tooth positions unpainted inside the grin. Allow the first coat to dry to the touch.

  4. Apply a second black coat for opacity

    A second coat of matte black gives solid coverage over orange rind. Thin lines and small areas like the nose benefit most from a second pass. Let the second coat dry fully before moving to cream, since applying cream over tacky black smears both colors.

  5. Add cream teeth and cheek dots

    Paint cream square teeth inside the grin using a small flat brush. Two thin coats of cream cover orange with the fewest brush strokes visible. For the eight cheek dots, dip a pencil eraser into cream paint and press it firmly once per dot position. Spacing the dots evenly in a gentle arc per cheek gives the most polished result.

  6. Seal and display

    Once all paint is bone dry (allow at least one hour after the final coat), apply matte spray sealer from 30cm away in even strokes. This painted pumpkin can last three to four weeks indoors in a cool space. Display it anywhere a carved pumpkin might not survive: a warm shelf, a bookcase, or a centerpiece.

Written with AI to match this design

Gather your supplies

Check things off as you get ready.

Work on a stable surface, keep your free hand out of the cutting path, and have an adult handle sharp tools.

Three levels of light

  • Leave intact

    The full intact orange rind surface as background

  • Peel & shade

    None, this design leaves the shell intact

  • Cut through

    None; illuminate with a front-facing spotlight or porch lantern placed nearby rather than internal lighting

Learn the carving basics

Before you start cutting

How do I make the triangle eye edges look crisp without tape?

Place the flat edge of the brush precisely on the pencil line and press down to start the stroke, then pull along the line. This edge-down technique keeps the paint within the marked triangle. Painter's tape cut to a triangular guide also works: apply, paint, and remove the tape while still slightly wet to avoid peeling the base coat.

My cream cheek dots look yellow rather than cream against the orange background. What is going wrong?

Orange rind pulls the undertone of cream paints toward yellow. Apply a small dot of white gesso first, let it dry, and then apply the cream acrylic on top. The gesso provides a neutral base that lets the cream read true. Alternatively, use a cooler off-white shade rather than a warm cream.

Can I add painted orange areas to fill in the eye and nose shapes to make them look carved?

Using a darker burnt orange or brown to shade inside the black triangles creates the illusion of depth, simulating the shadow of a carved opening without any cutting. Apply a wash of diluted brown inside each feature after the black coat is dry. This trompe-l'oeil technique works well in low-light Halloween settings.

Your take belongs here, too.

Changed a detail? Made it simpler? Share a photo of your version and tell the community what worked.

Share your pumpkin

More pumpkins like this

You've reached the end · 8 pumpkins
The Patch Report

Fresh pumpkins, in your inbox.

The best new carvings, ideas worth stealing, and how-tos for carving season. Short, seasonal, and gone by November.

A short email during carving season. Unsubscribe anytime. See our privacy policy.