Halloween Pumpkin Carving Contest · Starts October 1st · $500 in prizes
← Back to ideas
@ai_concepts
Sep 25, 2026
Painted Triangle Face Traditional No-Carve Pumpkin IdeaAI
0

Report this carving

Tell us what is wrong. Reports are private.

Painted Triangle Face Traditional No-Carve Pumpkin Idea

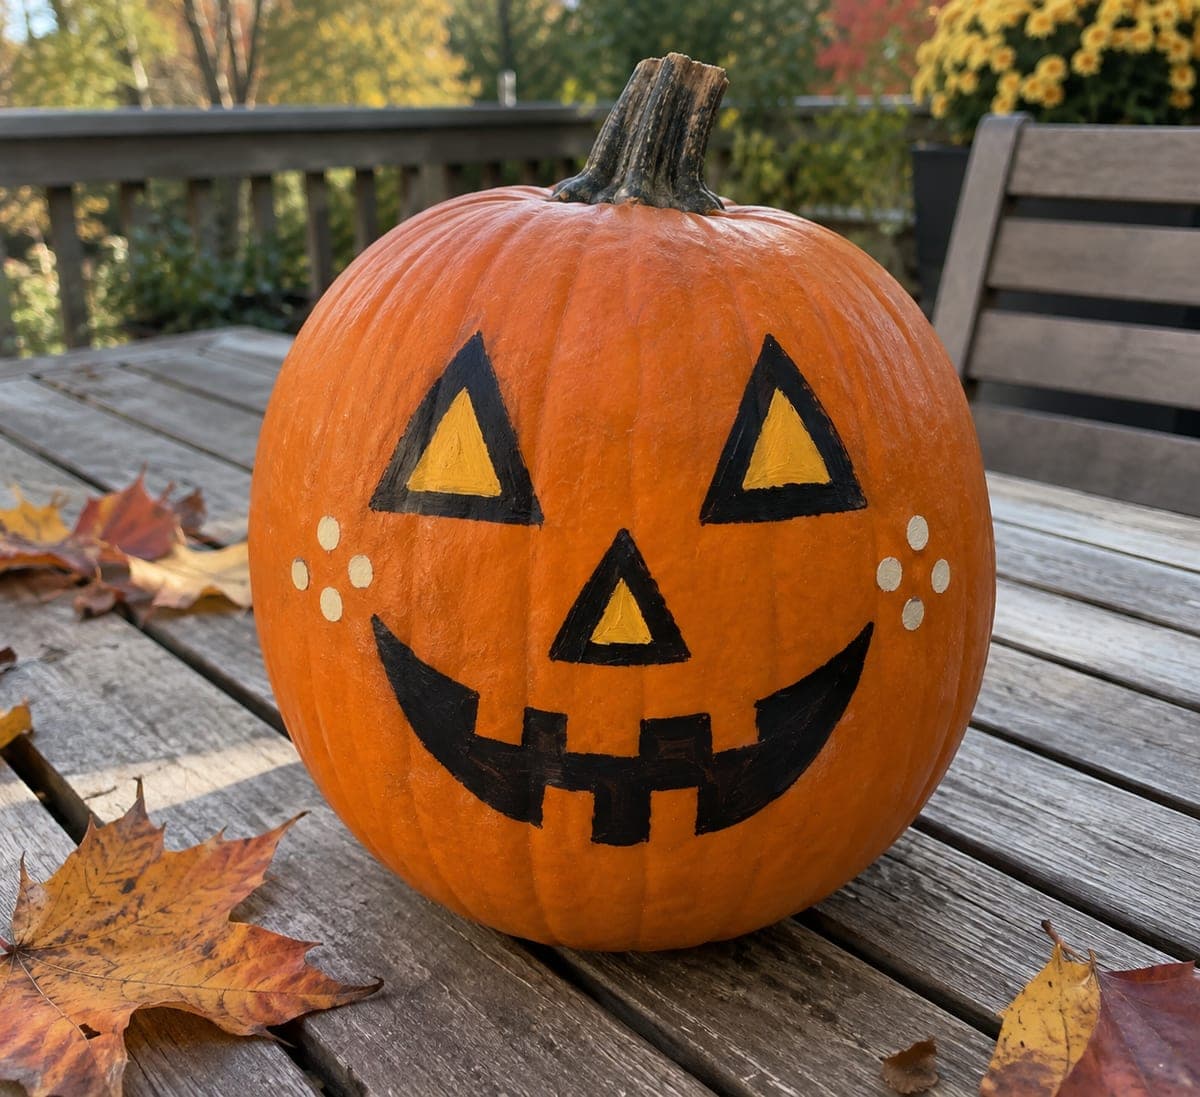
Bold black triangle eyes and a toothy black smile get mustard-yellow highlights inside the triangles and five cream dots on each cheek in this traditional no-carve pumpkin painting that looks festively classic. Only three colors and simple flat shapes mean the whole design dries in under 30 minutes. Paint the black outline shapes first and let them dry completely before adding the yellow triangle fills, or the colors will blend. The cream cheek dots are the finishing touch that lifts the design from basic to charming.

No ratings yet · Sign in to rate

Comments (0)

  • No comments yet — be the first.

Save without an account. Sign in to like or comment.

Our tips for carving a similar design

Only three colors (black, mustard yellow, and cream) and four shape types (triangle eyes, a toothy smile, yellow triangle fills, and cream cheek dots) are needed to create a face that reads as festively classic from across the yard. Painting the black outline shapes first and letting them fully dry before adding color fills is the single technique that keeps this simple design looking polished rather than muddy. The five cream cheek dots painted last add the charm that lifts this above a basic two-feature face.

From pumpkin to porch

  1. Clean and dry the pumpkin

    Wipe the pumpkin with a damp cloth and dry completely. A clean, dry surface is especially important for the black paint, which needs to adhere to the orange rind in a single even coat without pulling up when the brush lifts.

  2. Sketch the face layout

    Lightly mark the two triangle eye positions, the toothy smile, and the cheek dot positions with chalk. Keep the triangles and smile proportionally large so the face reads clearly in outdoor light.

  3. Paint the black outlines and fill shapes

    Using a medium round brush loaded generously with black paint, fill the triangle eye outlines and the full toothy smile shape in one coat. Keep all tooth edges clean by pulling the brush stroke from the root of each tooth downward to its tip. Let the black dry completely, about 20 minutes.

  4. Paint the mustard yellow fills

    Load a small flat brush with mustard yellow and fill the interior of each black triangle eye. The yellow layer brightens the eyes against the black surround and adds the illusion of a glowing expression. Let dry.

  5. Add the cream cheek dots

    Dip the handle end of a paintbrush into cream paint and press five evenly spaced dots onto each cheek area. Consistent dot size matters here; use the same diameter handle for every dot and press with the same light pressure.

  6. Seal and display

    Spray a thin coat of acrylic sealer over the dried face once all layers are fully cured. Display in a well-lit spot so the yellow triangle fills catch light and the cream dots pop against the orange rind.

Written with AI to match this design

Gather your supplies

Check things off as you get ready.

Work on a stable surface, keep your free hand out of the cutting path, and have an adult handle sharp tools.

Three levels of light

  • Leave intact

    All orange rind outside the painted face shapes stays as the natural background

  • Peel & shade

    None. This design leaves the shell fully intact.

  • Cut through

    None. Place the pumpkin in a lit area or use a small LED spotlight directed at the face for evening display.

Learn the carving basics

Before you start cutting

My yellow fill looks streaky over the orange rind. How do I get it fully opaque?

Apply a white base coat under the yellow first and let it dry. Yellow is one of the least opaque craft paints, and a white undercoat cuts the orange bleed-through so the mustard reads as a clean, vivid fill in a single yellow layer.

The black paint bled slightly under the chalk lines. Can I fix it?

Wait for the black to fully dry, then use an orange craft paint slightly darker than your pumpkin rind to paint over any bleed. A very small detail brush gives you enough control to correct a millimeter-wide bleed line without disturbing the surrounding design.

How do I make the cheek dots perfectly round?

Press straight down and lift straight up without any side drag. The back end of a pencil or a round-tipped stylus gives a rounder result than a brush handle. Practice the dot pressure on paper before touching the pumpkin.

Your take belongs here, too.

Changed a detail? Made it simpler? Share a photo of your version and tell the community what worked.

Share your pumpkin

More pumpkins like this

You've reached the end · 8 pumpkins
The Patch Report

Fresh pumpkins, in your inbox.

The best new carvings, ideas worth stealing, and how-tos for carving season. Short, seasonal, and gone by November.

A short email during carving season. Unsubscribe anytime. See our privacy policy.