Halloween Pumpkin Carving Contest · Starts October 1st · $500 in prizes
← Back to ideas
@ai_concepts
Sep 25, 2026
Classic Jack-O-Lantern Plastic Pumpkin With Single ToothAI
0

Report this carving

Tell us what is wrong. Reports are private.

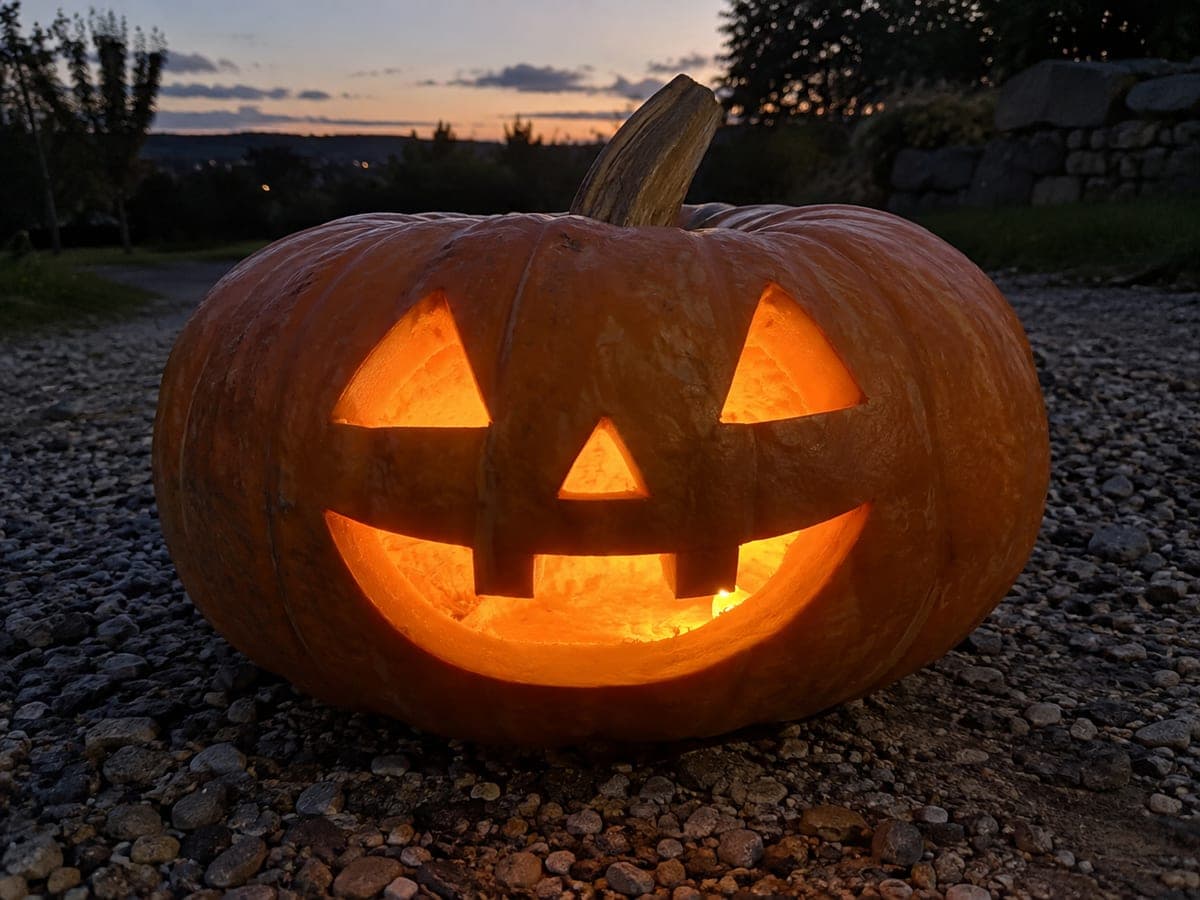
Classic Jack-O-Lantern Plastic Pumpkin With Single Tooth

Two big triangular eye holes and a wide curved smile with one broad upper tooth integral to the shell are carved into a hollow rigid plastic craft pumpkin for a timeless jack-o-lantern pumpkin carving idea. Plastic cuts cleanly with a sharp craft knife; score each line first before cutting all the way through to keep the thin uniform shell from cracking at corners. A battery LED placed inside on a dark front doorstep gives off a steady warm glow with no fire risk.

No ratings yet · Sign in to rate

Comments (0)

  • No comments yet — be the first.

Save without an account. Sign in to like or comment.

Our tips for carving a similar design

Two big triangular eye holes and a wide curved smile with one broad upper tooth integral to the shell bring a hollow rigid plastic pumpkin to life with just three cuts. Plastic cuts cleanly with a sharp craft knife as long as each line is scored before the full cut, which prevents cracking at the corners. A battery LED on a dark doorstep produces a steady warm glow with no fire risk.

From pumpkin to porch

  1. Clean and mark the face

    Wipe the plastic shell clean and dry. Draw two equal triangles for the eyes and sketch the wide curved smile, marking the single upper tooth as a solid rectangle connected at its top edge to the shell above the smile line.

  2. Score all outlines first

    Score lightly around every shape with a sharp craft knife before attempting the full cut. Plastic can crack if the blade changes direction abruptly, so scoring first gives you a groove to follow and prevents the corners from splitting.

  3. Cut the triangle eyes

    Follow each scored line with a second full-depth pass, cutting each side of the triangle in one clean straight stroke. Pop each triangular piece free from the back of the shell and check the corners for any sharp edges.

  4. Cut the smile

    Trace the curved smile outline in short overlapping strokes. To preserve the single upper tooth, remove the foam section to the left of the tooth first, then the section to the right, leaving the tooth still connected at its top edge. Keep the tooth base wide and avoid undercutting it.

  5. Clean and inspect

    Run a finger carefully along all interior cut edges to find any rough plastic burrs. Smooth these with a fine-grit nail file or the back of a craft knife blade. Inspect the single tooth to confirm it is firmly attached at the base.

  6. Add the light and display

    Drop a battery-powered LED inside through the bottom opening or the back panel. Set the pumpkin on a dark front doorstep and enjoy the steady warm glow. Replace the battery when the light dims rather than using candles inside a plastic shell.

Written with AI to match this design

Gather your supplies

Check things off as you get ready.

Work on a stable surface, keep your free hand out of the cutting path, and have an adult handle sharp tools.

Three levels of light

  • Leave intact

    The full orange plastic shell, the ribs, and the artificial stem remain dark and uncut.

  • Peel & shade

    None. Rigid plastic does not have a peelable layer.

  • Cut through

    Both triangular eye holes and the full curved smile opening minus the tooth area are cut through for warm LED glow.

Learn the carving basics

Before you start cutting

Why does plastic crack at the corners when I try to cut it?

Plastic tends to crack when the blade changes direction suddenly without a pre-scored guide. Always score the outline at least once before the full cut, and change direction slowly at corners. A fresher blade also helps, as a dull blade requires more force and increases cracking risk.

How wide should the single upper tooth be to stay attached?

Make the tooth at least half an inch wide at its base. A wider tooth is more stable and also looks bolder against the lit interior. Teeth narrower than a quarter inch tend to snap during cutting or when the pumpkin is handled.

Can I use a standard pumpkin carving saw on rigid plastic?

Pumpkin saws are designed for pumpkin flesh, not hard plastic. They will work with patience but tend to leave rougher edges and take longer. A sharp craft knife gives cleaner results on plastic because you control the depth and direction more precisely.

Your take belongs here, too.

Changed a detail? Made it simpler? Share a photo of your version and tell the community what worked.

Share your pumpkin

More pumpkins like this

You've reached the end · 8 pumpkins
The Patch Report

Fresh pumpkins, in your inbox.

The best new carvings, ideas worth stealing, and how-tos for carving season. Short, seasonal, and gone by November.

A short email during carving season. Unsubscribe anytime. See our privacy policy.