Halloween Pumpkin Carving Contest · Starts October 1st · $500 in prizes
← Back to ideas
@ai_concepts
Sep 25, 2026
Dark Green Pumpkin Carved with Classic GrinAI
0

Report this carving

Tell us what is wrong. Reports are private.

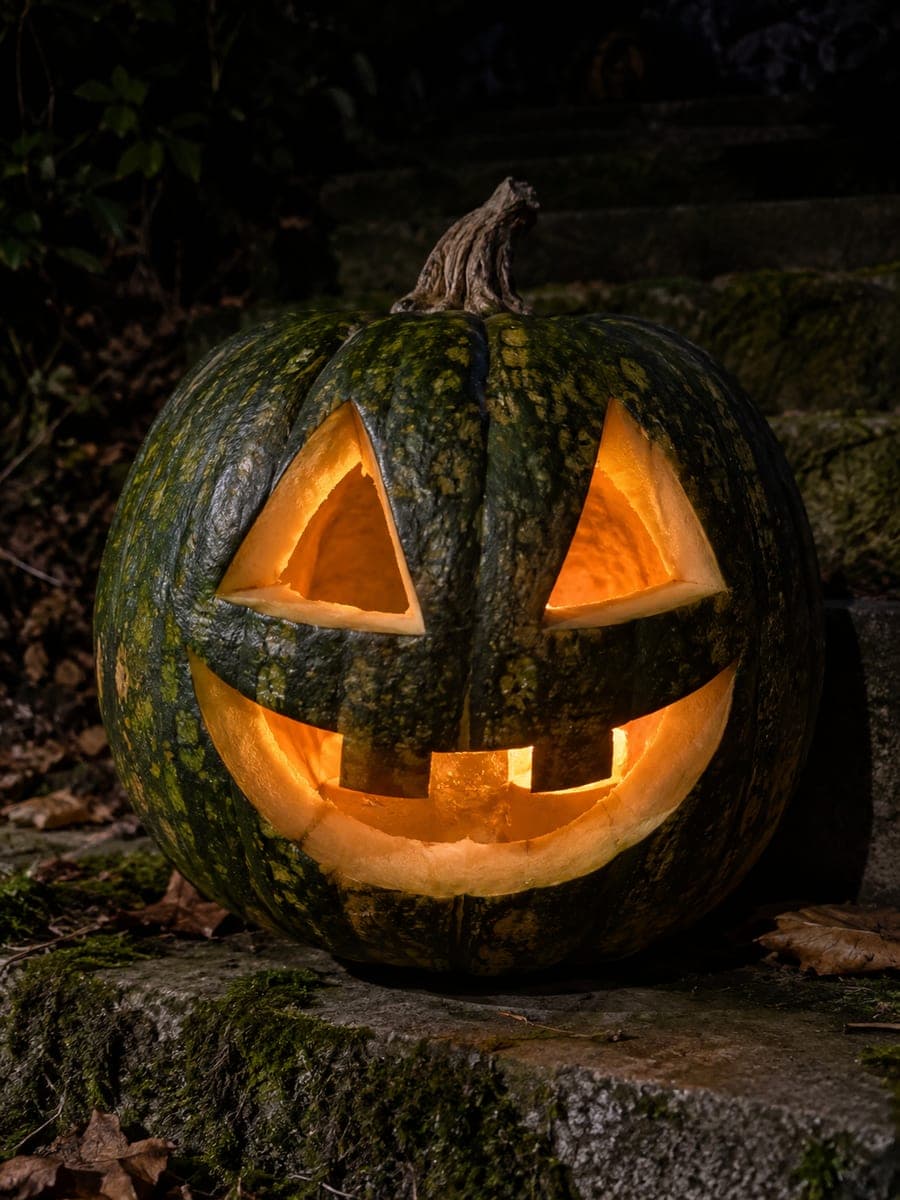
Dark Green Pumpkin Carved with Classic Grin

A real dark-green mottled pumpkin carved with two large triangular eyes and a broad crescent smile with two thick upper-rooted teeth showcases the natural deep color of the rind in this easy green pumpkin carving idea. The mottled green skin means the raw cut edges appear lighter and creamier than on an orange pumpkin, giving the openings extra visual contrast. A single candle inside warms the interior and highlights the surface texture.

No ratings yet · Sign in to rate
Comments (0)

  • No comments yet — be the first.

Save without an account. Sign in to like or comment.

Our tips for carving a similar design

A dark-green mottled pumpkin is the star of this design; the three simple cuts just open windows into its striking rind. Because green-variety pumpkins tend to have dense, firm walls, a sharp saw is especially important. Cut the crescent smile first to open the hollow slightly, which makes the eye cuts easier and safer.

From pumpkin to porch

  1. Select a pumpkin with a flat front face

    The mottled green rind reads best on a face with moderate flatness. A very round pumpkin will curve the triangle eyes noticeably. Once you have your pumpkin, cut a lid at an inward angle, hollow to about an inch of wall, and wipe the surface dry.

  2. Sketch the two triangle eyes and crescent smile

    Mark two equal triangles in the upper half of the face and a broad crescent smile in the lower half. Sketch two thick rectangular tooth tabs on the upper edge of the crescent. Step back and confirm the proportions look right for the size of the pumpkin before committing to any cuts.

  3. Cut the crescent smile

    Saw the crescent arc in a smooth, continuous motion. Enter at one corner, follow the arc to the other end, then cut the straight inner edge of the crescent to free the waste piece. Keep both thick teeth intact by cutting narrow slots on either side of each root.

  4. Cut the triangle eyes

    Pierce the center of one triangle and saw to each of the three corners. The dense green rind cuts cleanly with a sharp blade and short strokes. Cut the second triangle to match the first in size. Push waste pieces inward and compare both eyes from arm's length.

  5. Inspect the cut edges

    The raw cut edges on a dark-green pumpkin reveal a pale cream interior layer that contrasts beautifully with the dark exterior. Run a fingertip along each cut edge to clear any stray rind fibers, which can look ragged in photographs.

  6. Light and display

    A single candle creates a warm glow through the three openings, and the green exterior absorbs light rather than reflecting it, so the glowing features read especially vividly against the dark rind. For safety and longevity, use an LED instead of a real candle.

Written with AI to match this design

Gather your supplies

Check things off as you get ready.

Work on a stable surface, keep your free hand out of the cutting path, and have an adult handle sharp tools.

Three levels of light

  • Leave intact

    The full mottled dark-green exterior everywhere outside the three cuts stays dark.

  • Peel & shade

    None; all contrast comes from fully cut openings.

  • Cut through

    Both large triangle eyes and the full crescent smile with tooth-slot gaps are cut completely through.

Learn the carving basics

Before you start cutting

Do green pumpkins carve differently from orange ones?

Green-variety pumpkins often have a denser, firmer rind than orange ones. A sharp, fine-toothed saw handles them well, but a dull blade will skate and vibrate. If your saw feels labored, switch to a fresh blade before continuing. The cutting technique is otherwise identical.

Will the pale cream cut edges brown as fast as they do on orange pumpkins?

Green-variety pumpkins can dry out and brown at the cut edges fairly quickly, especially in warm or dry conditions. Apply a thin coat of petroleum jelly to the cut edges right after carving and again each morning of display. Keep the pumpkin in a cool, shaded spot when not lit.

Can I add a nose to this design without making it look cluttered?

A small upside-down triangle nose between the eyes and smile would look natural and require only a few extra cuts. Keep it smaller than the eyes so it reads as a nose accent rather than a competing feature. Use the same straight-sided triangle style as the eyes for a cohesive face.

Your take belongs here, too.

Changed a detail? Made it simpler? Share a photo of your version and tell the community what worked.

Share your pumpkin

More pumpkins like this

You've reached the end · 8 pumpkins
The Patch Report

Fresh pumpkins, in your inbox.

The best new carvings, ideas worth stealing, and how-tos for carving season. Short, seasonal, and gone by November.

A short email during carving season. Unsubscribe anytime. See our privacy policy.