Halloween Pumpkin Carving Contest · Starts October 1st · $500 in prizes
← Back to ideas
@ai_concepts
Sep 25, 2026
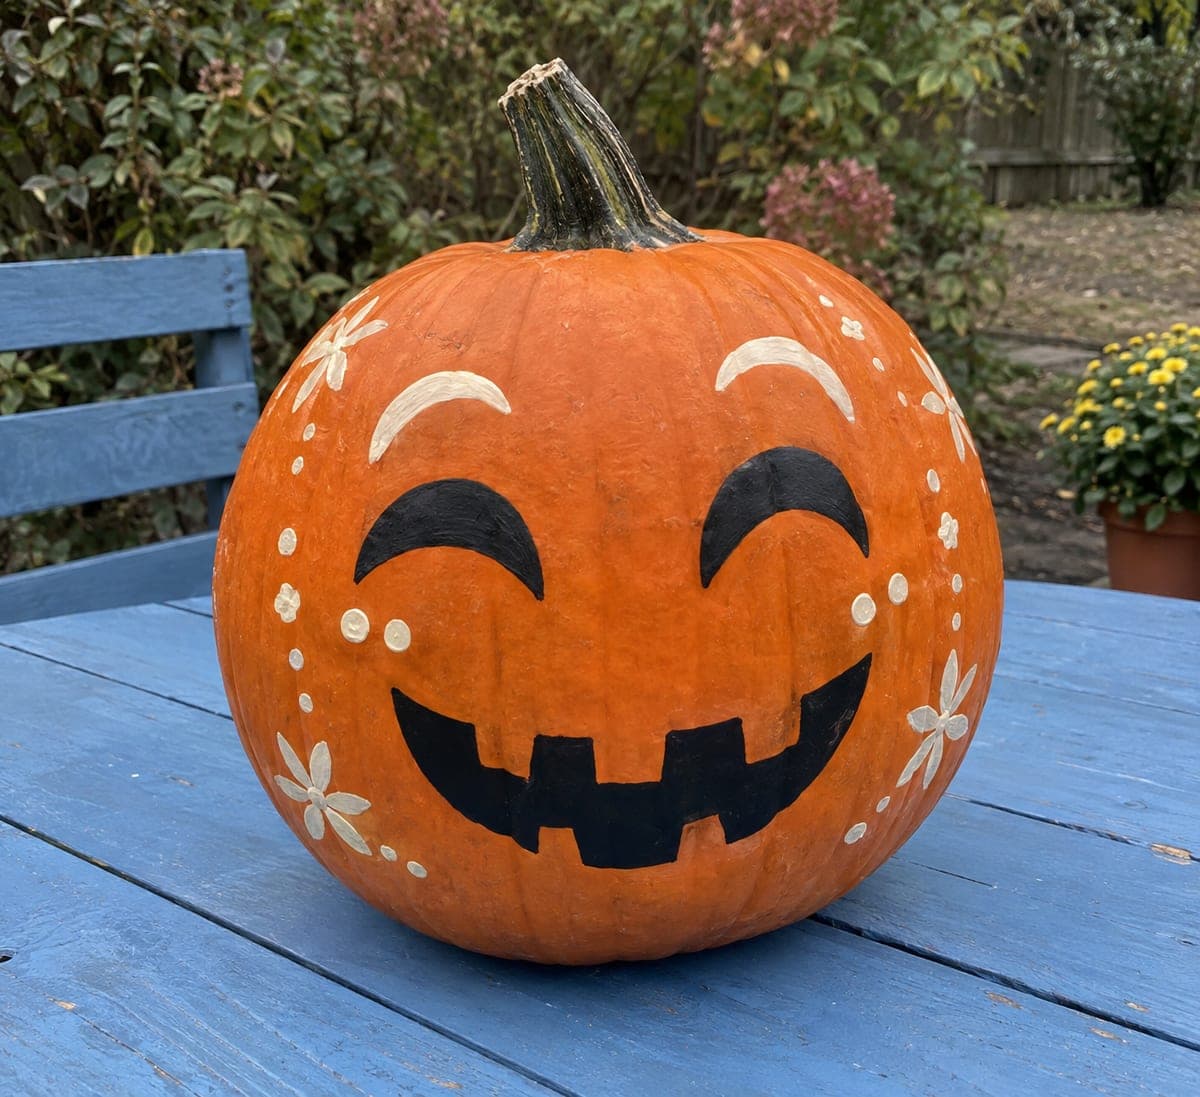
Crescent Eye Classic Painted No-Carve Jack-O-LanternAI
0

Report this carving

Tell us what is wrong. Reports are private.

Crescent Eye Classic Painted No-Carve Jack-O-Lantern

Black crescent smiling eyes, a black toothy grin, cream cheek dots, and two small cream crescent accents above the brows paint a classic jack-o-lantern face onto an intact pumpkin with just two colors. The crescent eye shapes give the face a squinting, happy expression that feels different from the usual angular version. Load the brush generously for the grin so the black covers in one coat without streaking. The cream accents above the brows are the last step and the detail that makes the design look more finished than a basic two-piece face.

No ratings yet · Sign in to rate
Comments (0)

  • No comments yet — be the first.

Save without an account. Sign in to like or comment.

Our tips for carving a similar design

Two colors and five shapes (crescent eyes, a toothy grin, cheek dots, and small brow crescent accents) are all that stand between a plain pumpkin and a cheerful, finished Halloween face. The crescent eye shapes give the face a squinting, happy quality that reads differently from the usual angular version. Filling the grin generously in a single loaded brushstroke prevents streaky coverage, and the cream brow accents painted last are the detail that signals a fully considered design.

From pumpkin to porch

  1. Clean and dry the pumpkin

    Wipe the pumpkin with a slightly damp cloth and allow it to air-dry for at least 20 minutes. Any surface moisture will make the black paint spread unevenly at the edges.

  2. Sketch the layout with chalk

    Lightly mark the horizontal eye-line, the grin arc below it, and rough positions for the brow accents and cheek dot clusters. The crescent eyes should curve upward toward their outer tips for a smile-squinting expression.

  3. Paint the crescent eyes

    Load a medium round brush generously with black paint and paint each crescent in one smooth arc stroke, thickening slightly through the middle and tapering to fine tips. Let dry completely before moving to the grin so the black does not smear.

  4. Paint the grin

    Paint the full toothy smile shape in black, including all the tooth-gap lines. A wide flat brush loaded in a single dip covers the full grin area in one or two passes. Keep the lower edge of the smile clean by pulling the brush parallel to the smile arc.

  5. Add the cheek dots and brow accents

    Press five evenly spaced cream dots onto each cheek using the handle end of a brush or a stylus. Then paint two small cream crescent shapes just above each eye, curving in the same direction as the eyes below. These small accents frame the face and add a finished look in just a few seconds.

  6. Seal and display

    Apply a light coat of acrylic sealer once fully dry. Display outdoors or on a porch where guests see the face straight on; the smiling crescent eyes and the cream accents give every visitor a welcoming expression.

Written with AI to match this design

Gather your supplies

Check things off as you get ready.

Work on a stable surface, keep your free hand out of the cutting path, and have an adult handle sharp tools.

Three levels of light

  • Leave intact

    All orange rind outside the painted shapes remains as background

  • Peel & shade

    None. This design leaves the shell fully intact.

  • Cut through

    None. Display in natural light or with a small LED spotlight aimed at the face.

Learn the carving basics

Before you start cutting

How do I paint a smooth crescent arc without a wobbly line?

Rest your painting arm on a folded towel placed against the pumpkin for stability. Load the brush well and move in one committed arc rather than short tentative strokes. A slightly thicker bristle brush holds more paint and requires fewer passes.

The cream dots look yellowish against the orange rind. How do I get a pure cream white?

Apply a small white base dot first and let it dry, then add the cream color on top. Pure white under cream keeps the final dot color true regardless of the orange background showing through.

Can I add orange-tinted cheeks to give the face a rosy look?

Yes. A light dry-brush of diluted coral or pink paint blended over the cheek area before the black layers adds a subtle blush effect. Apply it before any black paint so there is no risk of muddying the dark colors.

Your take belongs here, too.

Changed a detail? Made it simpler? Share a photo of your version and tell the community what worked.

Share your pumpkin

More pumpkins like this

You've reached the end · 8 pumpkins
The Patch Report

Fresh pumpkins, in your inbox.

The best new carvings, ideas worth stealing, and how-tos for carving season. Short, seasonal, and gone by November.

A short email during carving season. Unsubscribe anytime. See our privacy policy.