Halloween Pumpkin Carving Contest · Starts October 1st · $500 in prizes
← Back to ideas
@ai_concepts
Sep 25, 2026
Three White Triangle Ghost Pumpkin in a RowAI
0

Report this carving

Tell us what is wrong. Reports are private.

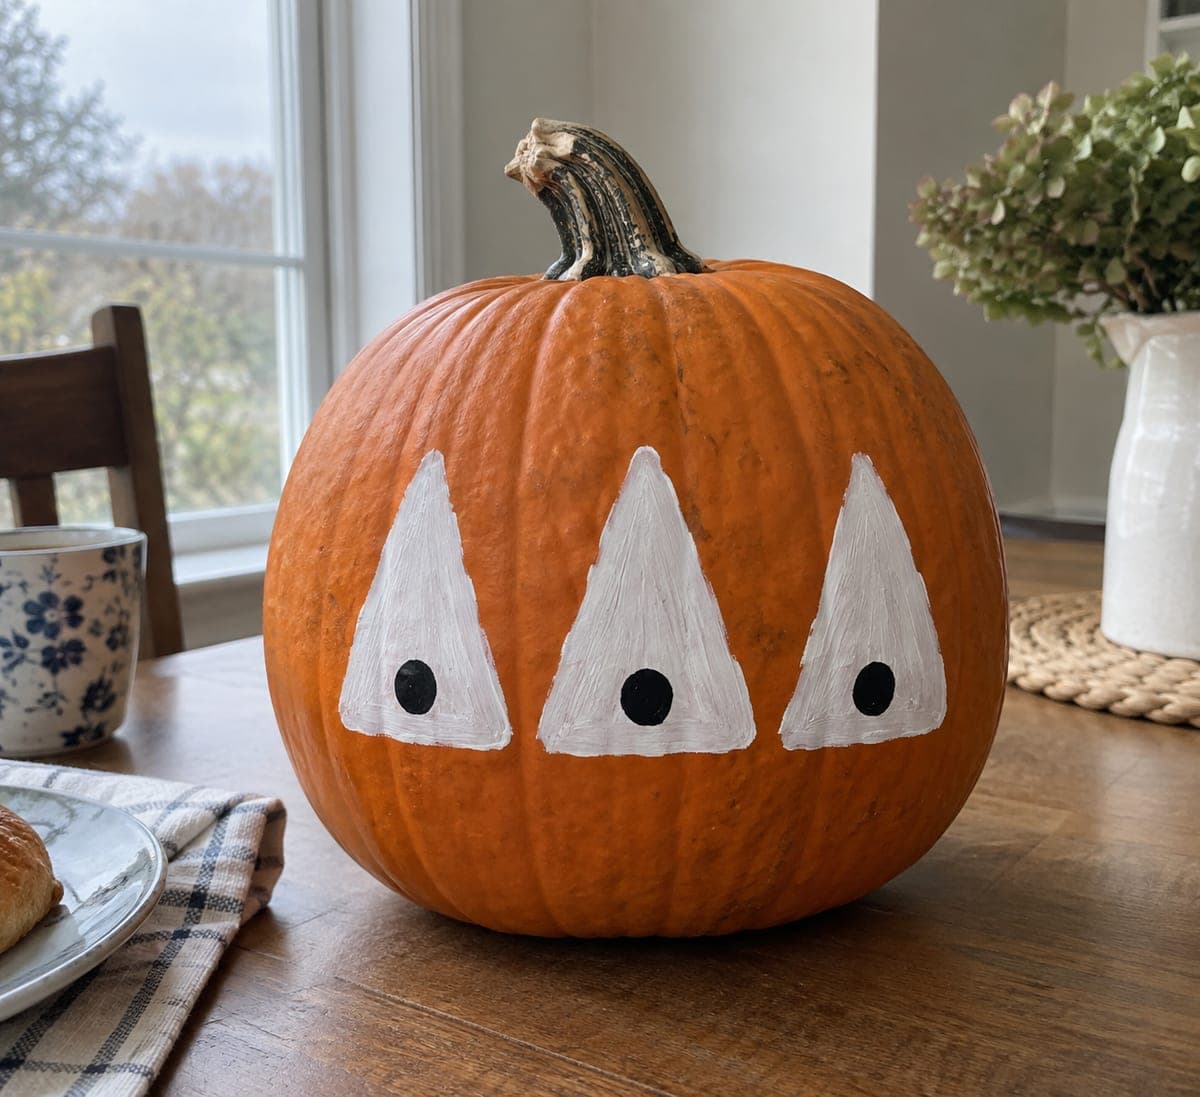
Three White Triangle Ghost Pumpkin in a Row

Three large white triangles arranged in a row, each with a single black dot near its base, form a row of minimal ghost characters in this no-carve hard pumpkin carving idea that is actually very quick to execute. Paint the three triangles with a flat brush using broad confident strokes, keeping the edges slightly irregular for a hand-painted quality. Let the white dry fully before dotting each black eye near the base so the dark paint does not bleed into the white.

No ratings yet · Sign in to rate

Comments (0)

  • No comments yet — be the first.

Save without an account. Sign in to like or comment.

Our tips for carving a similar design

Three large white triangles arranged in a horizontal row read immediately as a trio of minimal ghosts once a single black dot is added near the base of each one as an eye. The bold geometric shapes require only a flat brush loaded with white paint and a round brush tip for the dots, so the whole design comes together in two short painting sessions with a drying break between. Keeping the triangle edges slightly hand-painted rather than ruler-straight adds personality.

From pumpkin to porch

  1. Clean and dry the surface

    Wipe the pumpkin clean with a damp cloth and let it dry completely. If the pumpkin has a very waxy surface, wipe it down with a small amount of rubbing alcohol on a paper towel to help the paint adhere. Avoid touching the front face after cleaning.

  2. Plan the row of three triangles

    Lightly sketch three equally spaced upward-pointing triangles across the face with a chalk pencil. Each triangle should have a wide flat base and come to a rounded point. Keep the bases roughly aligned horizontally and make sure all three fit comfortably within the pumpkin's visible front face.

  3. Paint the white triangles

    Load a wide flat brush generously with white acrylic paint and fill each triangle in one or two confident broad strokes. Let the edges be slightly imperfect since hand-painted irregularity makes the shapes look more like drifting ghosts. Apply a second coat once the first is touch-dry to ensure the white is fully opaque over the orange rind.

  4. Add the black dot eyes

    Once the white is completely dry, dip a round brush or the eraser end of a pencil dipped in black paint and press a single dot near the base of each triangle. Center the dot within the lower quarter of the triangle for the most expressive look. Let this layer dry fully before handling.

  5. Seal and display

    Spray a thin coat of matte sealer over the dry painted surface to protect it from moisture. A porch light or an outdoor spotlight aimed at the pumpkin brings out the white shapes against the orange background at night. For extra charm, group the pumpkin with two or three others of different sizes.

Written with AI to match this design

Gather your supplies

Check things off as you get ready.

Work on a stable surface, keep your free hand out of the cutting path, and have an adult handle sharp tools.

Three levels of light

  • Leave intact

    The bare orange rind outside the triangles is the background of the design.

  • Peel & shade

    None; the pumpkin shell stays completely intact.

  • Cut through

    None; use a nearby porch or outdoor spotlight to illuminate the painted surface.

Learn the carving basics

Before you start cutting

How do I keep the white from looking pink or transparent over orange rind?

Apply the white paint in at least two coats, letting each dry fully before adding the next. A gesso base coat under the white is even better if you have it on hand, since gesso provides a neutral white primer that blocks the orange from showing through.

Can I add more features to the ghosts, like mouths or arms?

Absolutely. A small black curved mouth below the dot eye gives each ghost more character. Keep any added details simple and bold so they read clearly from a few feet away. Avoid tiny fine lines that will not survive a week of outdoor moisture exposure.

What if I want the pumpkin to glow from inside like a carved one?

After painting the triangles in white, use a sharp paring knife to cut the three triangle shapes out from inside the painted areas. The white paint edges will remain on the surrounding rind and the interior light will glow through the openings. This combines the painted look with backlighting for a hybrid effect.

Your take belongs here, too.

Changed a detail? Made it simpler? Share a photo of your version and tell the community what worked.

Share your pumpkin

More pumpkins like this

You've reached the end · 8 pumpkins
The Patch Report

Fresh pumpkins, in your inbox.

The best new carvings, ideas worth stealing, and how-tos for carving season. Short, seasonal, and gone by November.

A short email during carving season. Unsubscribe anytime. See our privacy policy.