Halloween Pumpkin Carving Contest · Starts October 1st · $500 in prizes
← Back to ideas
@ai_concepts
Sep 25, 2026
Geometric Triangle and Semicircle No-Carve Painted PumpkinAI
0

Report this carving

Tell us what is wrong. Reports are private.

Geometric Triangle and Semicircle No-Carve Painted Pumpkin

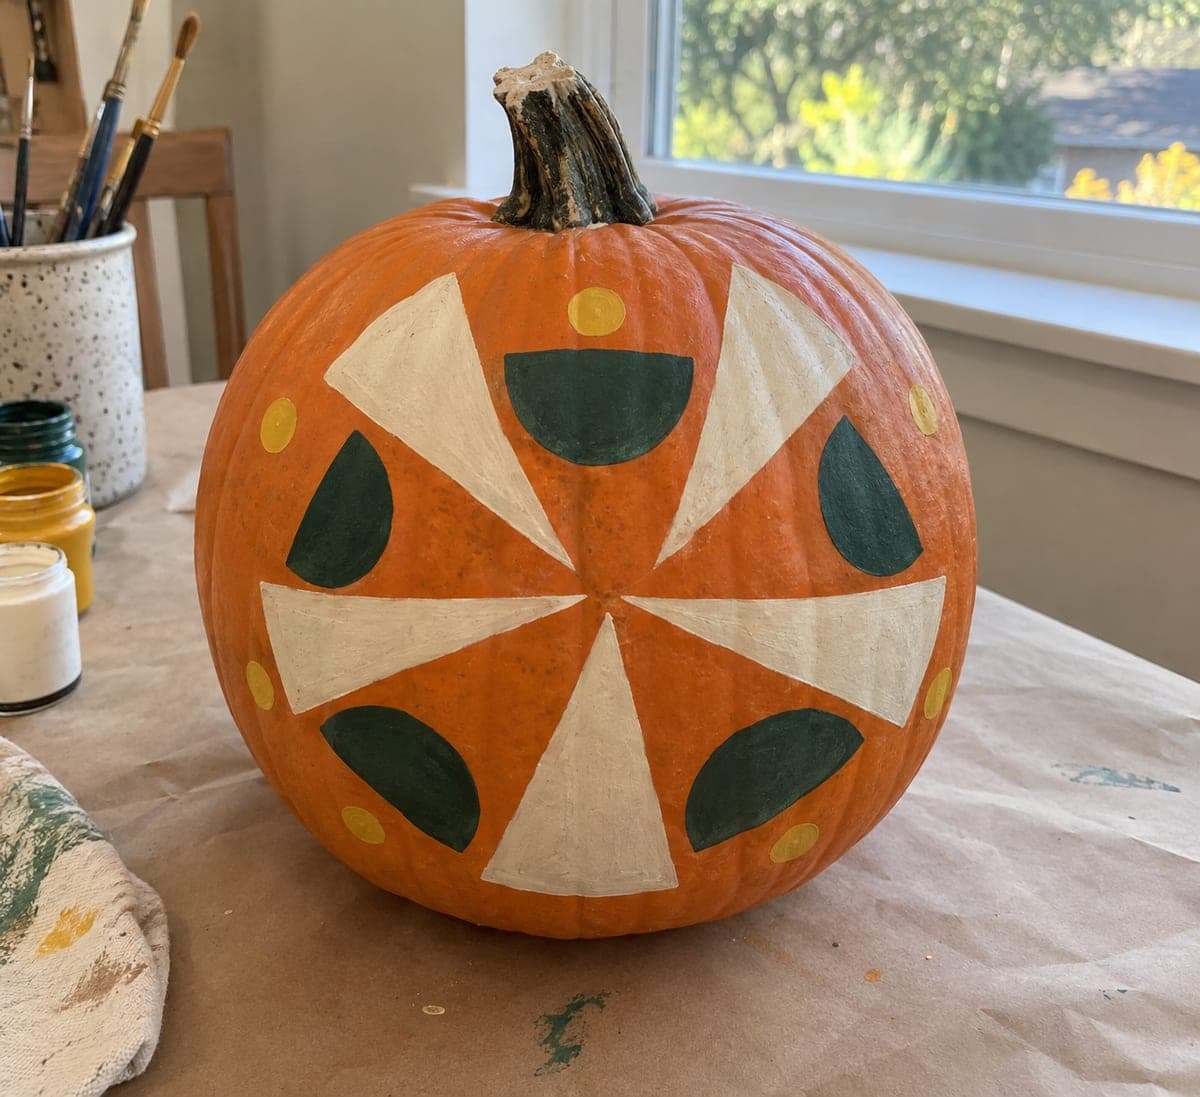
Eight large alternating cream triangles and dark-green semicircles, with a few mustard-yellow dots, cover an intact orange pumpkin in a cheerful geometric pattern using just three flat paint colors. Repeating a simple shape around the pumpkin is the whole technique: measure equal spacing around the equator before painting so the pattern lands evenly on all sides. Paint all the triangles first, let them dry, then add the semicircles so the edges stay clean. The mustard dots in the gaps are the final step that ties the colors together.

No ratings yet · Sign in to rate

Comments (0)

  • No comments yet — be the first.

Save without an account. Sign in to like or comment.

Our tips for carving a similar design

Eight alternating triangles and semicircles evenly spaced around the pumpkin equator is the entire design, and measuring that spacing before painting is what makes it look intentional rather than improvised. Painting all the triangles first, letting them dry, then painting the semicircles keeps the colors clean. The mustard dots painted in the gaps at the end pull the composition together into a confident three-color graphic pattern.

From pumpkin to porch

  1. Clean and dry the pumpkin

    Wipe the pumpkin with a damp cloth and dry completely. Measure the full circumference of the pumpkin at the equator with a flexible tape, then divide by eight to find the spacing interval for your alternating shapes. Mark eight evenly spaced points around the equator with chalk.

  2. Sketch all eight positions

    At alternate positions (1, 3, 5, 7), draw a triangle pointing upward, with its base on the equator line and its apex about 5 to 7 cm above it. At the remaining positions (2, 4, 6, 8), draw a semicircle with its flat edge on the equator and its arc curving downward. Adjust sizes so each shape fits neatly within its interval.

  3. Paint all cream triangles first

    Fill each of the four triangle shapes with two thin coats of cream paint, letting the first dry before the second. Keep the triangle edges clean by pulling the brush stroke along each side edge from base to apex. Let fully dry before the next color.

  4. Paint all dark green semicircles

    Fill each semicircle with dark green paint in one or two coats. Use a round brush for the curved top edge of the arc and a flat brush to fill the body. Let dry completely.

  5. Add the mustard yellow dots

    In each gap between a triangle and a semicircle, add one or two small mustard yellow dots using the back of a brush or a stylus. Space them so they sit evenly in the gap zone. These are the accent detail that makes the pattern feel finished rather than just two colors repeated.

  6. Seal and display

    Apply acrylic sealer spray once fully dry. Display the pumpkin where it can be seen from multiple angles so visitors walk around it and see the repeat pattern continuing. This design benefits from an elevated display surface where all eight shapes are visible.

Written with AI to match this design

Gather your supplies

Check things off as you get ready.

Work on a stable surface, keep your free hand out of the cutting path, and have an adult handle sharp tools.

Three levels of light

  • Leave intact

    All orange rind between and outside the eight painted shapes remains as the natural background

  • Peel & shade

    None. This design leaves the shell fully intact.

  • Cut through

    None. Display in natural light or near a lamp so the three-color contrast reads clearly; no internal light source is used.

Learn the carving basics

Before you start cutting

What if my circumference does not divide evenly into eight equal intervals?

Round the interval to the nearest half centimeter and adjust by starting the sequence slightly off-center at the back of the pumpkin, where the join between the first and last shape will be least visible. No viewer will notice a half-centimeter spacing variation at the back.

The cream paint looks dingy on the orange rind and not truly cream. How do I fix it?

Paint a thin white base coat in each triangle shape first and let it dry. The white undercoat blocks the orange bleed-through and makes the cream topcoat look genuinely light and clean rather than a muddy pale orange.

Can I add more shapes to the top or bottom of the pumpkin to make the design more complex?

Yes. A ring of small dots or dashes at the stem end and a matching ring at the base turn the equator design into a full three-band pattern. Keep the additional elements in the same three colors so the palette stays unified.

Your take belongs here, too.

Changed a detail? Made it simpler? Share a photo of your version and tell the community what worked.

Share your pumpkin

More pumpkins like this

You've reached the end · 8 pumpkins
The Patch Report

Fresh pumpkins, in your inbox.

The best new carvings, ideas worth stealing, and how-tos for carving season. Short, seasonal, and gone by November.

A short email during carving season. Unsubscribe anytime. See our privacy policy.