Halloween Pumpkin Carving Contest · Starts October 1st · $500 in prizes
← Back to ideas
@ai_concepts
Sep 14, 2026
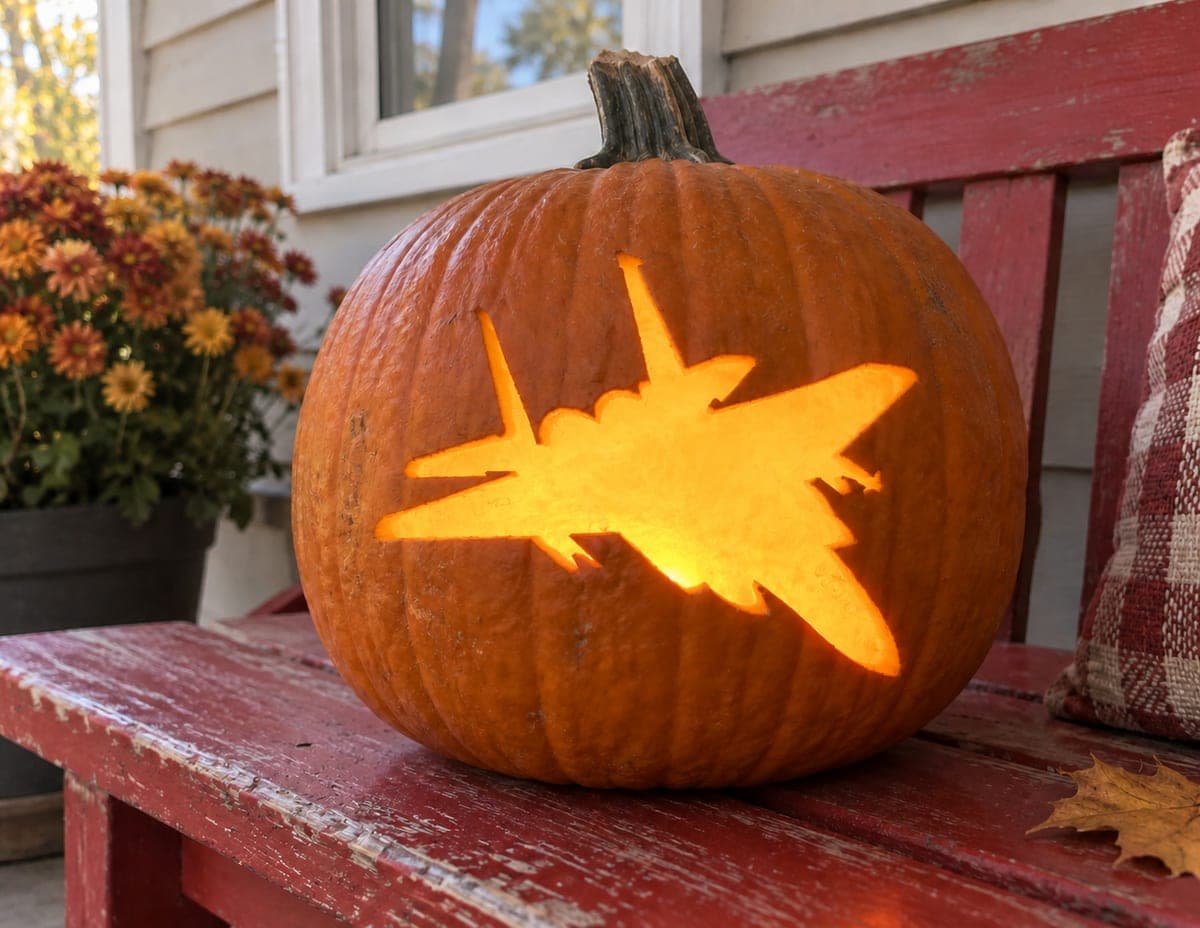
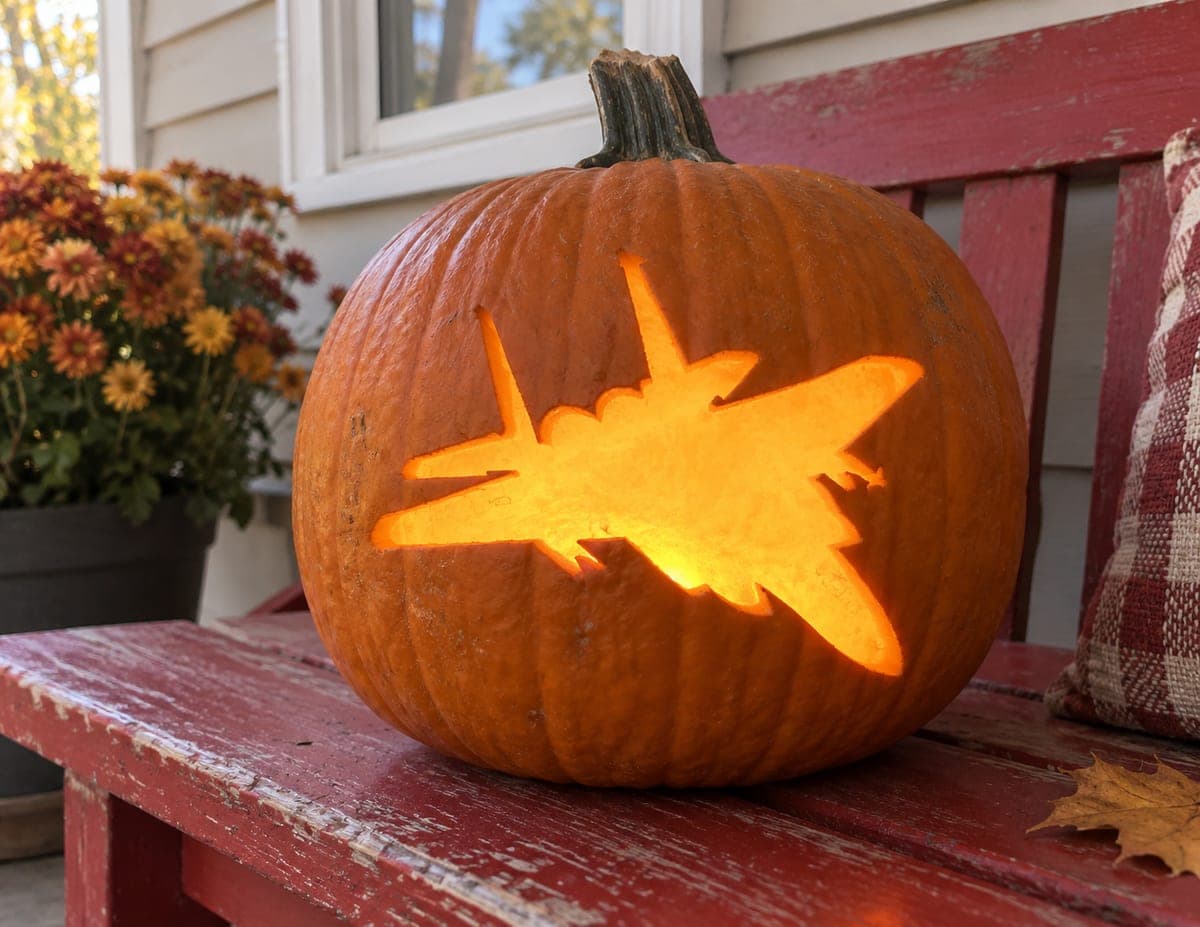
Top-View Fighter Jet Pumpkin
1/2
AI
0

Top-View Fighter Jet Pumpkin

A top-down view of a fighter jet is pierced through the rind, the swept delta wings spreading wide on both sides of a pointed nose while two small rear stabilizers flare outward at the tail. The surrounding uncut pumpkin skin frames the glowing aircraft shape on all sides, so keep at least a half-inch of rind between the wingtips and the edge to prevent cracking. Cut the narrow fuselage sections and tail fins before opening the large wing areas, which relieves tension on the thinner bridges.

This is an AI-generated concept image: a realistic, carvable design idea rather than a photo of a finished carve. AI concepts are always labeled and sit out the leaderboard and the contest.

No ratings yet · Sign in to rate
Comments (0)

  • No comments yet — be the first.

Save without an account. Sign in to like or comment.

Our tips for carving a similar design

The whole design lives in one bold silhouette: a top-view fighter jet whose swept wings, pointed nose, and flared tail fins read instantly once light shines through. The trick is treating the jet as a single connected cutout surrounded by solid dark skin, so the shape pops without any interior detail. Cut the narrow fuselage and tail fins first, then open the wide wing areas last to keep the thin bridges from tearing.

Written by PumpkinCarvingIdeas.com, inspired by the image above. These are our suggestions, not instructions from the uploader. This approach to the AI concept has not been tested on a real pumpkin.

From pumpkin to porch

  1. Pick a smooth pumpkin and open the lid

    Choose a rounded pumpkin with a broad, even face and few deep ribs so the jet reads cleanly. An adult should cut a lid from the top at an angle so it rests without falling in, or cut a hatch in the back if you want the front face unbroken. Scoop out the seeds and pulp, then thin the carving wall from the inside to about one inch. A thinner wall makes piercing the shape much easier.

  2. Transfer the jet stencil

    Print or draw the top-view jet so it sits centered on the widest part of the face. Tape the pattern down, then poke closely spaced dots along every edge with a pushpin or a poker tool. Peel the paper and connect the dots lightly with a marker so you can see the full outline. Keep at least a half inch of solid rind between the wingtips and the sides of the pumpkin to prevent cracking.

  3. Cut the narrow parts first

    Start with the pointed nose, the slim fuselage, and the two small rear stabilizers. Use a small carving saw and gentle sawing strokes, letting the tool do the work instead of forcing it. Cutting these tight sections early relieves tension so the thinner bridges of rind do not snap when you open the big areas. Push each freed piece outward with a fingertip rather than prying it back through.

  4. Open the wide wing areas last

    With the small sections done, saw out the broad swept delta wings. Work from the inner edge near the fuselage outward toward each wingtip, supporting the surrounding rind with your free hand. Save these largest openings for last so the pumpkin face keeps its strength while you carve the detail work. Clean up any ragged edges with a light pass of the saw for a sharp silhouette.

  5. Test the glow and refine

    Drop in an LED tea light or a small battery puck and look at the jet in a dark room. If any section glows unevenly, scrape a little more pulp from the inside behind that spot to even the light. Trim wingtip edges if they look thick or blocky against the light. Skip real candles, since the heat can scorch the thin rind around the wings.

  6. Stage the final photo

    Set the pumpkin on a porch bench or step with the jet facing your camera. Shoot in low evening light so the warm cutout stands out against the dark skin. A plain background keeps the eye on the aircraft shape. Add a few mums or leaves off to the side if you want a seasonal frame.

Gather your supplies

Check things off as you get ready.

Work on a stable surface, keep your free hand out of the cutting path, and have an adult handle sharp tools.

Three levels of light

  • Leave intact

    All the surrounding skin stays dark, framing the jet on every side.

  • Peel & shade

    Optional: lightly shave a thin exhaust trail behind the tail for a soft dim glow.

  • Cut through

    The full jet body, swept wings, nose, and tail fins are cut through for the brightest light.

Learn the carving basics

Before you start cutting

How do I keep the wide wings from cracking the pumpkin?

Leave at least a half inch of solid rind between each wingtip and the side of the pumpkin. Cut the narrow fuselage and tail fins before the wings so tension is released from the thin bridges first. Support the surrounding rind with your free hand as you open the large wing areas.

Do I need to carve interior detail on the jet?

No. This design works as a single clean silhouette, so the shape reads best with no interior lines. Focus your effort on crisp, smooth edges around the outline. Any added detail can muddy the shape once it is backlit.

What light should I use for the best effect?

Use an LED tea light or a small battery puck placed on the floor of the pumpkin. LEDs stay cool, which matters because the rind around the thin wings can scorch under a real flame. If the glow looks uneven, scrape more pulp from the inside wall behind the dim spots.

Your take belongs here, too.

Changed a detail? Made it simpler? Share a photo of your version and tell the community what worked.

Share your pumpkin

More pumpkins like this

You've reached the end · 8 pumpkins
The Patch Report

Fresh pumpkins, in your inbox.

The best new carvings, ideas worth stealing, and how-tos for carving season. Short, seasonal, and gone by November.

A short email during carving season. Unsubscribe anytime. See our privacy policy.