Halloween Pumpkin Carving Contest · Starts October 1st · $500 in prizes
← Back to ideas
@ai_concepts
Sep 14, 2026
Love Wins Heart PumpkinAI
0

Love Wins Heart Pumpkin

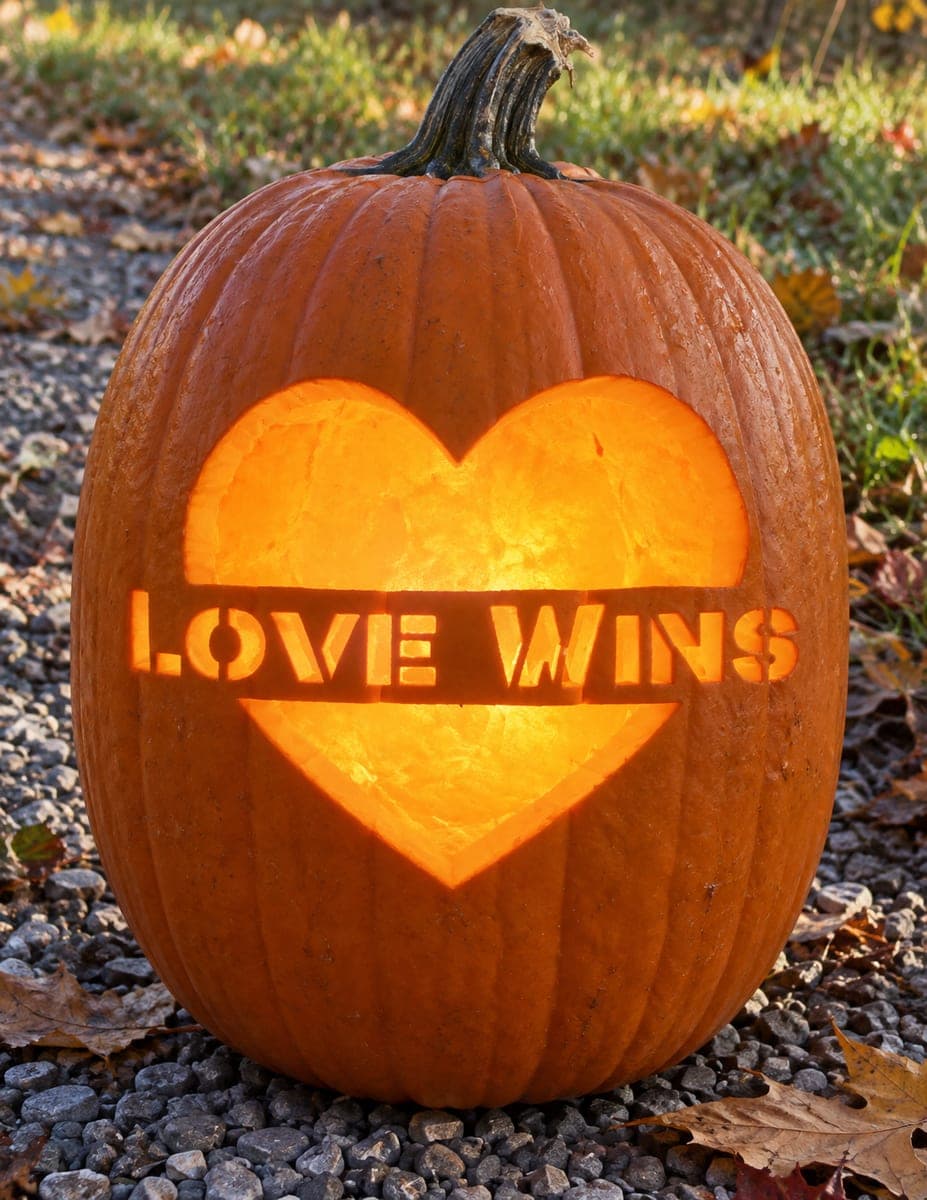
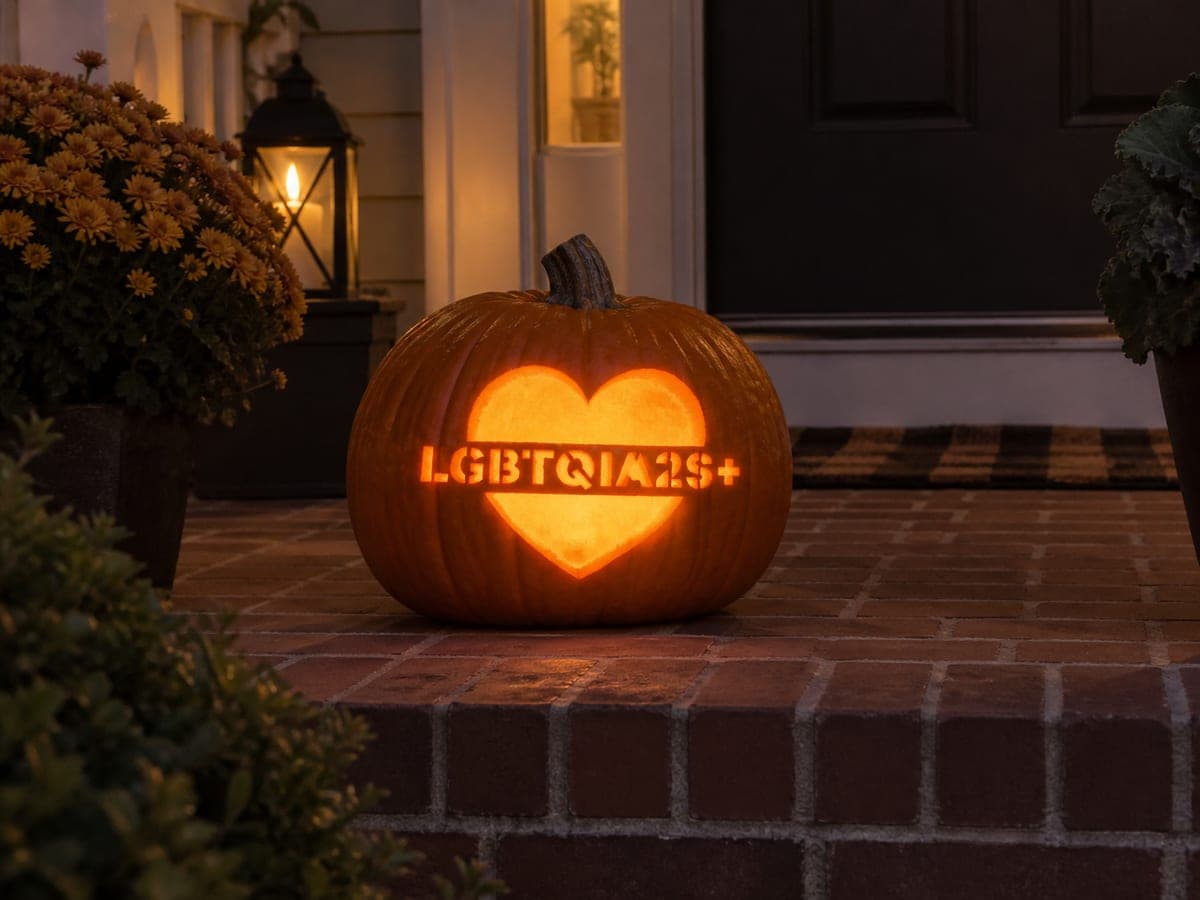
A large heart dominates the pumpkin face with a horizontal bar cutting across its widest point, inside which the words LOVE WINS appear in raised uncut letters against the glow. The heart interior and the open spaces between and around each letter are cut through in this pumpkin carving idea, with the letters themselves remaining as dark uncut silhouettes within the bright heart. Carve the letter gaps in tight sequence from left to right rather than skipping around, so the remaining wall distributes stress evenly and the narrow negative spaces between letters stay intact.

This is an AI-generated concept image: a realistic, carvable design idea rather than a photo of a finished carve. AI concepts are always labeled and sit out the leaderboard and the contest.
No ratings yet · Sign in to rate

Comments (0)

  • No comments yet — be the first.

Save without an account. Sign in to like or comment.

Our tips for carving a similar design

The core trick here is negative-space lettering: the whole heart interior is cut away for maximum glow, and the words LOVE WINS stay dark because you leave the letter shapes uncut while removing the gaps around them. Plan the heart as one large opening broken up only by a horizontal bar of text across its middle. The letters need connecting bridges to the surrounding wall so they do not fall out once the big opening is cut.

Written by PumpkinCarvingIdeas.com, inspired by the image above. These are our suggestions, not instructions from the uploader. This approach to the AI concept has not been tested on a real pumpkin.

From pumpkin to porch

  1. Pick a tall pumpkin and open it up

    Choose a tall, smooth pumpkin with a flat front panel big enough for a heart plus a line of text. An adult should cut a lid or, better for lettering, a wide bottom hatch so the shell stays intact on the carving face. Scrape the inside of the front wall down to about one inch thick so light passes through easily. A thinner wall also makes the fine letter gaps easier to cut cleanly.

  2. Transfer the stencil accurately

    Print a heart-with-text stencil sized to your pumpkin and tape it flat, snipping the paper edges so it hugs the curve. Poke through the outline with a pin or transfer tool, tracing the heart border, the top and bottom edge of the horizontal bar, and every letter edge. Go slowly around the letters since a missed dot means a crooked V or W later. Peel the paper and connect your dots with a washable marker before any blade touches the shell.

  3. Carve the letter gaps first, left to right

    Start with the small negative spaces between and inside the letters while the wall is still solid and strong. Use a fine detail saw or a craft knife and work in tight sequence from L through the final S rather than jumping around. This keeps the remaining wall evenly supported and protects the narrow slivers between letters. Leave the letters themselves attached to the bar above and below so they read as dark silhouettes.

  4. Open the heart around the text

    Now cut the large heart interior in sections, doing the top lobes and the pointed bottom last. Keep the horizontal bar that holds the words as an uncut bridge spanning the heart's widest point. Cut the big open areas after the fine work so the shell does not flex while you handle delicate letters. Push each freed piece inward and out to avoid chipping the edges.

  5. Clean edges and test the glow

    Bevel the cut edges slightly toward the inside so more light spills through the openings. Trim any ragged bits around the letters with the tip of your knife and check that no letter is hanging by a thread. Drop in an LED light, never a candle, and view it in a dark room. If a letter looks lost, shave the inside wall a little thinner around it to brighten the contrast.

  6. Stage and photograph it

    Set the pumpkin at eye level on gravel or a step so the message sits straight on for the camera. Use one or two bright LEDs and shoot at dusk when the sky still holds a little color. Turn the pumpkin slightly so the ridges do not distort the letters. A dab of petroleum jelly on the cut edges slows drying and keeps the glow crisp for a few days.

Gather your supplies

Check things off as you get ready.

Work on a stable surface, keep your free hand out of the cutting path, and have an adult handle sharp tools.

Three levels of light

  • Leave intact

    The outer face around the heart and the LOVE WINS letters stay as untouched skin, reading dark against the glow.

  • Peel & shade

    Optional: shave a shallow border just inside the heart outline to add a soft dim-orange halo around the bright center.

  • Cut through

    The heart interior and every gap around and between the letters are cut fully through for the brightest light.

Learn the carving basics

Before you start cutting

How do I keep the letters from falling out?

Each letter stays connected to the horizontal bar of pumpkin skin that runs across the heart's widest point, so they are never fully surrounded by cuts. Carve the small gaps around them before you open the large heart area, while the wall is still rigid. Avoid cutting the top and bottom edges of the bar away, since those hold the whole word in place.

What if my pumpkin is too round or ribbed for straight text?

Deep ribs make letters bend and blur, so pick the flattest panel you can find. Keep the text small and centered on the smoothest section rather than stretching it wide across ridges. If the surface still curves, size the letters a bit taller so slight distortion is less noticeable head on.

This is an AI concept image, so will a real pumpkin look the same?

No real pumpkin was carved for this picture, but the design is fully doable on a real one. Keep letter strokes and the bar at least a finger-width wide so nothing tears, and thin the wall for a strong glow. Expect slightly softer, more organic edges than the rendered image shows.

Your take belongs here, too.

Changed a detail? Made it simpler? Share a photo of your version and tell the community what worked.

Share your pumpkin

More pumpkins like this

You've reached the end · 8 pumpkins
The Patch Report

Fresh pumpkins, in your inbox.

The best new carvings, ideas worth stealing, and how-tos for carving season. Short, seasonal, and gone by November.

A short email during carving season. Unsubscribe anytime. See our privacy policy.