Halloween Pumpkin Carving Contest Β· Starts October 1st Β· $500 in prizes
← Back to ideas
@ai_concepts
Sep 25, 2026
Hard Pokemon Pumpkin Carving with Connected SilhouetteAI
0

Report this carving

Tell us what is wrong. Reports are private.

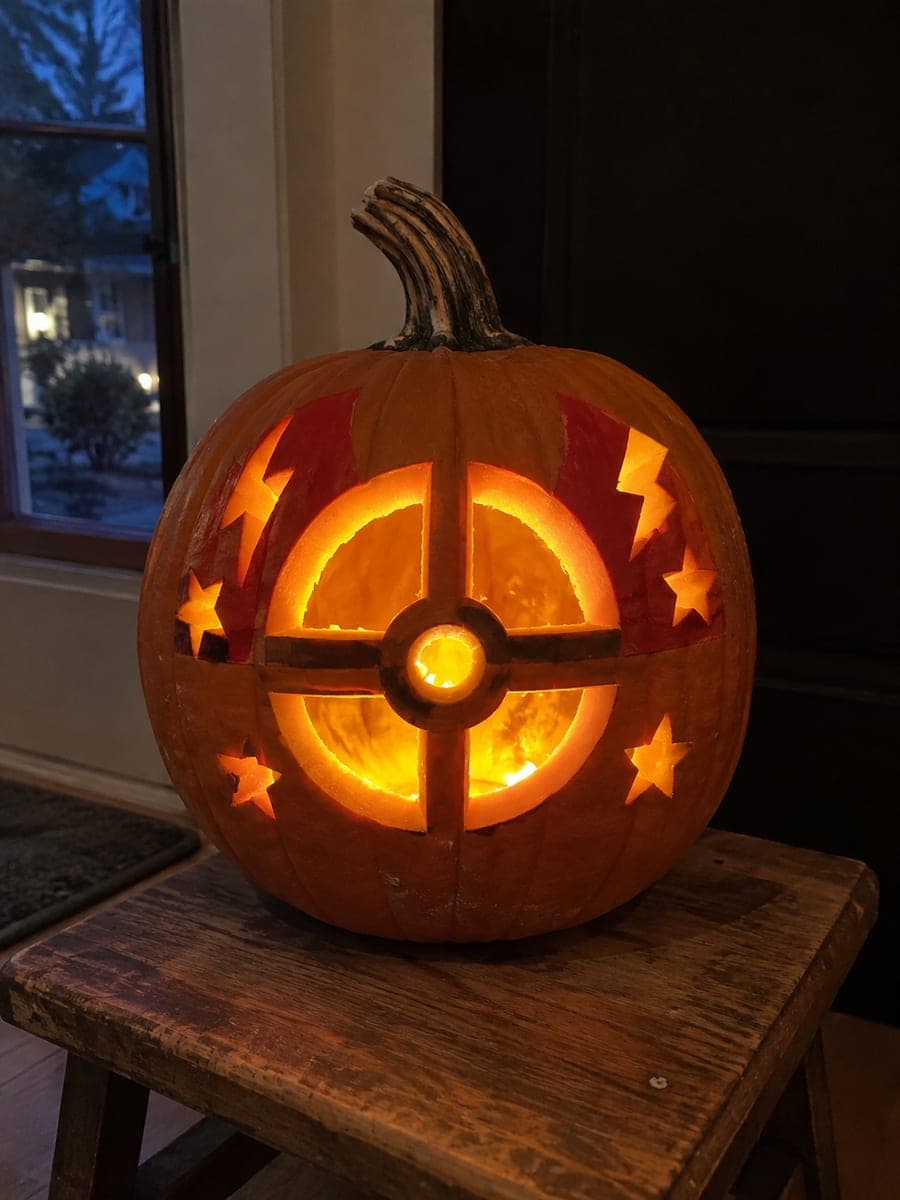
Hard Pokemon Pumpkin Carving with Connected Silhouette

This hard Pokemon pumpkin carving idea features cut-through main apertures with retained pupils, teeth, ribs, and character silhouettes all broadly anchored to the surrounding shell. Secondary surface accents are shallow back-carved to add layered detail without risking breakage on the thinner rind sections. Carve the largest openings first to remove the most rind mass early, then refine the retained details once the main composition is established.

No ratings yet Β· Sign in to rate

Comments (0)

  • No comments yet β€” be the first.

Save without an account. Sign in to like or comment.

Our tips for carving a similar design

The hard version of this Pokemon design increases the complexity of the retained details, more numerous ribs, finer teeth profiles, and more layered silhouette sections, while maintaining the same principle of broad anchor connections at every retained piece. Shallow-backed surface accents fill the gaps between apertures with texture that adds depth without punching through the rind. Carving the largest openings first to remove the most mass early gives you the clearest picture of how much rind remains for the subsequent retained detail work.

From pumpkin to porch

  1. Prep and thorough planning

    Scoop from the back and thin walls to a consistent inch. Before transferring, study the stencil to identify every retained piece and its anchor points. Transfer with a pounce wheel and mark anchor boundaries with double lines on the pumpkin surface. Have a clear X or circle label for every zone before making the first cut.

  2. Cut the largest apertures first

    Open the largest face apertures with a medium carving saw, working from the most open areas toward the zones with complex retained details. This removes the bulk of the rind mass early and stabilizes your sense of the overall composition before the precision work begins.

  3. Isolate the retained pupils and complex details

    Use a fine detail saw to cut the apertures adjacent to retained pupils, teeth, and rib silhouettes. Work methodically from the outermost retained piece inward, confirming each anchor connection after its adjacent cut is complete. These cuts require slow, deliberate passes.

  4. Work the remaining smaller apertures

    Cut all remaining smaller apertures in order from largest to smallest with the fine detail saw. These may include secondary facial detail areas or background fills. After each cut, check that no previously retained piece has developed any flex.

  5. Add the surface accent texture

    Switch to a gouge for the shallow accent texture marks. At this difficulty level there may be significantly more accent work than at easier levels, covering brow plates, scale texture, and fin or feather surface lines. Maintain consistent depth throughout and complete all accent work in one section before moving to the next.

  6. Light and display

    Place an LED tea light inside and evaluate from several feet in low light. The multi-layer composition should read with clear contrast between glowing apertures, dark retained silhouettes, and mid-glow backed texture. Coat all surfaces with petroleum jelly and store cold when not on display.

Written with AI to match this design

Gather your supplies

Check things off as you get ready.

Work on a stable surface, keep your free hand out of the cutting path, and have an adult handle sharp tools.

Three levels of light

  • Leave intact

    Retained pupils, teeth, rib silhouettes, and other connected detail pieces remain dark

  • Peel & shade

    Surface texture accents on retained surfaces are shallow-backed to cream flesh for mid-glow layering

  • Cut through

    Main face apertures, secondary openings, and all other through-cut zones are fully cut through

Learn the carving basics

Before you start cutting

How do I prevent the increased number of retained pieces from making the design look cluttered?

The design avoids clutter as long as every retained piece has a clear visual relationship to an adjacent lit aperture. If a retained rib or tooth looks disconnected from the surrounding composition, check that the aperture next to it is wide enough to show it clearly. Widening a narrow adjacent aperture by a few millimeters is often all it takes to give a retained piece visual purpose.

I have extra shallow-backed surface accents to do. Can I do them while the apertures are still closed?

Yes, and for large areas of texture work this is often preferred. Doing the surface accent work on a closed pumpkin gives you full support under the rind for every gouge pass. Establish your accent marks first, then make the through-cuts in the established order. The only adjustment needed is to be more careful not to over-back any zone you plan to cut through later.

The stencil shows retained ribs that run diagonally. Are those harder to execute than horizontal or vertical ribs?

Diagonal retained ribs are cut using the same technique but require rotating the pumpkin orientation so the rib runs roughly along your natural saw direction rather than across it. Position the pumpkin so the rib you are working runs left-to-right in front of you and cut along it with gentle, continuous pressure. Diagonal orientation is more about body position than technique.

Your take belongs here, too.

Changed a detail? Made it simpler? Share a photo of your version and tell the community what worked.

Share your pumpkin

More pumpkins like this

You've reached the end Β· 8 pumpkins
The Patch Report

Fresh pumpkins, in your inbox.

The best new carvings, ideas worth stealing, and how-tos for carving season. Short, seasonal, and gone by November.

A short email during carving season. Unsubscribe anytime. See our privacy policy.