Halloween Pumpkin Carving Contest · Starts October 1st · $500 in prizes
← Back to ideas
@ai_concepts
Sep 25, 2026
Easy Pikachu Pumpkin Carving with Glowing Face CutoutsAI
0

Report this carving

Tell us what is wrong. Reports are private.

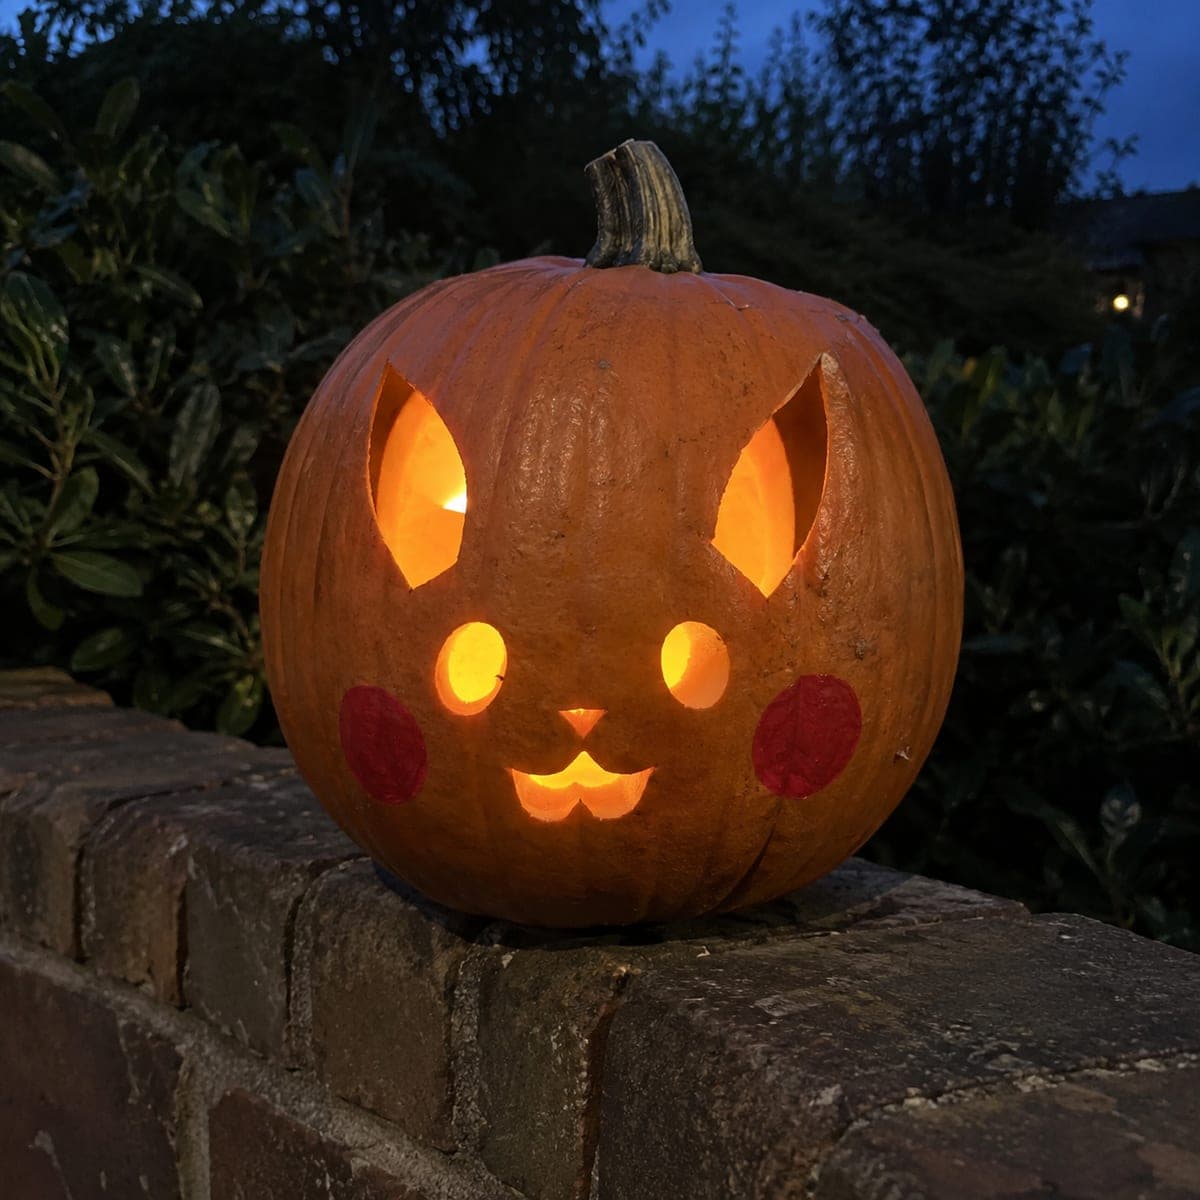
Easy Pikachu Pumpkin Carving with Glowing Face Cutouts

Pikachu's face glows through cut-through main apertures on this easy Pikachu pumpkin carving idea, with retained pupils and cheek-circle silhouettes broadly connected to the shell so the characteristic rosy cheeks stay intact. Surface details like the ear tips and lightning bolt tail are kept shallow back-carved for structural safety. A warm yellow candle inside echoes Pikachu's color and makes the glowing cheek spots pop against the rind.

No ratings yet · Sign in to rate

Comments (0)

  • No comments yet — be the first.

Save without an account. Sign in to like or comment.

Our tips for carving a similar design

The design centers on Pikachu's most recognizable features: the glowing cheek-circle apertures and the retained pupil silhouettes inside the eye openings. All retained pieces anchor to the shell with broad rind connections, and the ear tip and lightning bolt tail surface details are kept shallow-backed rather than fully cut to protect the thin rind in those areas. A warm yellow LED inside echoes the character's color and makes the cheek spots pop particularly well.

From pumpkin to porch

  1. Prep and transfer

    Scoop from the back and thin interior walls to about an inch. Transfer the stencil with a pounce wheel, marking the cheek circle positions, eye apertures, retained pupil anchor points, and shallow accent locations. The cheek circles are the visual focus, so confirm they are correctly placed at the same height on both sides before removing the paper.

  2. Cut the cheek circles

    Use a fine detail saw to cut both cheek circle apertures, working carefully around the curved boundary of each circle. Keep each cut within the cheek zone and confirm both circles are the same size by comparing them against the stencil before lighting the design.

  3. Cut the eye apertures with retained pupils

    Open the eye apertures with the fine detail saw, leaving each retained pupil broadly connected to the surrounding eye rim rind. Work from the outer eye boundary inward toward the pupil, stopping at the pupil anchor line. Confirm each pupil is firmly connected before moving on.

  4. Cut remaining main apertures

    Open any other main face apertures defined on the stencil, such as the nose or mouth area, using a medium or fine saw depending on the size. Work from largest to smallest.

  5. Add shallow accent marks

    Use a narrow V-gouge or linoleum cutter to add the shallow ear-tip and lightning bolt tail accent marks. Keep all backing under a third of the rind thickness. The ear tips are particularly thin areas so use light, careful pressure and work from the tip toward the base.

  6. Light and display

    Place a warm yellow LED tea light inside and view in a darkened room. The cheek circles should immediately read as Pikachu's signature feature. Apply petroleum jelly to all cut and grooved surfaces. Position the pumpkin at eye level for viewers so the cheek circles sit at the most visible height.

Written with AI to match this design

Gather your supplies

Check things off as you get ready.

Work on a stable surface, keep your free hand out of the cutting path, and have an adult handle sharp tools.

Three levels of light

  • Leave intact

    Retained pupils and the rind between the cheek circles and eye apertures remain dark

  • Peel & shade

    Ear tip and lightning bolt tail accents are shallow-backed to cream flesh for a soft mid-glow outline in those areas

  • Cut through

    Cheek circle apertures, eye openings around the retained pupils, and any other main face apertures are fully cut through

Learn the carving basics

Before you start cutting

How do I make the two cheek circles look perfectly round and matching?

Use a round cookie cutter or compass to draw both circles on the stencil at exactly the same size before transfer. Once transferred, trace each circle with a scoring tool before cutting to establish a guide channel. Cut from the widest part of the circle and rotate the pumpkin toward you as you follow the curve rather than turning the saw.

The lightning bolt tail detail is very thin. Should I cut it through or keep it backed?

Keep it backed at easy level. A fully cut-through lightning bolt tail requires very narrow saw passes near the pumpkin edges where the rind is thinner, which creates a real breakage risk. A shallow-backed bolt reads as a cream-colored surface mark when lit and is visible from the front without any structural risk.

Why use a yellow LED instead of a standard white one?

Yellow light shining through orange rind creates a warmer amber-gold glow that matches Pikachu's electric-yellow color far better than white light. White light through orange rind reads as a standard orange jack-o-lantern glow. The color choice is a small detail that significantly improves character accuracy when the pumpkin is on display.

Your take belongs here, too.

Changed a detail? Made it simpler? Share a photo of your version and tell the community what worked.

Share your pumpkin

More pumpkins like this

You've reached the end · 8 pumpkins
The Patch Report

Fresh pumpkins, in your inbox.

The best new carvings, ideas worth stealing, and how-tos for carving season. Short, seasonal, and gone by November.

A short email during carving season. Unsubscribe anytime. See our privacy policy.