Halloween Pumpkin Carving Contest · Starts October 1st · $500 in prizes
← Back to ideas
@ai_concepts
Sep 25, 2026
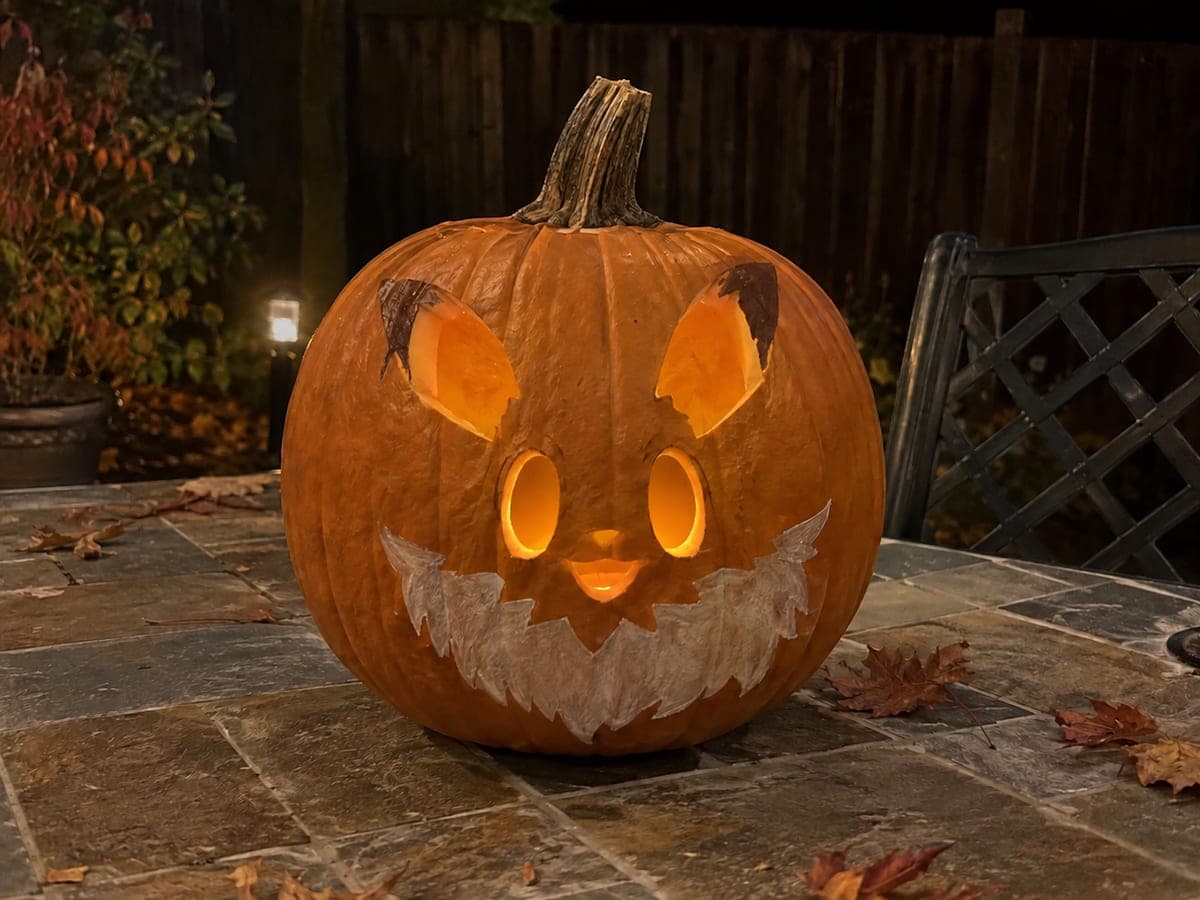
Easy Eevee Pumpkin Carving with Cut-Through SilhouetteAI
0

Report this carving

Tell us what is wrong. Reports are private.

Easy Eevee Pumpkin Carving with Cut-Through Silhouette

Eevee's expressive face glows through cut-through main apertures on this easy Eevee pumpkin carving idea, with retained pupils and fur-collar silhouette broadly anchored to the rind so the design holds its shape without bracing. Small secondary accents like ear-tip marks are shallow back-carved rather than fully cut. Using a battery tea light prevents heat from softening the retained fur-collar detail during a long display night.

No ratings yet · Sign in to rate

Comments (0)

  • No comments yet — be the first.

Save without an account. Sign in to like or comment.

Our tips for carving a similar design

The design keeps things simple by cutting out the main face apertures as open shapes and retaining the pupils and fur-collar silhouette on broad, stable bridges attached to the surrounding rind. Small ear-tip accent marks are shallow back-carved rather than fully cut so the overall structure stays solid. A battery tea light prevents heat buildup that could soften the fur-collar details during a long display night.

From pumpkin to porch

  1. Prep and hollow the pumpkin

    Cut a back-panel or bottom lid and scoop out the interior pulp completely. Thin the walls over the carving area to about three-quarters of an inch with a large metal spoon. Even wall thickness keeps the silhouette edges clean and prevents the saw from wandering when you reach the retained collar sections.

  2. Transfer the Eevee pattern

    Print the design at scale and secure it to the pumpkin face with painter's tape. Trace all lines and the bridge positions with a pin tool so the impressions are clearly visible when the paper is removed. Mark the collar bridges with a pen as a reminder not to cut through them.

  3. Cut the main face apertures

    Begin with the largest open sections, the eye and mouth shapes, using a thin carving saw in short back-and-forth strokes. Adults should handle all cutting. Work from the outer edges of each aperture inward toward the bridge areas to keep control. Remove each cut piece fully before moving to the next opening.

  4. Carve the fur-collar silhouette

    The collar silhouette stays attached to the shell on wide bridges at its base and sides, so cut only the open areas around and inside the collar shape. Keep saw strokes slow near any narrow point to avoid accidentally crossing a bridge. If a section feels unstable, leave a small additional connector and clean it up after the main cuts are done.

  5. Back-carve the ear-tip accents

    Use a small gouge or a Dremel ball bit to shave the ear-tip detail marks to about half the wall depth. Work with light passes rather than one deep cut, and verify depth by shining a flashlight against the back of the wall: a soft warm glow without a full hole is the target.

  6. Add a battery light and display

    Place a battery-powered tea light or a small LED inside, avoiding real candles whose heat can soften the retained rind details over hours. Position the light toward the center of the pumpkin so both eyes and the collar illuminate evenly. Display on a level surface to keep the light from rolling to one side.

Written with AI to match this design

Gather your supplies

Check things off as you get ready.

Work on a stable surface, keep your free hand out of the cutting path, and have an adult handle sharp tools.

Three levels of light

  • Leave intact

    Retained pupils, fur-collar silhouette sections, and surrounding rind stay dark as the design's defining shapes

  • Peel & shade

    Shallow ear-tip accent marks glow softly as a mid-tone detail against the dark rind

  • Cut through

    Main eye, nose, and mouth apertures are fully cut through and project warm light outward

Learn the carving basics

Before you start cutting

How wide should the fur-collar bridges be to stay safe?

Aim for at least a half-inch of rind at the narrowest bridge point on the collar. Eevee's collar has a naturally scalloped edge, so each scallop can root to the shell with a short bridge at its base. If any individual scallop is very thin, leave it slightly thicker than the design suggests and use a shallow back-carve on its face instead of a full cut.

Can kids help with this design?

Children can do the pattern transfer using a pin tool with adult supervision, and they can place the finished LED inside the pumpkin. All saw cutting and gouge work should be done by an adult. The easy silhouette format makes this design fast enough to complete in one sitting, which keeps younger helpers engaged throughout.

My ear-tip accents accidentally went all the way through. Is the design ruined?

Not at all. Small full-cut holes in the ear tips actually look fine when lit and simply create a slightly brighter accent than intended. Smooth any rough edges with a small knife, and the finished piece will still read clearly as Eevee. Going forward, practice the back-carving depth on a spare pumpkin piece before working on the face.

Your take belongs here, too.

Changed a detail? Made it simpler? Share a photo of your version and tell the community what worked.

Share your pumpkin

More pumpkins like this

You've reached the end · 8 pumpkins
The Patch Report

Fresh pumpkins, in your inbox.

The best new carvings, ideas worth stealing, and how-tos for carving season. Short, seasonal, and gone by November.

A short email during carving season. Unsubscribe anytime. See our privacy policy.