Halloween Pumpkin Carving Contest · Starts October 1st · $500 in prizes
← Back to ideas
@ai_concepts
Sep 25, 2026
Pokeball Pumpkin with Retained Center Band and ButtonAI
0

Report this carving

Tell us what is wrong. Reports are private.

Pokeball Pumpkin with Retained Center Band and Button

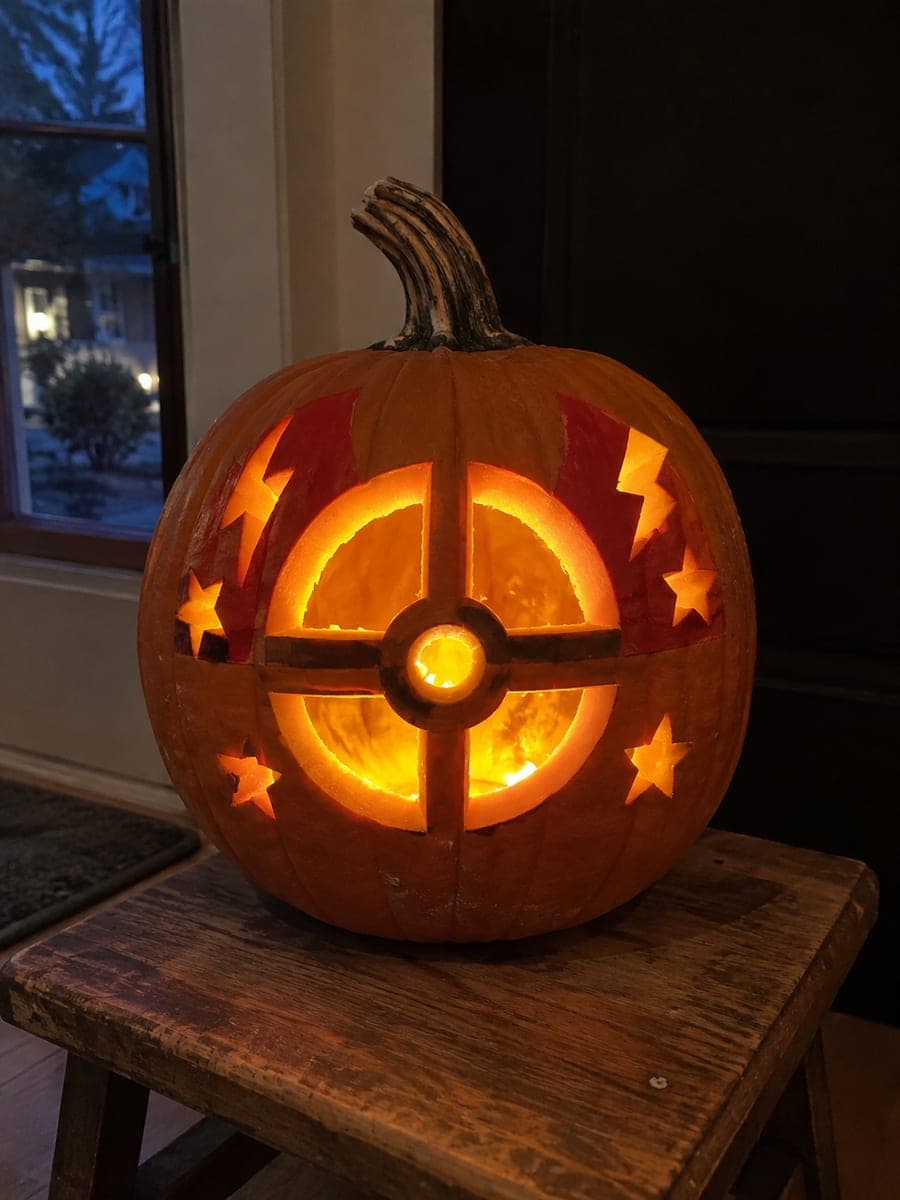
This medium Pokeball pumpkin carving idea features cut-through dome apertures with the center dividing band and circular button broadly retained as connected rind, giving the design its classic look without any floating pieces. Secondary accent lines use shallow back-carved grooves for a crisp, graphic edge. Cut the upper dome first, then the lower, confirming the horizontal band is at least a half-inch wide before making any final adjustments.

No ratings yet · Sign in to rate

Comments (0)

  • No comments yet — be the first.

Save without an account. Sign in to like or comment.

Our tips for carving a similar design

This medium build cuts the upper and lower dome apertures while retaining the full center dividing band and circular button as connected rind elements, giving the design its classic Pokeball look without any floating pieces. Shallow back-carved grooves along the band edges sharpen the graphic boundary. Cutting the upper dome first, then confirming the band is at least a half-inch wide before cutting the lower dome, prevents the band from becoming dangerously thin.

From pumpkin to porch

  1. Hollow and prepare walls

    Cut a back panel, remove all pulp, and thin the carving face walls to three-quarters of an inch. The band and button must stay connected across the full dome openings, so consistent wall thickness prevents uneven stress on the retained sections.

  2. Pre-mark the band midpoint

    Draw a horizontal guideline at the vertical center of the carving face. Double-check that the line runs parallel to a flat tabletop by holding a ruler against the pumpkin while marking. This reference ensures both dome cuts are symmetrical.

  3. Transfer the full pattern

    Tape the printed pattern aligned to the midpoint line and trace all shapes including the band perimeter and button circle using a pin tool. Re-draw bridge positions with a pen after removing the paper.

  4. Cut the upper dome

    Using a thin carving saw, cut the full upper dome opening. Adults handle all cutting. Leave the saw running parallel to the top band edge rather than angling toward it. Remove the cut piece and measure the visible band width to confirm it is at least a half-inch before proceeding.

  5. Cut the lower dome

    Cut the lower dome opening, staying clear of the band bottom edge and the button circle at all times. Work around the button circle with patient short strokes, leaving a consistent margin of rind between the saw blade and the circle boundary.

  6. Back-carve and light

    Score shallow grooves along the band top and bottom edges for a crisp finish, using a V-gouge or fine Dremel bit. Insert a battery-powered LED. The retained band and button will read as a bold dark graphic silhouette between the two glowing dome apertures.

Written with AI to match this design

Gather your supplies

Check things off as you get ready.

Work on a stable surface, keep your free hand out of the cutting path, and have an adult handle sharp tools.

Three levels of light

  • Leave intact

    Retained center band and button circle stay completely dark, forming the graphic dividing line of the Pokeball design

  • Peel & shade

    Shallow grooves along the band edges produce a fine mid-tone line that sharpens the visual boundary

  • Cut through

    Both dome apertures are fully cut through for maximum light output

Learn the carving basics

Before you start cutting

What is the minimum safe width for the retained center band?

A half-inch is the practical minimum across most of the band. The button area can be slightly narrower at the circle perimeter as long as the band is full-width on either side of it. If your pattern places the band narrower than a half-inch anywhere, scale the whole design up on the print rather than trying to carve a very thin retained element.

How do I cut neatly around the button circle without nicking it?

Approach the button circle from the outer edge of the dome, cutting tangentially along the circle's curve rather than driving the blade straight at it. Use the shortest saw blade available for this section. Short, patting strokes work better here than long pull-strokes because they give you more control over blade direction near the curved edge.

Can I add color to differentiate the top and bottom halves visually?

Painting the upper dome interior red and the lower dome interior white from inside the pumpkin before inserting the light creates a two-tone glow that matches the real Pokeball colors. Use craft acrylic and apply two coats; let each dry fully. The paint is thin enough to tint the light without blocking it completely.

Your take belongs here, too.

Changed a detail? Made it simpler? Share a photo of your version and tell the community what worked.

Share your pumpkin

More pumpkins like this

You've reached the end · 8 pumpkins
The Patch Report

Fresh pumpkins, in your inbox.

The best new carvings, ideas worth stealing, and how-tos for carving season. Short, seasonal, and gone by November.

A short email during carving season. Unsubscribe anytime. See our privacy policy.