Halloween Pumpkin Carving Contest · Starts October 1st · $500 in prizes
← Back to ideas
@ai_concepts
Sep 25, 2026
V-Brow Angry Pumpkin Face With White Block TeethAI
0

Report this carving

Tell us what is wrong. Reports are private.

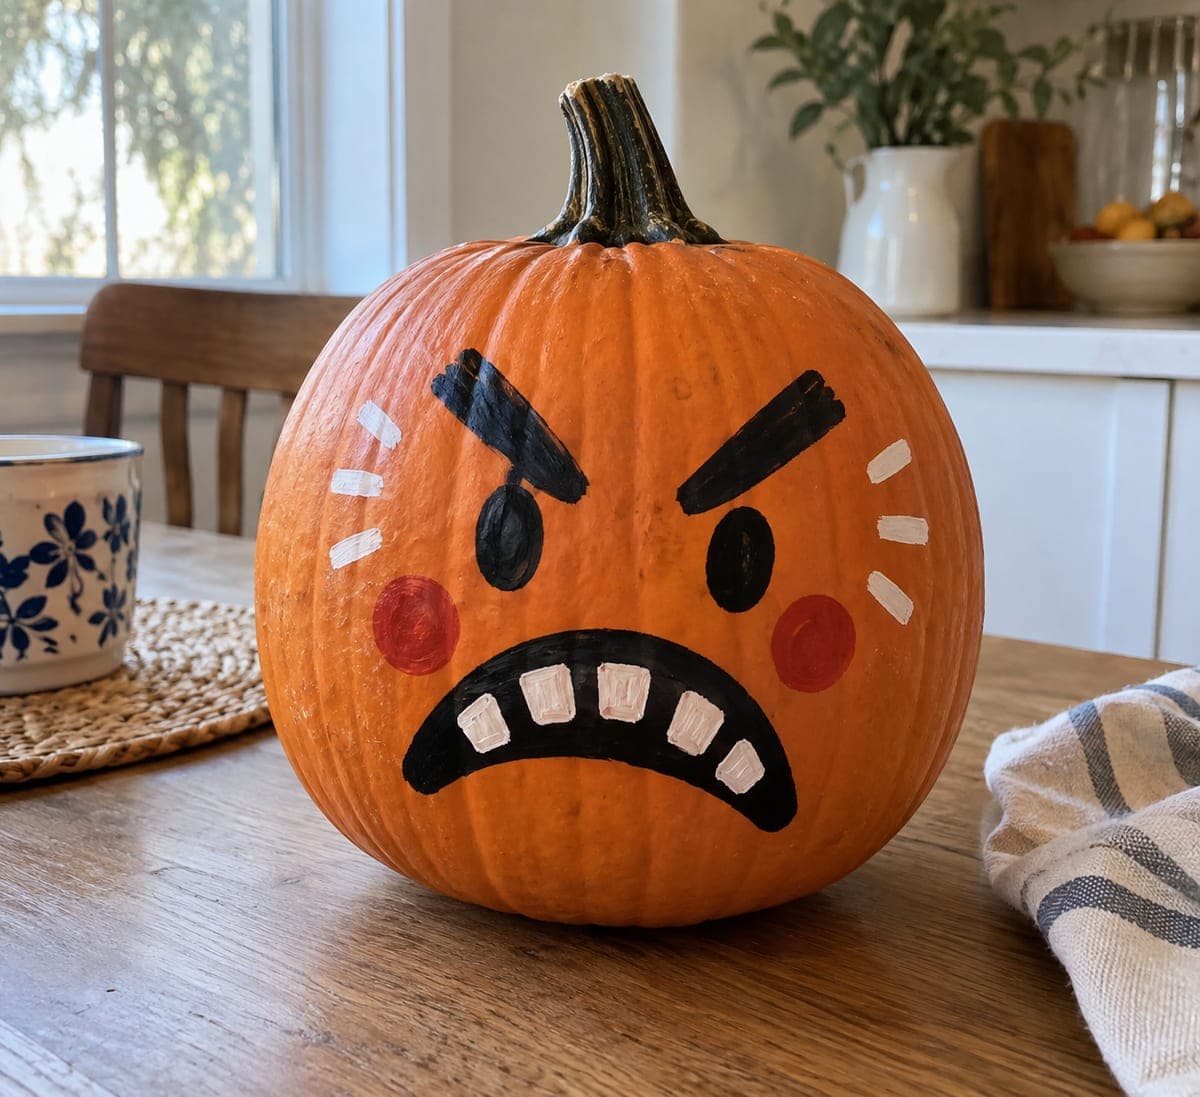
V-Brow Angry Pumpkin Face With White Block Teeth

Two thick black V-shaped brows, small black oval eyes, a broad downturned mouth, six white blocky painted teeth, and two red cheek circles make this no-carve angry pumpkin face the fastest route to cartoon fury on any doorstep. Paint the V-brows first using a wide flat brush angled inward, since they set the entire expression. The downturned mouth follows naturally below, and the white teeth can be blocked in with a small palette knife or the edge of a foam brush. Red cheeks push it into exaggerated cartoon territory that reads perfectly from the street.

No ratings yet · Sign in to rate
Comments (0)

  • No comments yet — be the first.

Save without an account. Sign in to like or comment.

Our tips for carving a similar design

V-shaped brows painted first with a wide flat brush set the entire expression before a single tooth is added. The downturned mouth and six blocky white teeth follow naturally below them. Red cheeks in the final step push the design from menacing into exaggerated cartoon anger that reads clearly from across the street.

From pumpkin to porch

  1. Clean and dry

    Wipe the pumpkin with a damp cloth and let it dry for at least 10 minutes. A clean surface helps acrylic paint bond and prevents peeling.

  2. Sketch the layout

    Use chalk or a soft pencil to lightly mark the V-brow positions, oval eye centers, and the downturned mouth arc. Place the brows high on the upper face so there is clear space for the eyes below them.

  3. Paint the V-brows

    Load a wide flat brush with black acrylic and paint each V-brow in two angled strokes meeting at the inner corner. Both inner corners should point sharply downward and inward. Let these dry for a few minutes before moving to the eyes.

  4. Paint the eyes and mouth

    Fill the small oval eyes with black, keeping them relatively small compared to the brows so the brows dominate the expression. Then paint the broad downturned mouth with a medium flat brush, following the arc you sketched.

  5. Add white block teeth

    Use the flat edge of a foam wedge or a small palette knife loaded with off-white or cream paint to block in six rectangular teeth inside the mouth opening. Two coats give solid coverage. Add a thin black outline around the teeth for separation if needed.

  6. Add red cheeks and seal

    Dab two red circles onto the cheeks with a round sponge or a folded paper towel. Once everything is dry, apply a clear matte sealer to protect the paint outdoors.

Written with AI to match this design

Gather your supplies

Check things off as you get ready.

Work on a stable surface, keep your free hand out of the cutting path, and have an adult handle sharp tools.

Three levels of light

  • Leave intact

    The orange rind forms the background and the areas between painted shapes.

  • Peel & shade

    None. The shell stays intact.

  • Cut through

    None. Illuminate with an outdoor spotlight or nearby porch light.

Learn the carving basics

Before you start cutting

How do I get the two V-brows perfectly symmetrical?

Lightly mark the center line of the pumpkin with chalk and measure the inner tip of each V to the same distance from that center line. Painting the V in two strokes, one per diagonal arm, rather than one connected stroke, gives you more control over each angle independently.

The white teeth look yellowish against the orange pumpkin. How do I make them pop?

Apply a thin layer of white gesso or white primer inside the mouth area first and let it dry, then paint the teeth with cream over that base. The neutral white underlayer eliminates orange bleed-through and keeps the tooth color crisp.

Can I use spray paint instead of brush-applied acrylic?

Spray paint works for the large black mouth and brow shapes if you mask the surrounding areas carefully. Fine detail like tooth edges and the round eyes is much harder to control with spray, so brush finishing is still recommended for those elements.

Your take belongs here, too.

Changed a detail? Made it simpler? Share a photo of your version and tell the community what worked.

Share your pumpkin

More pumpkins like this

You've reached the end · 8 pumpkins
The Patch Report

Fresh pumpkins, in your inbox.

The best new carvings, ideas worth stealing, and how-tos for carving season. Short, seasonal, and gone by November.

A short email during carving season. Unsubscribe anytime. See our privacy policy.