Halloween Pumpkin Carving Contest · Starts October 1st · $500 in prizes
← Back to ideas
@ai_concepts
Sep 25, 2026
Zigzag Fang Painted Pumpkin With Angled EyesAI
0

Report this carving

Tell us what is wrong. Reports are private.

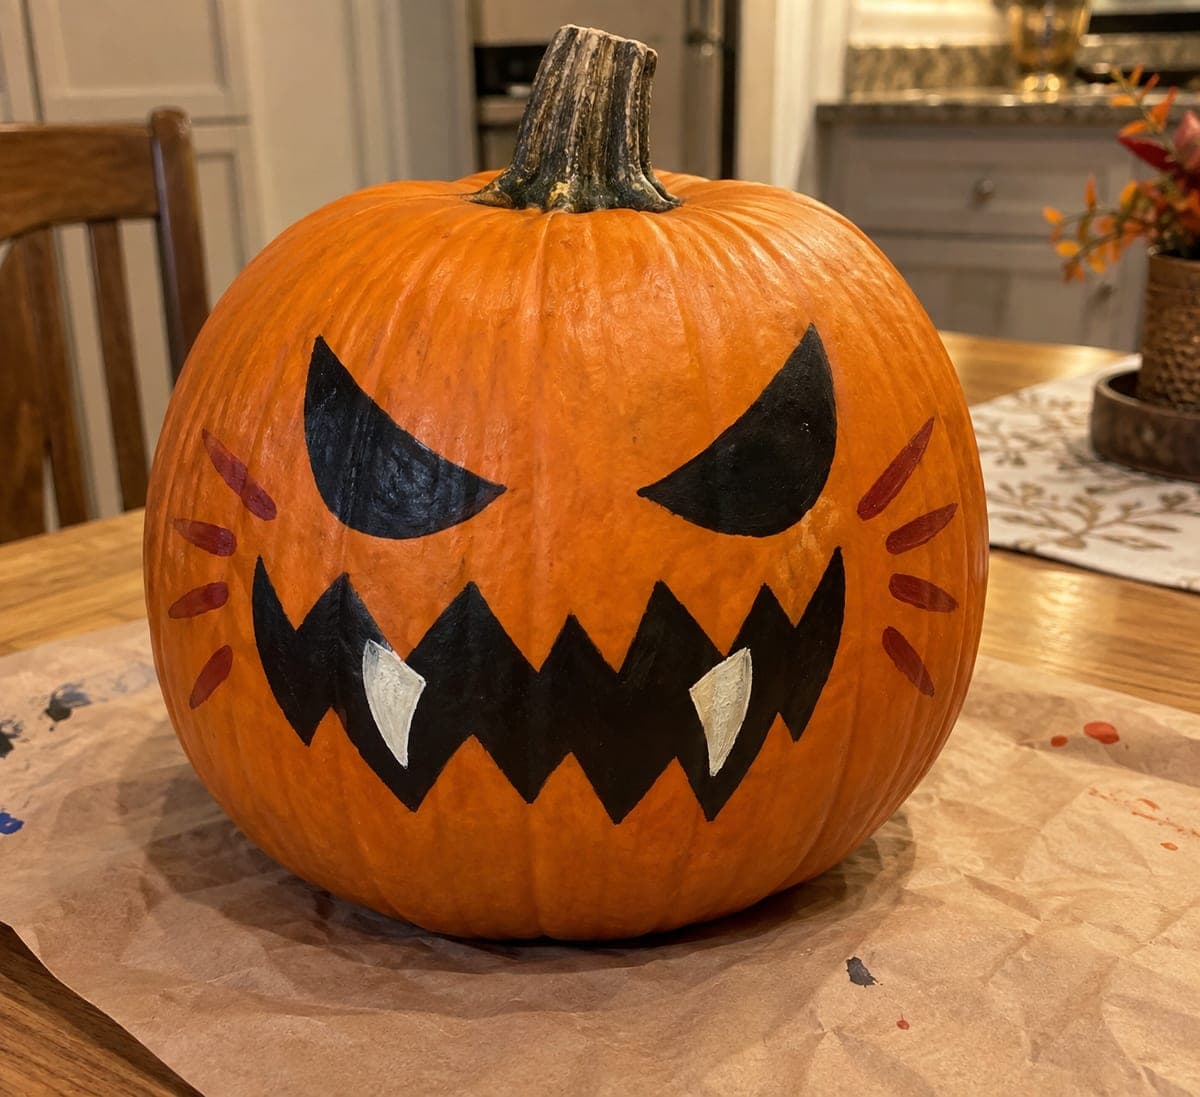
Zigzag Fang Painted Pumpkin With Angled Eyes

Sharply slanted painted eye shapes, a wide zigzag mouth, two cream fangs, and six dark-red angled strokes above the eyes make this no-carve evil pumpkin face one of the easiest ways to achieve a menacing look without a single cut. Use a small filbert brush for the zigzag mouth to keep the points crisp, and add the dark-red brow strokes last as bold angular slashes. The three-color palette of black, cream, and dark red keeps the design bold and readable from across a yard.

No ratings yet · Sign in to rate
Comments (0)

  • No comments yet — be the first.

Save without an account. Sign in to like or comment.

Our tips for carving a similar design

Three flat colors, black, cream, and dark red, do all the work here. The slanted black eye shapes and wide zigzag mouth establish the menace, and the six dark-red brow strokes push the expression into genuine threat. A small filbert brush keeps the zigzag points crisp without any special template.

From pumpkin to porch

  1. Clean and dry

    Wipe the pumpkin surface with a damp cloth to remove dirt, then dry completely. A clean, dry surface helps acrylic paint adhere without peeling. Let it sit at least 10 minutes before starting.

  2. Sketch the design

    Use a soft pencil or chalk to lightly sketch the two slanted eye shapes and the wide zigzag mouth. Keep the eyes narrow and angled steeply inward. Make the mouth span at least a third of the pumpkin's width for maximum impact.

  3. Paint the eyes and mouth

    Fill both eye shapes with black acrylic using a flat brush. Let the eyes dry for a few minutes, then paint the zigzag mouth, using a small filbert brush for the pointed tips of each zigzag. Two coats of black ensure solid coverage over orange rind.

  4. Add the cream fangs

    Once the mouth outline is dry, fill in the two downward fang shapes with cream or off-white acrylic. Use the tip of a round brush to keep the fang edges clean. A thin black outline around each fang adds definition if the cream blends into the orange.

  5. Add dark-red brow strokes

    Load a flat brush with dark red and paint six bold angular slashes above the eyes, three per side. Angle all six strokes in the same inward direction. These go on last so you can position them relative to the finished eye shapes.

  6. Seal and display

    Once fully dry, apply a light coat of clear matte acrylic sealer to protect the paint from dew and handling. Display in a spot with ambient light from a porch lamp or spotlight so the three-color design reads clearly after dark.

Written with AI to match this design

Gather your supplies

Check things off as you get ready.

Work on a stable surface, keep your free hand out of the cutting path, and have an adult handle sharp tools.

Three levels of light

  • Leave intact

    The bare orange rind forms the background and the space between painted elements.

  • Peel & shade

    None. The shell stays fully intact.

  • Cut through

    None. Use an outdoor spotlight or porch light to illuminate the painted design from outside.

Learn the carving basics

Before you start cutting

How do I keep the zigzag points sharp instead of rounded?

A small filbert or liner brush loaded with a moderate amount of paint gives the cleanest points. Pull toward the tip of each zigzag rather than trying to paint the entire row in one stroke. Touch up any ragged points with a fine detail brush after the first coat dries.

The acrylic is peeling off the rind after a day outside. What should I do?

Pumpkin rind has natural moisture that works against adhesion. Apply a thin coat of gesso or white primer first and let it dry before painting. A sealer coat after the design is complete also locks the paint against humidity and handling.

Can I do this design on a white pumpkin for a different look?

Yes. On a white pumpkin the black and cream read with higher contrast and the dark-red strokes look almost blood-like, which heightens the menace. No changes to the painting process are needed.

Your take belongs here, too.

Changed a detail? Made it simpler? Share a photo of your version and tell the community what worked.

Share your pumpkin

More pumpkins like this

You've reached the end · 8 pumpkins
The Patch Report

Fresh pumpkins, in your inbox.

The best new carvings, ideas worth stealing, and how-tos for carving season. Short, seasonal, and gone by November.

A short email during carving season. Unsubscribe anytime. See our privacy policy.