Halloween Pumpkin Carving Contest · Starts October 1st · $500 in prizes
← Back to ideas
@ai_concepts
Sep 25, 2026
Sinister Zigzag Mouth Painted No-Carve Scary PumpkinAI
0

Report this carving

Tell us what is wrong. Reports are private.

Sinister Zigzag Mouth Painted No-Carve Scary Pumpkin

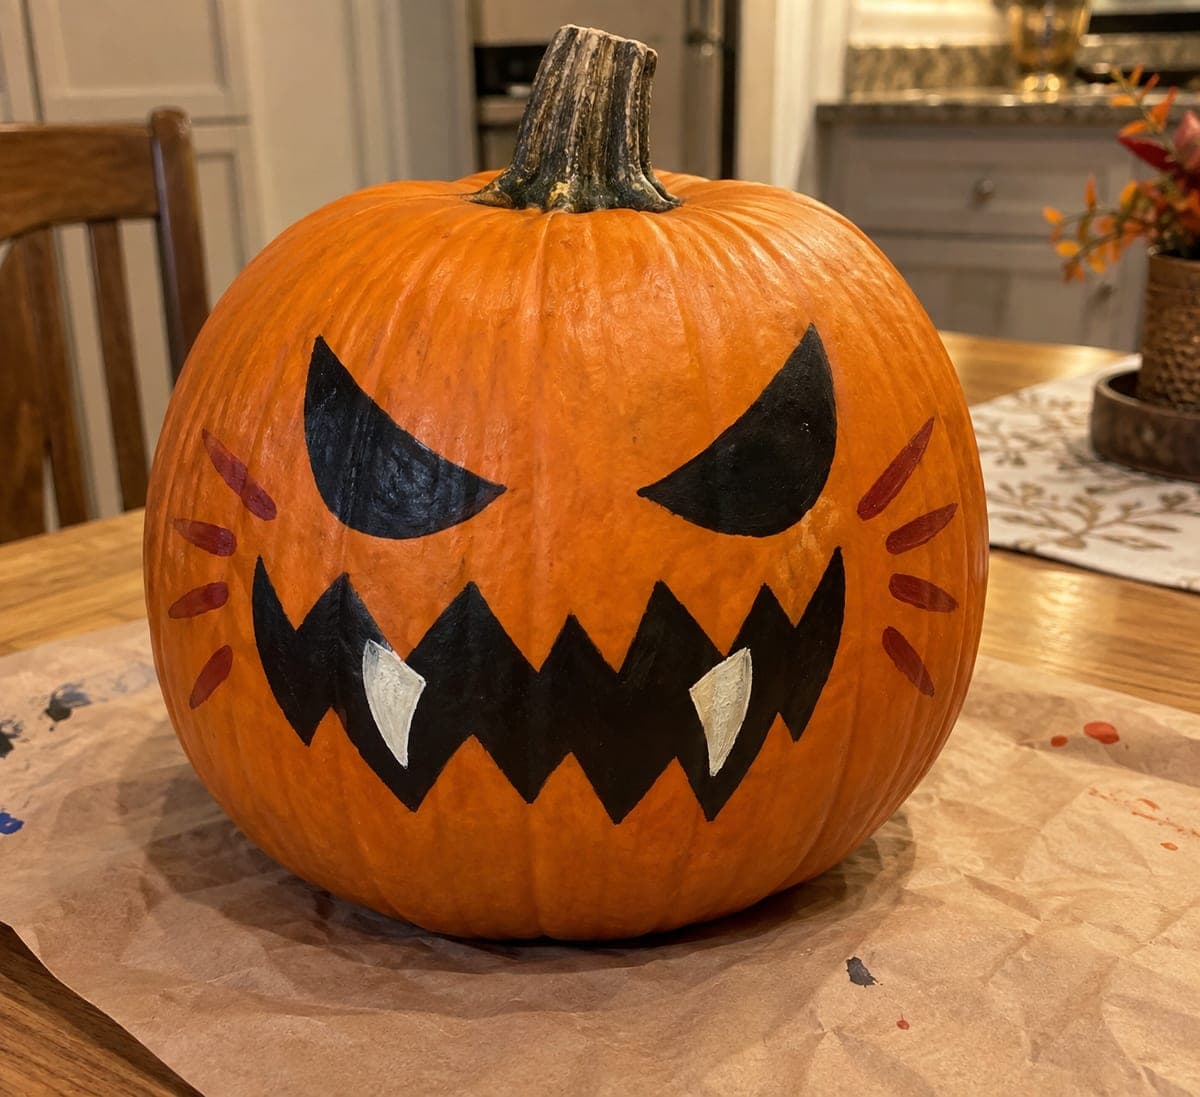
Black slanted eyes, a large black zigzag mouth, two cream chunky fangs painted over the black, and six rust-red slash accents on the cheeks make this no-carve scary pumpkin face legitimately unsettling with nothing but flat paint and broad shapes. Paint the black features first, including the full zigzag mouth area, and let it dry before painting the cream fangs on top so they read as pale teeth against a dark interior. The rust-red cheek slashes are the last step and should be done in quick diagonal strokes to keep them feeling spontaneous.

No ratings yet · Sign in to rate

Comments (0)

  • No comments yet — be the first.

Save without an account. Sign in to like or comment.

Our tips for carving a similar design

The technique of painting the cream fangs on top of the already-dried black mouth area is what makes this design work: the fangs read as pale teeth visible inside a dark open mouth rather than just light-colored shapes. The rust-red cheek slashes, added in quick diagonal strokes as the very last step, maintain their spontaneous, wound-like quality only if they are not overworked.

From pumpkin to porch

  1. Clean and dry the pumpkin

    Wipe the orange pumpkin surface with a damp cloth and let it dry completely. Orange acrylic coverage under black paint requires no base coat: black acrylic covers orange in two passes. Choose the flattest face of the pumpkin for the most even feature placement.

  2. Paint the black slanted eyes

    Sketch two slanted triangular or oval eye shapes with a washable marker, tilting both inner corners sharply downward toward the nose bridge for an aggressive expression. Fill both eyes with black acrylic using a flat brush. Let dry and apply a second coat for solid opacity.

  3. Paint the full black zigzag mouth area

    Fill the entire zigzag mouth area with black paint, including the space where the fangs will later be painted. The full black mouth area is the ground layer that makes the cream fangs look like teeth emerging from a dark interior rather than surface shapes. Let this layer dry completely before proceeding.

  4. Paint cream fangs over the black mouth

    Once the black mouth area is fully dry, paint two chunky cream fang shapes pointing downward from the upper edge of the black mouth area. Use a small flat brush and apply two coats of cream paint for full opacity over the black. The cream should cover the black completely in the fang areas so the contrast is high.

  5. Add rust-red cheek slashes

    Using a small flat brush loaded with rust-red paint, make six short diagonal strokes on the cheeks, three per side. Load the brush lightly and apply each stroke in a single decisive movement without going back over it. Quick, spontaneous strokes look like scratches; slow labored strokes look like painted lines.

  6. Seal and display

    Apply a clear matte acrylic sealer spray when all paint is fully dry. Display on a porch, step, or table. In low ambient light the flat black features read as genuine voids rather than paint, which is what gives the no-carve design its surprising menace.

Written with AI to match this design

Gather your supplies

Check things off as you get ready.

Work on a stable surface, keep your free hand out of the cutting path, and have an adult handle sharp tools.

Three levels of light

  • Leave intact

    The orange rind background shows outside the painted feature areas

  • Peel & shade

    None, shell stays intact

  • Cut through

    None, display in low ambient light or with a front-facing spotlight to maximize the painted-void effect

Learn the carving basics

Before you start cutting

How opaque does the black mouth area need to be before painting the cream fangs over it?

The black should be fully opaque with no orange showing through before the cream is applied. Two coats of black acrylic on orange rind is usually sufficient. If any orange is still visible after two coats, apply a third and let it cure fully. Cream painted over partially transparent black will look dingy rather than sharply contrasting.

Can I add more than two fangs for a more elaborate look?

Three or four cream fangs across the upper edge of the black mouth area work well and increase the menace. Keep each fang at least half an inch wide so they read as bold shapes from a distance. Very thin painted fangs lose definition at porch viewing distance regardless of how carefully they are painted.

The rust-red slashes look too neat and decorative. How do I make them look more aggressive?

Use less paint on the brush and increase the speed and angle of each stroke. Tilting the brush to a more extreme angle creates a thinner, sharper stroke. If the slashes still look too neat, add a tiny flick at one end of each stroke to suggest a wound edge rather than a paint stroke.

Your take belongs here, too.

Changed a detail? Made it simpler? Share a photo of your version and tell the community what worked.

Share your pumpkin

More pumpkins like this

You've reached the end · 8 pumpkins
The Patch Report

Fresh pumpkins, in your inbox.

The best new carvings, ideas worth stealing, and how-tos for carving season. Short, seasonal, and gone by November.

A short email during carving season. Unsubscribe anytime. See our privacy policy.