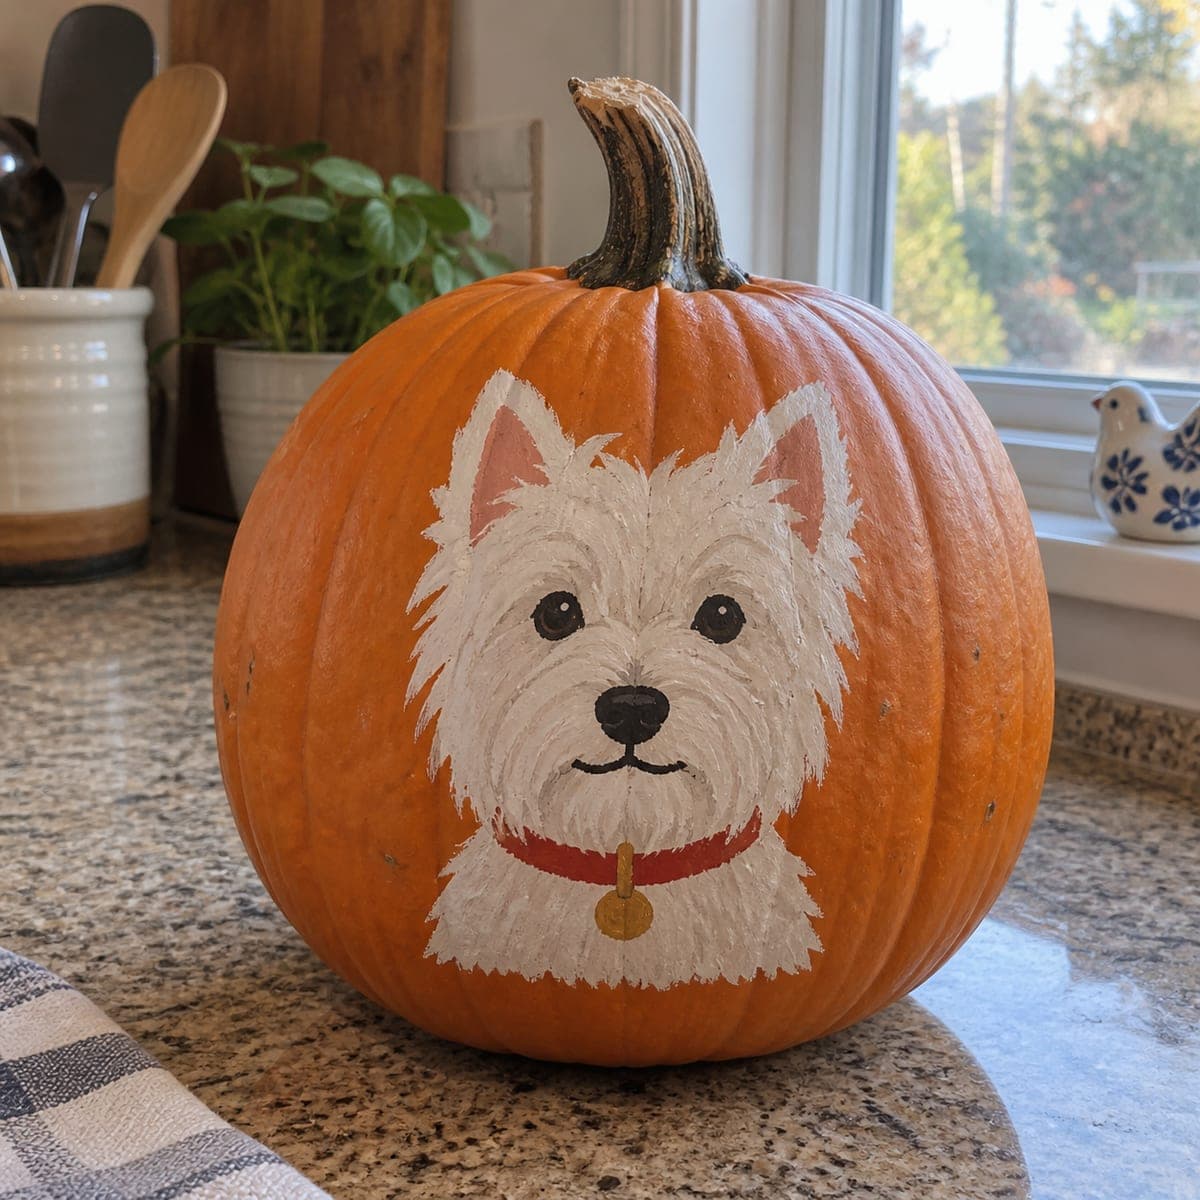
A fluffy white Westie with a red collar and gold tag smiles from the front of this no-carve pumpkin portrait. The shaggy coat is built from short overlapping strokes of white and soft gray, so work from the outline inward and save the black eyes, nose, and mouth for the very end. It is a thoughtful way to feature the family dog in your fall decor, and it keeps for weeks indoors.
This is an AI-generated concept image: a realistic, carvable design idea rather than a photo of a finished carve. AI concepts are always labeled and sit out the leaderboard and the contest.
The core trick here is building a fluffy white coat from many short overlapping brush strokes rather than one flat shape, which is what gives the fur its shaggy, layered look. Because this is a no-carve design, you paint the whole face on the front of an uncut pumpkin, working from the outer outline inward. Save the darkest details, the eyes, nose, and mouth, for the very end so nothing smudges.
Written by PumpkinCarvingIdeas.com, inspired by the image above. These are our suggestions, not instructions from the uploader. This approach to the AI concept has not been tested on a real pumpkin.
From pumpkin to porch
1
Prep and sketch the face
Wipe the pumpkin front with a damp cloth and let it dry fully so paint grips the skin. Pick the smoothest, flattest panel facing you for the portrait. With a pencil or washable marker, lightly sketch the overall head shape, the two pointed ears, and rough placement of eyes, nose, and collar. Keep lines faint since they will be covered by paint.
2
Block in the base coat
Using acrylic craft paint, fill the whole head shape with a soft off-white or light gray base. This first layer can look flat and patchy, it is just a foundation. Let it dry, then add a second coat if the orange still shows through. Leave the collar area unpainted for now.
3
Build the shaggy fur
Load a small flat or filbert brush with white and paint short, quick strokes that all point outward from the center of the face. Work from the outer edge of the coat inward, letting the tips break into a jagged fringe like real Westie fur. Mix in a little soft gray in the shadow areas under the chin and around the muzzle for depth. Layer light over dark until the coat looks full and dimensional.
4
Add the collar and tag
Paint the red collar as a clean band across the lower neck, then let it dry. Add the small gold tag hanging below it with a dot of metallic or yellow paint. A thin darker red line along the bottom edge of the collar gives it a little roundness. Keep these shapes crisp so they stand out against the white fur.
5
Paint the eyes, nose, and mouth last
With a fine detail brush and black paint, add the two round eyes, the triangular nose, and the simple curved mouth. Let each feature dry before adding the next so they stay sharp. Finish the eyes with a tiny white highlight dot to bring them to life. Add a touch of soft pink inside the ears to warm up the face.
6
Seal and stage your photo
Once everything is fully dry, brush on a coat of clear matte sealer to protect the paint and help it keep for weeks indoors. Set the pumpkin on a windowsill or shelf where daylight shows off the fur texture. If you want a glow nearby, place a battery LED beside it rather than inside, since this design is not cut open. Snap your photo in soft natural light for the best detail.
Gather your supplies
Check things off as you get ready.
Work on a stable surface, keep your free hand out of the cutting path, and have an adult handle sharp tools.
Three levels of light
Leave intact
The bare orange pumpkin skin around the portrait stays untouched as the natural background.
Peel & shade
Since nothing is carved, the painted white and gray coat plays the role of the mid tone, catching soft daylight.
Cut through
No cutouts on this no-carve design, so an external LED can add a bright accent beside the pumpkin instead.
No, this is a fully no-carve painted design, so the pumpkin stays whole. That actually helps it last longer since there is no exposed flesh to rot. If you want light, set a battery LED next to it rather than carving a hole.
How do I keep the fur from looking like a flat white blob?
Use many short, separate strokes instead of one smooth fill, and always point them outward from the center of the face. Mixing a little soft gray into the shadowed areas under the chin and muzzle adds depth. Layering lighter white on top of the gray at the end gives that fluffy, dimensional look.
What paint holds up best on a pumpkin?
Standard acrylic craft paint sticks well to clean, dry pumpkin skin and dries fairly quickly between layers. Wipe the surface first so no dust or wax blocks adhesion. A clear matte sealer at the end protects your work and keeps colors from smearing.
Your take belongs here, too.
Changed a detail? Made it simpler? Share a photo of your version and tell the community what worked.
 AI
AI






Comments (0)