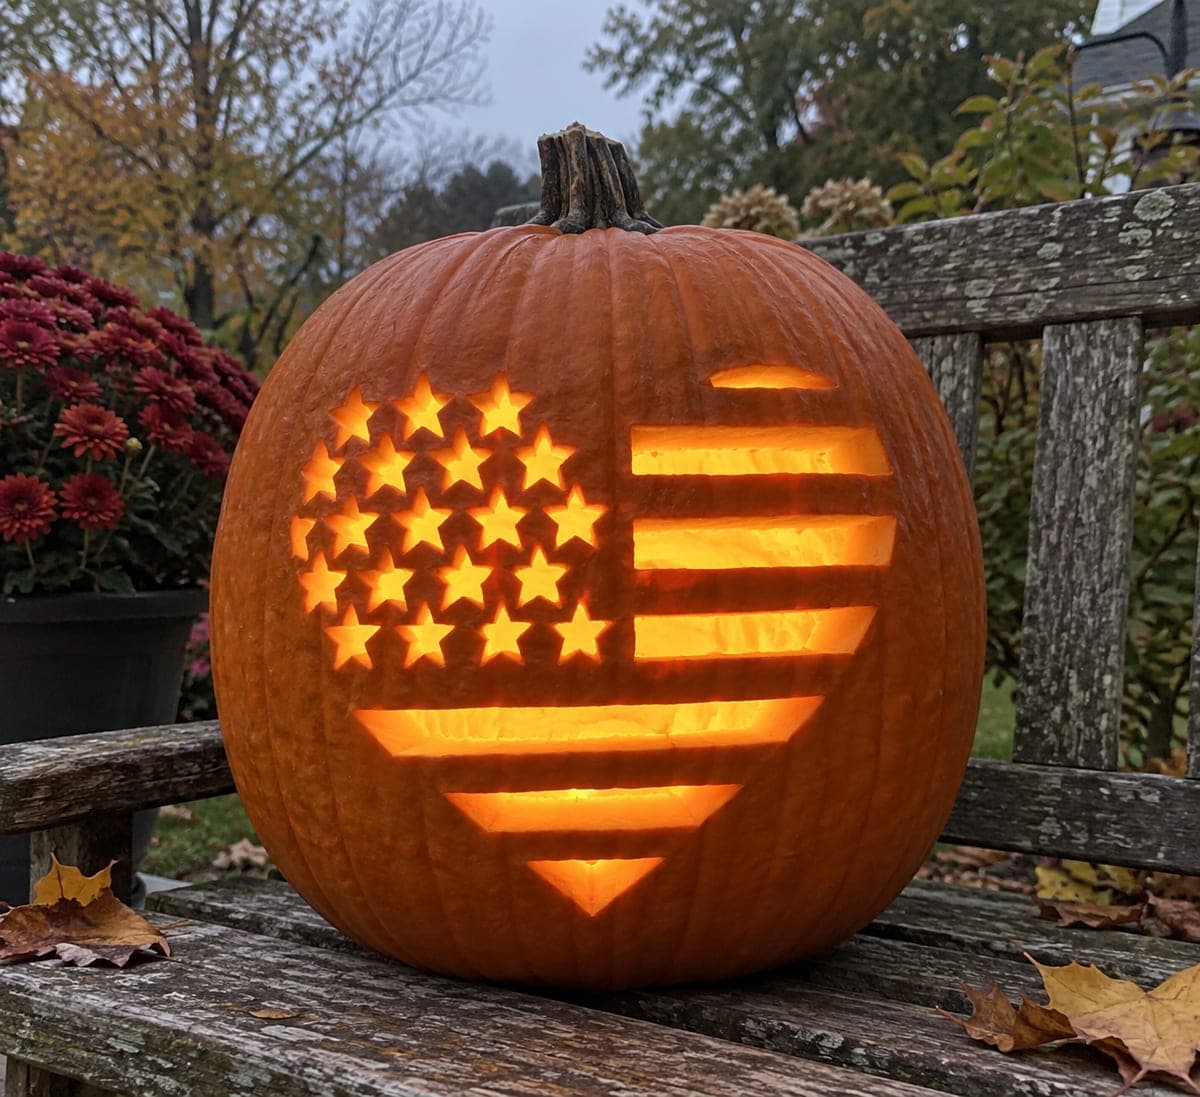
An American flag fills a large heart-shaped outline on this pumpkin carving idea, with a grid of glowing stars cut into the upper-left canton and horizontal stripes running across the rest of the heart to a downward point at the base. The cutout technique pierces both the star shapes and the stripe sections so the finished jack-o-lantern glows with a patriotic pattern of stars and bars inside the heart silhouette. Cut all the stars before removing the stripe sections, since the wall is strongest when the larger stripe openings are still intact and can brace the saw as you work the small star points.
This is an AI-generated concept image: a realistic, carvable design idea rather than a photo of a finished carve. AI concepts are always labeled and sit out the leaderboard and the contest.
The core trick here is packing two flag elements, a grid of small stars and a set of horizontal stripes, inside a single heart outline made entirely of full cutouts. The plan is to transfer a clean stencil, cut every tiny star while the shell is still solid, then open the wider stripe bars, and finish by carving the heart's pointed base. Because this is a full pierce-through design, the untouched skin between shapes does all the structural work, so leave generous spacing.
Written by PumpkinCarvingIdeas.com, inspired by the image above. These are our suggestions, not instructions from the uploader. This approach to the AI concept has not been tested on a real pumpkin.
From pumpkin to porch
1
Pick and prep the pumpkin
Choose a large, round pumpkin with a broad, smooth face so the heart and flag have room to read clearly. Cut a lid from the bottom or the back rather than the top, which keeps the front face uninterrupted and makes it easy to set over an LED light. Scrape the inside wall on the carving side down to about one inch thick so your saw moves smoothly. A thinner, even wall makes the small star points far easier to control.
2
Transfer the heart and flag layout
Print a stencil that fits a star canton in the upper left and stripes filling the rest of a heart shape. Tape it snugly, then poke the outlines with a pushpin or transfer with a dull pencil so you have a dotted guide. Double check that the stripes stay level and the stars sit in even rows before you cut anything. Keep solid skin between every star and between each stripe so the wall stays strong.
3
Cut all the stars first
Using a fine detail saw, cut each small star in the canton before you touch the stripes. Work slowly from the center of each star outward, letting the saw find the points rather than forcing it. Keeping the larger stripe sections intact right now braces the surrounding wall so it does not flex while you carve the delicate points. Adults should handle the saw, and take breaks so your hand stays steady on the tiny cuts.
4
Open the stripe bars
Once the stars are done, cut out the horizontal stripe sections one at a time, leaving even bands of skin between them. Support each strip with your free hand as it releases so it does not tear the neighbors. Work from the top of the heart downward so the finished bars help you keep the rest of the layout aligned. Clean the edges with a gentle pass of the saw for crisp light lines.
5
Carve the heart point last
Finish by cutting the narrow lower stripes that taper toward the downward point of the heart. This is the largest concentration of open cutouts, so save it for last when nothing else needs bracing. Trim the very tip carefully, since the little triangle at the bottom is fragile and easy to snap. Round any rough inside edges so light spreads evenly.
6
Light it and photograph
Set a bright battery LED inside, warm white or amber, and settle the pumpkin over it through your back or bottom opening. Shoot at dusk so the stars and stripes glow against the dark skin, just like a porch or bench setting. Add a second small light if the lower point looks dim. Mist the cut edges with water and keep it cool between showings to slow drying.
Gather your supplies
Check things off as you get ready.
Work on a stable surface, keep your free hand out of the cutting path, and have an adult handle sharp tools.
Three levels of light
Leave intact
The whole outer pumpkin face and the skin borders around the heart stay untouched and dark, framing the design.
Peel & shade
Optional: shave a thin line along the heart's outer edge to add a soft dim outline without piercing the wall.
Cut through
The stars in the canton and every stripe bar are cut fully through, so they carry the brightest patriotic glow.
Should I really cut every star before the stripes?
Yes. The wide stripe openings remove a lot of material, so leaving them intact keeps the wall rigid while you carve the tiny star points. Once the delicate stars are finished, you can open the stripes without risking cracks. Working in that order is the single biggest thing that keeps this design from tearing.
How do I keep the small stars from breaking?
Use a sharp fine-detail saw and let it do the work with light pressure instead of pushing. Keep solid skin between each star so none of them share a thin wall. Thinning the pumpkin wall to about an inch also gives you cleaner, easier cuts on the points.
This is a concept image, so can a real pumpkin hold all these cutouts?
It can, as long as you space the shapes out and keep bridges of skin between them. Avoid crowding stars or stripes so close that the walls between them get paper thin. Choose a big pumpkin, keep the wall even, and open the largest sections last for the most stable result.
Your take belongs here, too.
Changed a detail? Made it simpler? Share a photo of your version and tell the community what worked.
 AI
AI





Comments (0)