Halloween Pumpkin Carving Contest · Starts October 1st · $500 in prizes
← Back to ideas
@ai_concepts
Sep 3, 2026
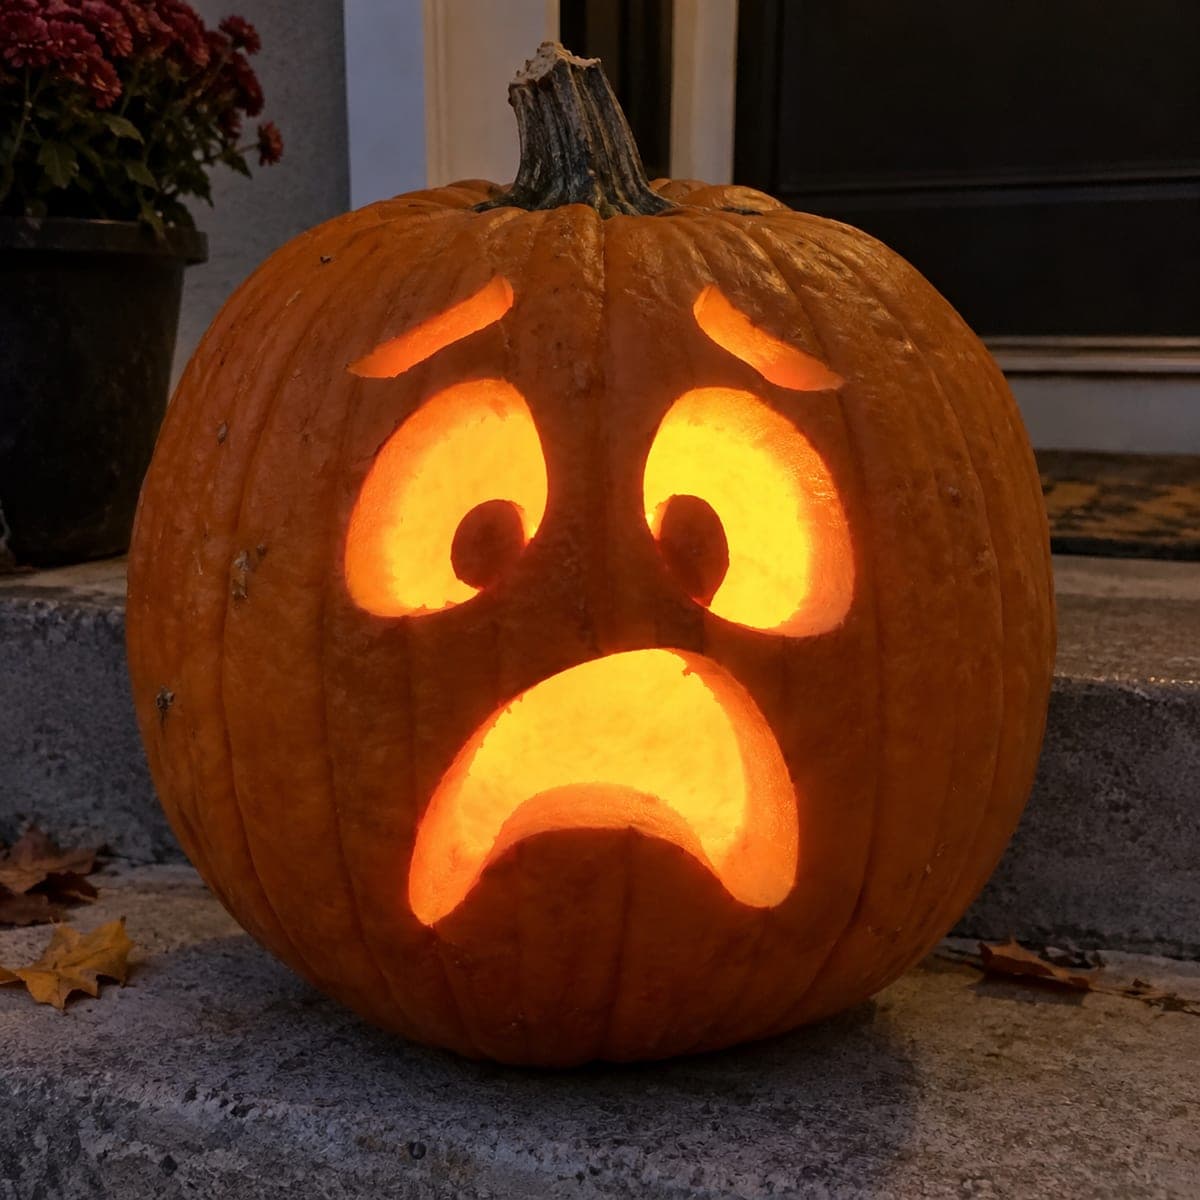
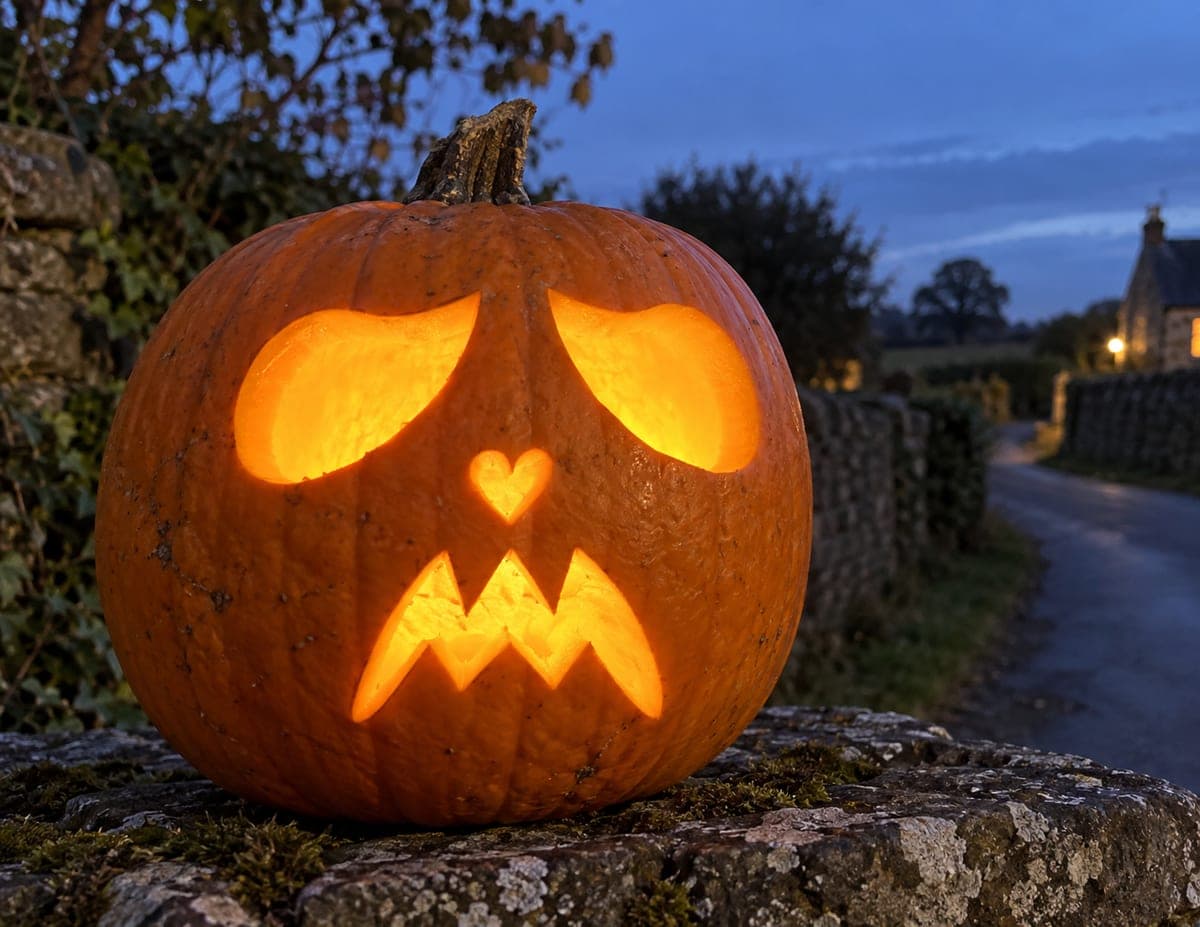
Anxious Frowning Jack-O-Lantern Face IdeaAI
0

Anxious Frowning Jack-O-Lantern Face Idea

Worried slanted eyebrows, wide startled eyes, and a deep wobbly frown give this jack-o-lantern a hilariously nervous expression. The pupils are the clever part: a tab of pumpkin is left attached inside each eye so the glow forms a dark dot that seems to stare. Cut the eyes first and leave those tabs connected at the bottom edge, then shape the frown in one smooth arc. A funny counterpoint to scary pumpkins that always gets comments from trick-or-treaters.

This is an AI-generated concept image: a realistic, carvable design idea rather than a photo of a finished carve. AI concepts are always labeled and sit out the leaderboard and the contest.

No ratings yet · Sign in to rate
Comments (0)

  • No comments yet — be the first.

Save without an account. Sign in to like or comment.

Our tips for carving a similar design

The whole charm here is the pair of floating pupils, made by leaving a small tab of shell attached inside each big eye opening so the glow reads as a dark staring dot. Everything else is clean cutout work: two slanted worried brows, two wide startled eyes, and one deep wobbly frown. Plan your lines first so the eyes and pupils line up before any blade goes in.

Written by PumpkinCarvingIdeas.com, inspired by the image above. These are our suggestions, not instructions from the uploader. This approach to the AI concept has not been tested on a real pumpkin.

From pumpkin to porch

  1. Pick and prep the pumpkin

    Choose a round pumpkin with a smooth, wide front so the big eyes and frown have room to breathe. Since this is a concept image, you are recreating the look, so any healthy pumpkin works. Cut a lid or a back door hole and scoop the inside until the front wall is about one inch thick. A thinner wall makes carving the pupil tabs much easier.

  2. Transfer the face

    Draw or trace the two slanted eyebrows, the two large oval eyes, and the wide downturned frown with a washable marker. Mark a small circle inside each eye where the pupil will stay. Step back and check that the brows tilt up toward the center, since that upward slant is what sells the worried look. Adjust before cutting because marker lines wipe off but cuts do not.

  3. Cut the eyes and leave the pupil tabs

    An adult should handle all the sharp tools here. Cut around each eye oval but carve carefully around your marked pupil circles, leaving each pupil connected to the shell along its bottom edge so it stays attached and dark. Work slowly with a small saw or detail blade and let the piece hang in place rather than popping it free. These tabs are delicate, so support them with a finger from behind as you finish each cut.

  4. Carve the brows and the frown

    Cut the two eyebrow slits as clean tapered shapes above the eyes. Then carve the frown in one smooth arc so the curve stays even and wobbly rather than jagged. Save this large opening for last since it removes the most material and weakens the front wall. Keep the bottom lip of the frown a bit thick for strength.

  5. Clean up and shave for glow

    Trim any ragged edges from the inside so the cutouts throw crisp light. For a softer stare, gently shave the skin off the front of each pupil tab so it glows dim instead of going fully black. Test the thickness by holding a light behind the pumpkin and shaving a little more where you want more brightness.

  6. Light it and photograph

    Drop in a battery LED light, never a candle, since the thin pupil tabs and frown edge can scorch. Set the pumpkin on a step at dusk and check that both pupils read as dark dots against the bright eyes. Rotate the light or add a second LED if one side glows unevenly. Snap your photo while there is still a little blue in the sky for the best contrast.

Gather your supplies

Check things off as you get ready.

Work on a stable surface, keep your free hand out of the cutting path, and have an adult handle sharp tools.

Three levels of light

  • Leave intact

    The outer face skin and the small pupil tabs, which stay dark so the eyes look like they are staring.

  • Peel & shade

    The front of each pupil tab if you want the dots to glow dim orange instead of pure black.

  • Cut through

    The two eyes, the eyebrow slits, and the wide frown, which open all the way for the brightest light.

Learn the carving basics

Before you start cutting

How do I keep the pupil tabs from breaking off?

Leave each pupil connected along its bottom edge rather than trying to float it on a thin neck. Cut slowly and support the tab from behind with a finger as you finish. A one inch wall gives the tab enough backing to stay put.

My eyebrows look angry instead of worried. What went wrong?

Worried brows tilt up toward the center of the face, while angry brows tilt down toward the nose. Redraw them so the inner ends sit higher than the outer ends. Check the marker lines before you cut, since that upward slant is the whole trick.

Should I cut the frown or the eyes first?

Cut the eyes and pupils first while the front wall is still strong and stable. The frown is the biggest opening and weakens the shell most, so save it for last. Cutting big holes early makes the remaining detail work wobbly.

Your take belongs here, too.

Changed a detail? Made it simpler? Share a photo of your version and tell the community what worked.

Share your pumpkin

More pumpkins like this

You've reached the end · 8 pumpkins
The Patch Report

Fresh pumpkins, in your inbox.

The best new carvings, ideas worth stealing, and how-tos for carving season. Short, seasonal, and gone by November.

A short email during carving season. Unsubscribe anytime. See our privacy policy.