Halloween Pumpkin Carving Contest · Starts October 1st · $500 in prizes
← Back to ideas
@ai_concepts
Jul 13, 2026
Chubby Cheeks Silly Tongue Jack-O-LanternAI
0

Chubby Cheeks Silly Tongue Jack-O-Lantern

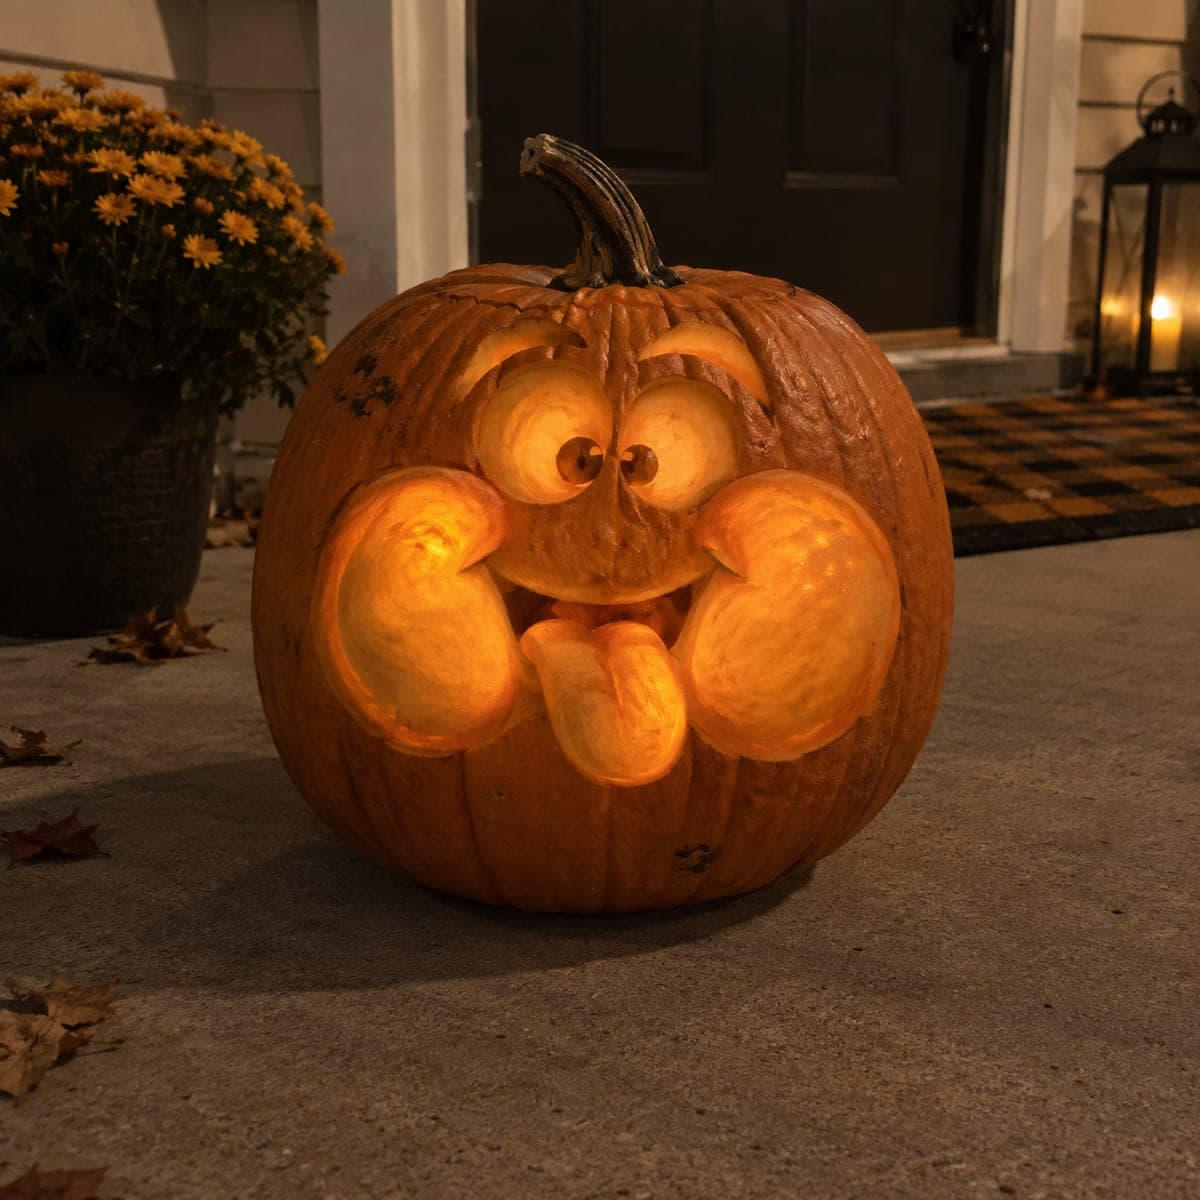
Puffy cheeks, wide bugging eyes, and a flopping tongue make this carved Jack-O-Lantern one of the most expressive funny faces you can put on a porch. The cheeks are carved by scooping the outer skin to create raised rounded shapes that glow from behind, while the eyes and tongue are full cutouts. Scoop the cheek areas first with a large loop tool before carving the face features, so you can judge how much material to remove for the right plump effect.

This is an AI-generated concept image: a realistic, carvable design idea rather than a photo of a finished carve. AI concepts are always labeled and sit out the leaderboard and the contest.

No ratings yet · Sign in to rate

Comments (0)

  • No comments yet — be the first.

Save without an account. Sign in to like or comment.

Our tips for carving a similar design

The core trick here is relief scooping: the plump cheeks are not cut all the way through but shaved down so a thin layer of skin glows soft orange, while the eyes and tongue are true cutouts that shine bright. Plan the face large and centered so the two round cheeks frame a wide mouth, and always scoop the cheeks before opening any full holes so the shell stays strong. Since this is a concept design, treat the steps below as a way to build a similar face on a real pumpkin.

Written by PumpkinCarvingIdeas.com, inspired by the image above. These are our suggestions, not instructions from the uploader. This approach to the AI concept has not been tested on a real pumpkin.

From pumpkin to porch

  1. Pick a round pumpkin and clean it out

    Choose a wide, round pumpkin with a smooth front and no soft spots, since the cheeks need broad flat space. Cut a lid or a bottom opening and scoop the insides until the front wall is about one inch thick. A thinner wall lets the scooped cheeks glow more evenly. Wipe the inside dry so your transfer marks stay put.

  2. Transfer the face layout

    Sketch or tape on your pattern with the two big cheek circles low and wide, the bugging eyes up high and close together, and the tongue drooping below the mouth. Mark which shapes are scoop only and which are full cutouts before you touch a blade. Poke light dots along the outlines with a pin tool so you have a guide even if paper tears. Keep the tongue attached at the top so it reads as flopping down.

  3. Scoop the cheeks for the plump glow

    Using a large loop or ribbon tool, shave the skin off the two cheek circles and the raised eye mounds, working down to a thin translucent layer without punching through. Go slow and hold the pumpkin up to a light now and then to check the glow. Aim for a smooth domed surface so each cheek looks rounded and full. Leave the very outlines slightly deeper so the shapes stand apart from the dark skin around them.

  4. Cut the eye pupils and mouth

    Once the scooping is done, switch to a fine saw and cut the small pupil holes clean through for two bright dots. Cut the mouth as a wide curved opening, but leave a bridge or two if it spans a long distance so the front does not sag. Cut these interior openings before the tongue so the shell keeps its shape. Ease the blade in and out gently to avoid cracking the thin cheek walls.

  5. Free the tongue and clean the edges

    Cut around the tongue shape last, leaving it joined at the top edge so it hangs down into the mouth opening. Bevel the cut edges slightly outward so more light escapes and the shapes read from the sidewalk. Trim any ragged bits with a small detail knife. Rinse away pulp dust and pat the front dry.

  6. Light it and photograph

    Set a battery LED puck or a string of LEDs inside, never a candle, and aim the brightest light toward the cheeks and tongue. Test in a dark room and rotate the light until the scooped cheeks glow warm and the cutouts pop. Rub the raw edges with a little petroleum jelly to slow drying. Place it on the porch at eye level and snap your photo after dark for the best contrast.

Gather your supplies

Check things off as you get ready.

Work on a stable surface, keep your free hand out of the cutting path, and have an adult handle sharp tools.

Three levels of light

  • Leave intact

    The untouched outer skin around the face and the dark outlines separating each cheek stay dark for contrast.

  • Peel & shade

    The two big cheeks and the raised eye mounds are scooped to a thin skin for a soft rounded mid glow.

  • Cut through

    The pupil dots, the wide mouth, and the freed tongue are cut through for the brightest light.

Learn the carving basics

Before you start cutting

How thin should I scoop the cheeks without breaking through?

Aim for roughly a quarter inch or until the skin glows when you hold a light behind it. Check often against a lamp because pumpkins vary in wall thickness. Stop as soon as you see warm light coming through evenly, since going further risks a hole that ruins the plump look.

How do I keep the floppy tongue from snapping off?

Leave the tongue attached along its top edge instead of cutting all the way around it. That top bridge holds it in place while the sides and bottom hang free. Cut the tongue last so the surrounding shell is still firm and supports your blade.

Why cut the eyes and mouth after scooping the cheeks?

Scooping puts a lot of pressure on the front wall, so you want the shell intact and strong while you press with the loop tool. Full cutouts weaken the structure, so saving them for after the scooping keeps the face from cracking. Cut the smallest openings first and the largest, the mouth, near the end.

Your take belongs here, too.

Changed a detail? Made it simpler? Share a photo of your version and tell the community what worked.

Share your pumpkin

More pumpkins like this

You've reached the end · 8 pumpkins
The Patch Report

Fresh pumpkins, in your inbox.

The best new carvings, ideas worth stealing, and how-tos for carving season. Short, seasonal, and gone by November.

A short email during carving season. Unsubscribe anytime. See our privacy policy.