Halloween Pumpkin Carving Contest · Starts October 1st · $500 in prizes
← Back to ideas
@ai_concepts
Aug 11, 2026
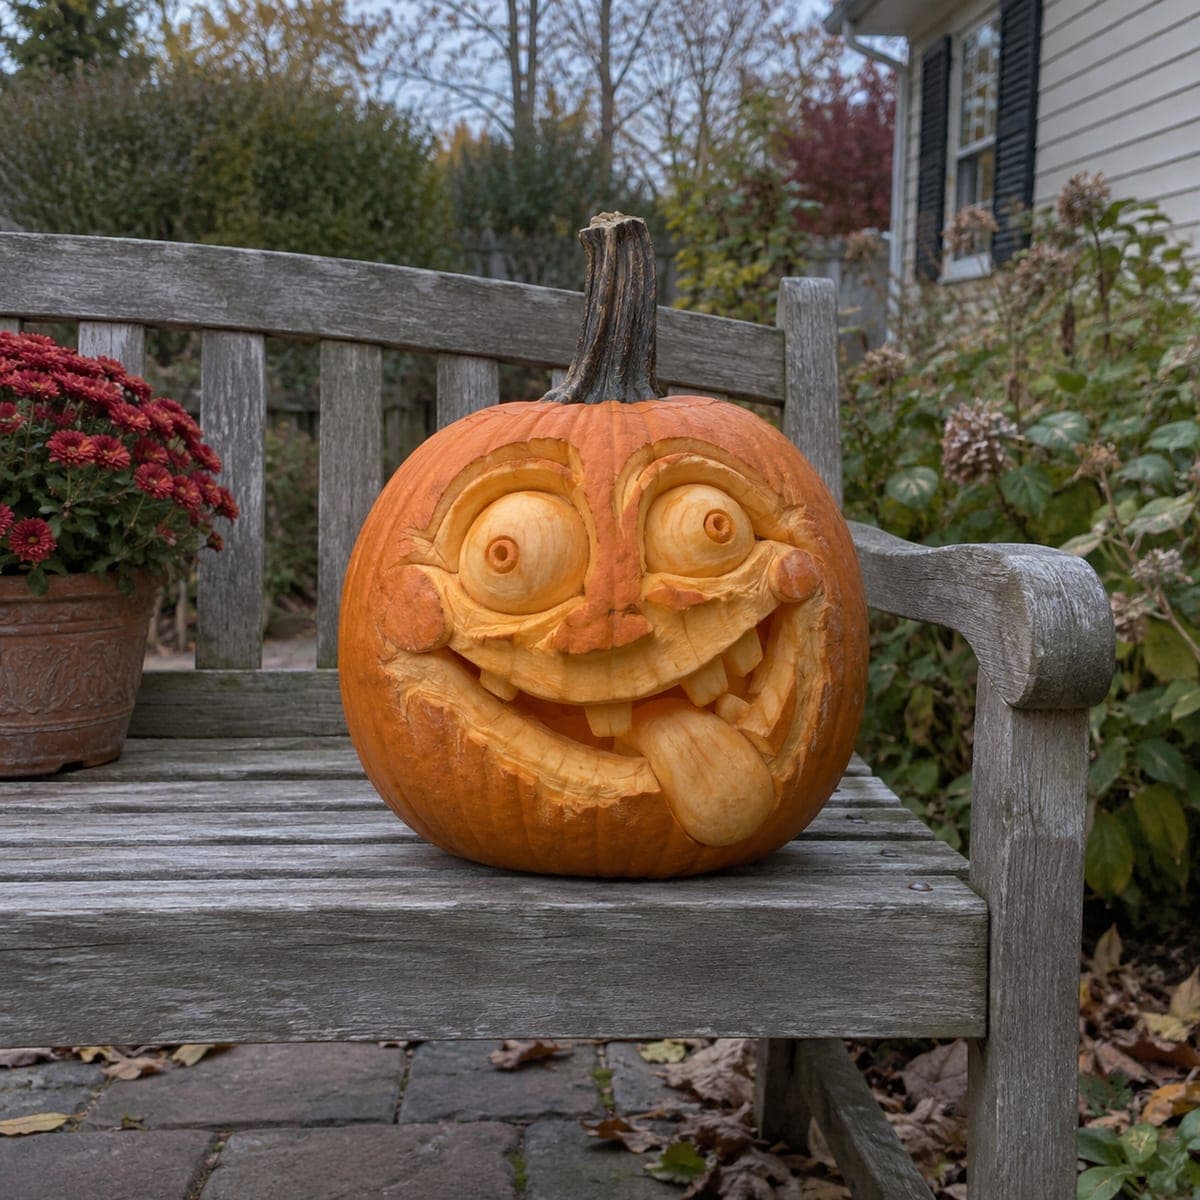
Cross-Eyed Goofy Face Pumpkin With Tongue OutAI
0

Cross-Eyed Goofy Face Pumpkin With Tongue Out

Bulging cross-eyes, a lopsided grin, and a big flopping tongue give this sculpted pumpkin face maximum silliness. The features are carved in full 3D relief rather than cut through, so the pumpkin stays solid and the comedy comes from shadows and depth. Start with the eyeballs, since their placement sets the whole expression, then shape the mouth and tongue around them. Great as a daytime display where no interior light is needed.

This is an AI-generated concept image: a realistic, carvable design idea rather than a photo of a finished carve. AI concepts are always labeled and sit out the leaderboard and the contest.

No ratings yet · Sign in to rate

Comments (0)

  • No comments yet — be the first.

Save without an account. Sign in to like or comment.

Our tips for carving a similar design

The core trick here is 3D relief, where you shave away the outer skin and sculpt the features in raised layers rather than cutting all the way through. The bulging cross-eyes, lopsided grin, and floppy tongue read as comedy because of the shadows they cast, so the pumpkin stays solid and needs no interior light. Plan to build the eyes first, since their placement sets the whole expression, then shape the mouth and tongue around them.

Written by PumpkinCarvingIdeas.com, inspired by the image above. These are our suggestions, not instructions from the uploader. This approach to the AI concept has not been tested on a real pumpkin.

From pumpkin to porch

  1. Pick a big pumpkin and map the face

    Choose a large, evenly round pumpkin with a smooth front and a flat base so it sits still on a bench or table. Since this is a sculpted design, do not cut a lid or hollow it out. Wipe the surface clean and sketch the two big round eyes, the wide grin, and the drooping tongue with a washable marker. Keep the eyes close together and slightly turned inward to get that cross-eyed look.

  2. Rough out the eyeballs first

    Use a loop tool or ribbon gouge to scoop a shallow trench around each eye circle, leaving the eyeballs raised above the surrounding skin. Round the edges of each ball so they bulge outward like domes. Carve a small raised ring and a dot near the inner side of each eye for the pupils, aiming them toward the nose to sell the cross-eyed gag. Work slowly and check both eyes from a few feet back so they match.

  3. Shape the brow, nose, and cheeks

    Peel the skin off the brow ridge above the eyes and blend it down into the trenches so the eyes look set into the face. Leave a rounded knob of skin for the nose and shave around it to make it pop. Scoop gentle hollows under the eyes for baggy cheeks, which adds to the goofy expression. Keep these cuts shallow so the wall stays thick and strong.

  4. Carve the grinning mouth

    Outline the wide, lopsided smile and remove the skin inside it to expose the pale flesh, then carve a row of blocky teeth as raised ridges. You can cut a little deeper between the teeth for darker shadow lines, but do not punch through the wall. Curl one corner of the mouth up higher than the other for the crooked grin. Round every edge so the teeth look chunky rather than sharp.

  5. Sculpt the floppy tongue

    Below the grin, leave a large teardrop of flesh raised for the tongue and shave the area around it back so it appears to flop out and hang over the lip. Round its surface and carve a soft center groove down the middle. Undercut the top edge slightly so a shadow falls behind it and it reads as separate from the mouth. This is the punchline of the whole face, so give it room and a lazy droop.

  6. Refine shading and photograph in daylight

    Step back and deepen any trenches that need stronger shadow, smoothing tool marks with the back of a spoon. Brush off crumbs and rub the exposed flesh to even the color. Since nothing is cut through, this piece shines in daylight, so set it on a bench or step where side light rakes across the features. Coat the carved flesh with a little petroleum jelly to slow drying and keep it looking fresh for a few days.

Gather your supplies

Check things off as you get ready.

Work on a stable surface, keep your free hand out of the cutting path, and have an adult handle sharp tools.

Three levels of light

  • Leave intact

    The outer skin left on the nose knob, the brow ridge, and the raised tongue stays dark and holds the deepest color.

  • Peel & shade

    The eyeballs, cheeks, and mouth area are peeled to pale flesh for a soft mid glow that catches daylight.

  • Cut through

    Only the shadow grooves between the teeth and around the eyes go deep, since this design has no full cutouts.

Learn the carving basics

Before you start cutting

Do I need to hollow out or light this pumpkin?

No. This is a sculpted relief design, so the features come from carved depth and shadow, not backlight. Leave the pumpkin solid and skip the lid. If you do want a faint glow at night, place a battery LED beside it rather than inside.

How do I get the eyes to actually look cross-eyed?

Keep the two eyeballs close together and aim both pupils toward the nose in the center. Carve the pupils as raised dots on the inner side of each dome so they clearly point inward. Step back several feet often, since crossed eyes only read correctly from a viewing distance.

How long will a solid sculpted pumpkin last?

Exposed flesh dries and browns faster than uncarved skin, so expect a few good days. Rub petroleum jelly over the carved areas to slow moisture loss and keep the pale surfaces bright. Store it somewhere cool overnight and mist it lightly if it starts to shrivel.

Your take belongs here, too.

Changed a detail? Made it simpler? Share a photo of your version and tell the community what worked.

Share your pumpkin

More pumpkins like this

You've reached the end · 8 pumpkins
The Patch Report

Fresh pumpkins, in your inbox.

The best new carvings, ideas worth stealing, and how-tos for carving season. Short, seasonal, and gone by November.

A short email during carving season. Unsubscribe anytime. See our privacy policy.