Halloween Pumpkin Carving Contest · Starts October 1st · $500 in prizes
← Back to ideas
@ai_concepts
Sep 12, 2026
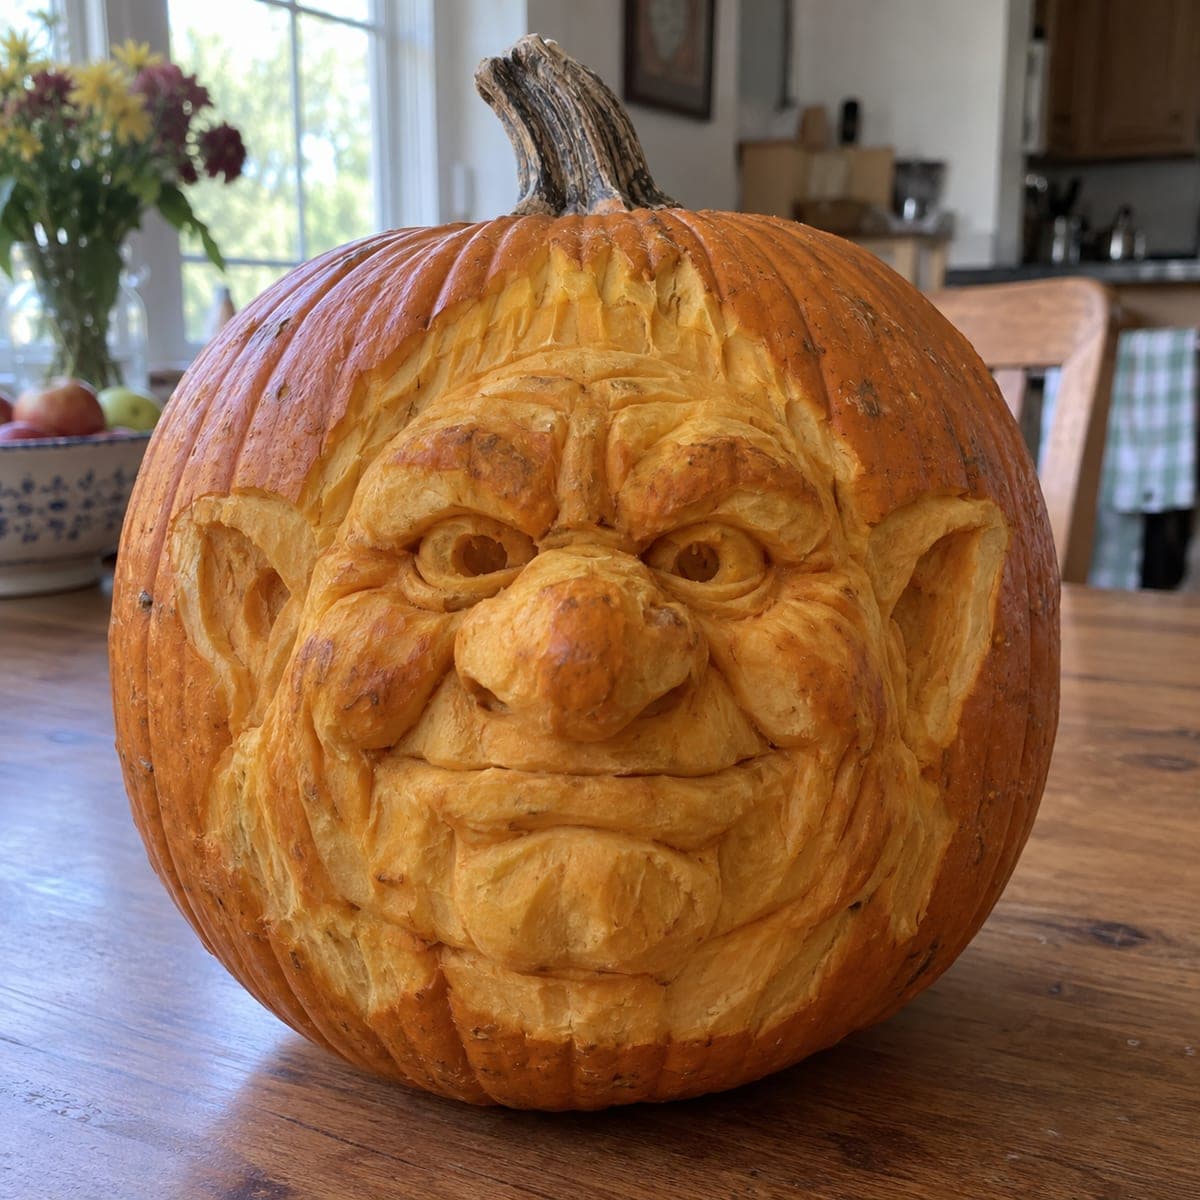
Grinning Troll Face Sculpted Pumpkin HeadAI
0

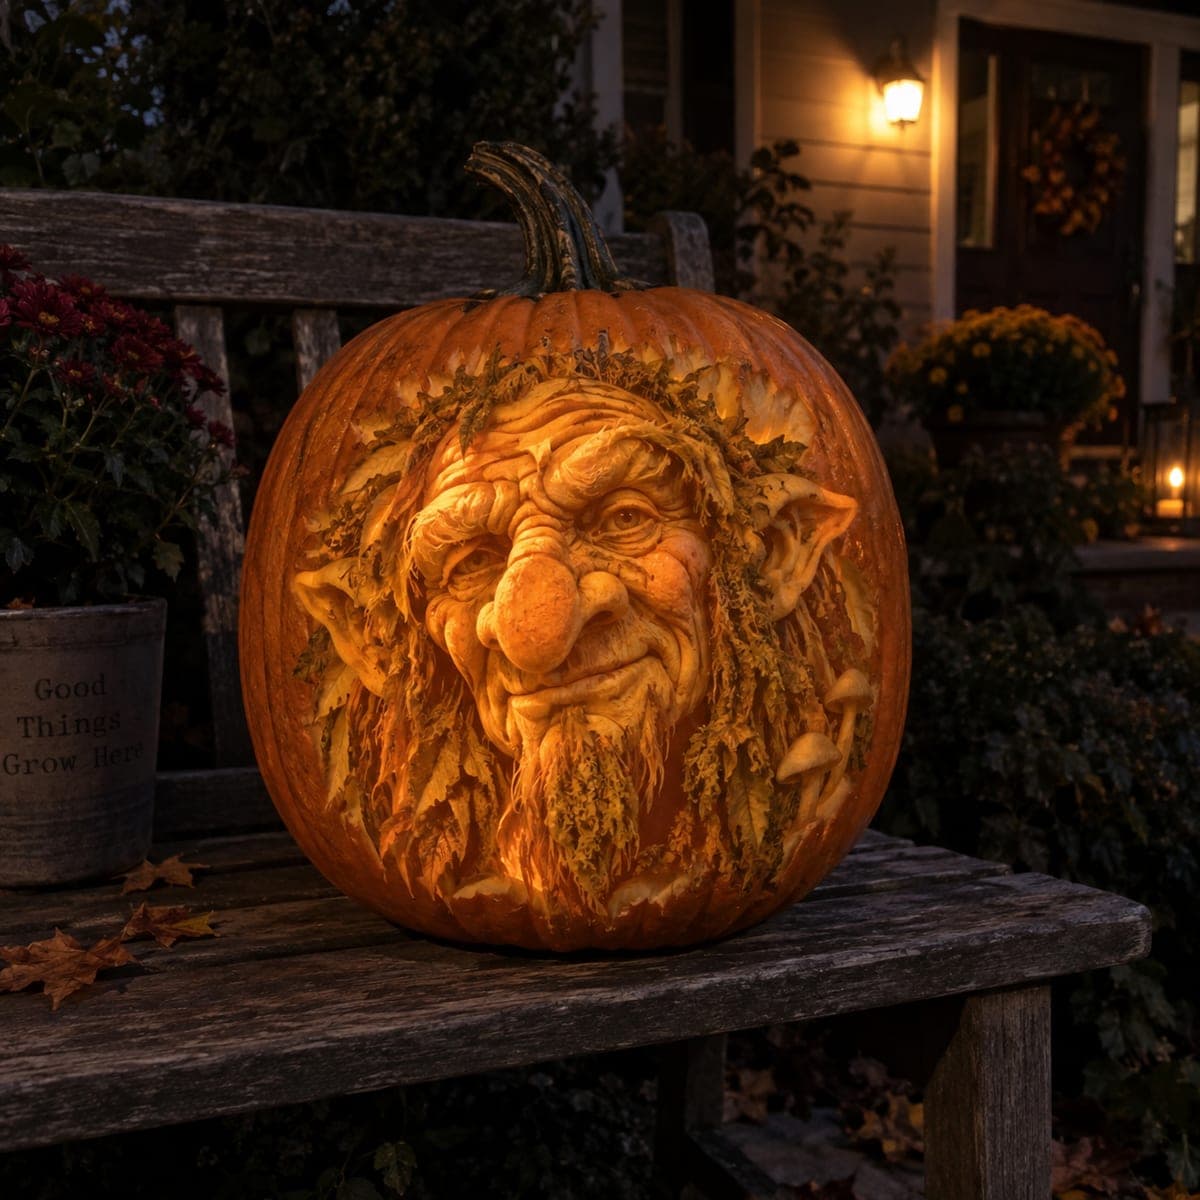
Grinning Troll Face Sculpted Pumpkin Head

Pointed ears, a bulbous nose, and a sly grin turn this pumpkin into a full three-dimensional troll head, sculpted straight into the thick wall like clay. Deep-set eyes and heavy brow ridges do most of the character work, so establish those landmarks before refining cheeks and chin. Use loop tools for the broad planes and a knife for crisp lip and wrinkle lines, and mist it with diluted bleach water to keep the sculpt fresh longer.

This is an AI-generated concept image: a realistic, carvable design idea rather than a photo of a finished carve. AI concepts are always labeled and sit out the leaderboard and the contest.

No ratings yet · Sign in to rate
Comments (0)

  • No comments yet — be the first.

Save without an account. Sign in to like or comment.

Our tips for carving a similar design

The trick here is relief sculpting, where you carve into the thick pumpkin wall like clay instead of cutting all the way through. The whole face is built by removing skin and flesh at different depths so the brow, nose, and ears stand proud while the eye sockets sink back. Plan your landmarks first, then shave down the surrounding areas to reveal the features.

Written by PumpkinCarvingIdeas.com, inspired by the image above. These are our suggestions, not instructions from the uploader. This approach to the AI concept has not been tested on a real pumpkin.

From pumpkin to porch

  1. Pick a big, thick pumpkin and map the face

    Choose a large pumpkin with a heavy, thick wall since all the depth comes from the flesh itself. Wipe it down and let it come to room temperature so the surface carves smoothly. With a washable marker, sketch the brow ridge, deep-set eyes, bulbous nose, grin, and pointed ears. Keep the nose and ears where the wall is thickest so you have material to work with.

  2. Rough out the high points

    Do not open the pumpkin. Use a large loop tool to shave away the skin and shallow flesh everywhere except the nose, brow, and ear tips, which you leave raised. Work in broad, even passes and keep checking that your high points still line up with your sketch. Leaving the biggest features standing tall now gives you room to refine them later.

  3. Sink the eye sockets and cheeks

    Switch to a smaller loop tool and dig the eye sockets deep and rounded under the heavy brow to get that hooded, character-filled look. Scoop gentle hollows beside the nose and under the cheekbones so the nose and grin read as forward-facing. Keep the walls between features thick enough to hold their shape. Sculpt both sides evenly by turning the pumpkin often and comparing left to right.

  4. Refine the ears and shape the grin

    Carve the pointed ears by cutting a channel behind each one, then thinning and rounding the front so they curl outward. Leave a bridge of flesh where each ear meets the head so it stays firmly attached and will not snap. Use a detail knife to define the closed-mouth grin, cutting the lip line crisp and rolling the lower lip forward. Add nostrils and the corners of the smile with shallow, controlled cuts.

  5. Add wrinkles and shading

    With a fine knife and a small loop tool, carve the forehead creases, the folds beside the nose, and the puffy bags under the eyes. Vary how deep you scrape so some areas glow brighter than others when lit, which is how you shade a sculpt. Step back often and squint to check that the character reads from a few feet away. Keep tool cuts shallow near thin edges so nothing tears.

  6. Preserve, light, and photograph

    Mist the whole sculpt with diluted bleach water, about one teaspoon per cup, to slow drying and mold, then pat off the excess. Rub a little petroleum jelly on the freshly cut surfaces to seal in moisture. Set a battery LED puck or two behind or beside the face rather than inside, since this is a relief piece with no open cavity. Shoot your photo in a dim room at dusk so the shaded planes and grin show off.

Gather your supplies

Check things off as you get ready.

Work on a stable surface, keep your free hand out of the cutting path, and have an adult handle sharp tools.

Three levels of light

  • Leave intact

    The untouched outer skin around the edges of the head and the very tips of the ears stays dark to frame the face.

  • Peel & shade

    The broad shaved planes of the forehead, cheeks, nose, and chin glow a soft orange where the skin is removed but the wall stays thick.

  • Cut through

    The deepest scoops of the eye sockets and the thinnest sculpted folds let the most light through for the brightest highlights.

Learn the carving basics

Before you start cutting

Do I cut all the way through the pumpkin anywhere?

No, this is a relief sculpt, so almost everything stays as carved flesh rather than open holes. You only thin the wall in the deepest spots like the eye sockets to let a little glow through. Keeping it mostly solid is what gives the face its clay-like, three-dimensional look.

How do I keep the pointed ears from breaking off?

Carve a channel behind each ear but leave a solid bridge of flesh where the ear joins the head. Do not thin the ear all the way down to a fragile flap. Work slowly with a sharp knife so you are slicing, not prying, which is what usually snaps thin details.

This is an expert project, what makes it so hard?

Sculpting in relief means you are removing material in graded depths by eye instead of following a cut line, so it takes patience and a feel for the form. The eyes and brow do most of the character work, so getting them symmetrical and deep is the real challenge. Take breaks, turn the pumpkin often, and check both sides against each other.

Your take belongs here, too.

Changed a detail? Made it simpler? Share a photo of your version and tell the community what worked.

Share your pumpkin

More pumpkins like this

You've reached the end · 8 pumpkins
The Patch Report

Fresh pumpkins, in your inbox.

The best new carvings, ideas worth stealing, and how-tos for carving season. Short, seasonal, and gone by November.

A short email during carving season. Unsubscribe anytime. See our privacy policy.