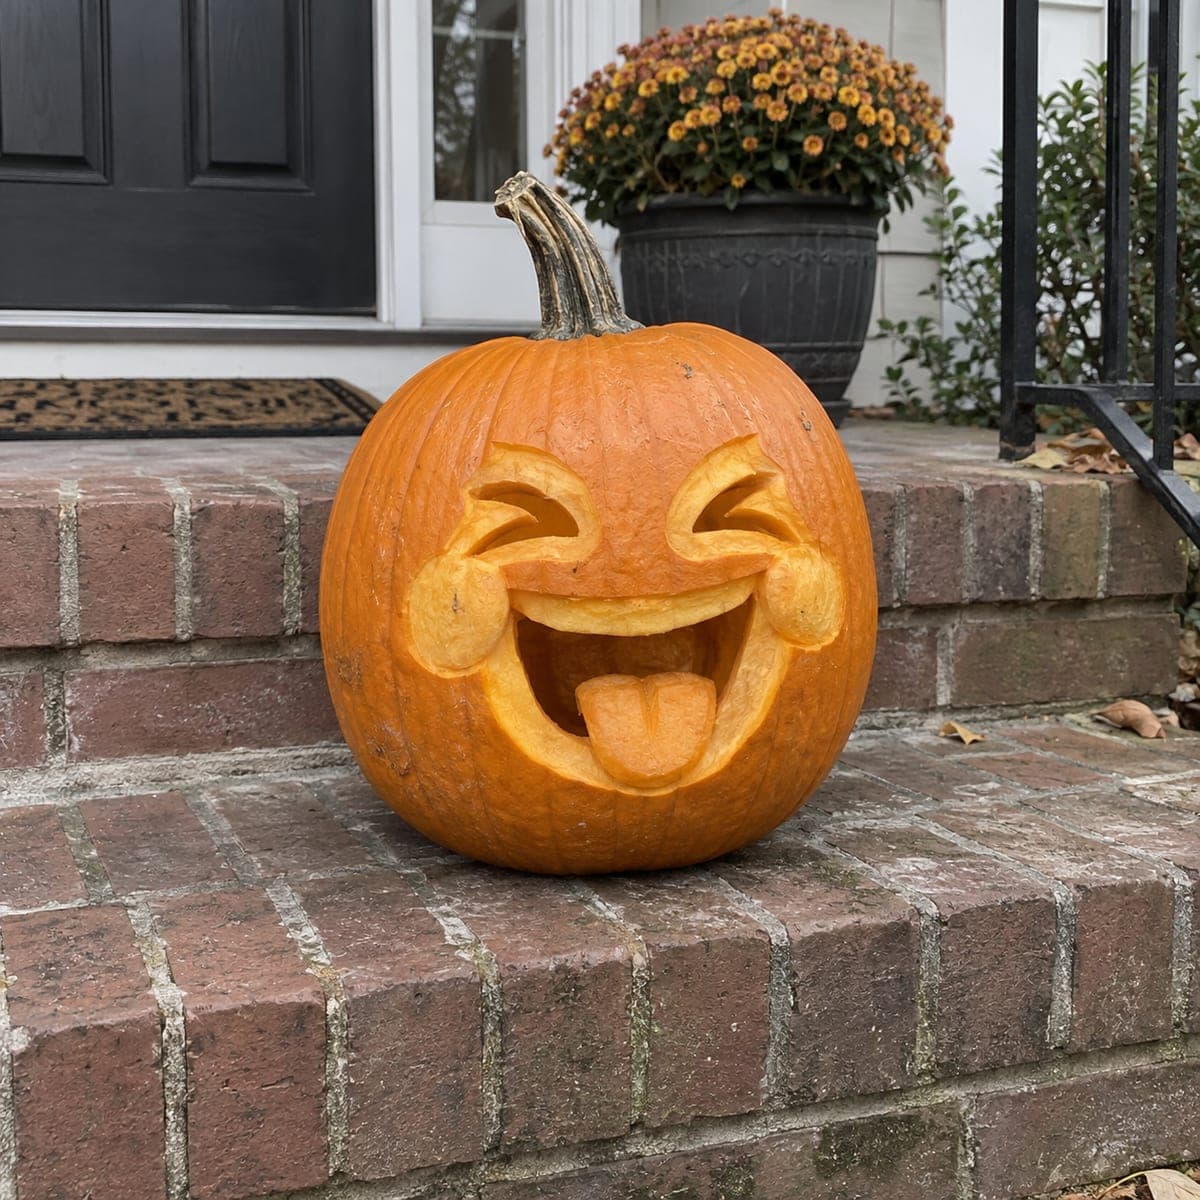
The tears-of-joy emoji becomes a sculpted jack-o-lantern here, with squeezed-shut eyes, round teardrops on each cheek, and a wide open mouth sticking out a carved tongue. Most of the face is shaved in relief rather than cut through, which is what gives the features their 3D cartoon depth. Rough out the big shapes with a knife, refine with a spoon or loop tool, and leave the tongue attached at the back of the mouth for support.
This is an AI-generated concept image: a realistic, carvable design idea rather than a photo of a finished carve. AI concepts are always labeled and sit out the leaderboard and the contest.
The core trick here is relief carving, where you shave away the skin and only a shallow layer of flesh instead of cutting all the way through. That surface sculpting is what gives the squeezed eyes, round teardrops, and puffy tongue their cartoon depth. Plan to rough out the big shapes first, refine them with a spoon or loop tool, then save the one true cutout, the open mouth, for last.
Written by PumpkinCarvingIdeas.com, inspired by the image above. These are our suggestions, not instructions from the uploader. This approach to the AI concept has not been tested on a real pumpkin.
From pumpkin to porch
1
Open and clean the pumpkin
Pick a large, round pumpkin with a smooth front and cut a lid from the bottom or back so the stem stays intact for that cheerful look. Scoop the insides and scrape the inner wall of the carving side down to about one inch thick. A thinner wall makes relief shading much easier and lets light pass through the peeled areas. Dry the inside with a paper towel before you start.
2
Transfer the emoji face
Print or sketch the classic layout: two curved, squeezed-shut eyes up top, a wide grinning mouth below, a small teardrop on each cheek, and a tongue peeking from the mouth. Tape the pattern flat and poke closely spaced holes along every line, or draw it on directly with a washable marker. Keep the mouth centered and slightly lower than the eyes so the face reads as looking up and laughing. Step back and check the spacing before cutting.
3
Rough out the shapes with a knife
Using a small serrated carving knife, make shallow score cuts along your outlines, no more than a quarter inch deep at first. Define the eye slits, the mouth outline, the two teardrops, and the tongue as raised islands. Do not cut through the wall yet. These score lines are your fences for the shading work that follows.
4
Shade the face in relief
Switch to a spoon or a loop tool and start shaving away the skin around your shapes so they stand slightly proud of the surface. Peel the skin fully off the raised teardrops and tongue so they glow a soft orange, and cut the eye slits a little deeper for stronger shadow lines. Work slowly and keep checking the depth by holding a light inside. This gentle terracing is what makes the emoji look sculpted rather than flat.
5
Cut the open mouth last
Once all your shading is set, cut cleanly through the mouth opening so it becomes the brightest part of the face. Leave the carved tongue attached at the back and bottom of the mouth so it has support and does not snap off. Trim the inside edges of the mouth at a slight bevel toward the back to let more light escape. Save this full cutout for the end so the wall stays sturdy while you sculpt.
6
Light it and photograph
Set a battery LED puck or string inside and aim it upward so it catches the tongue and teardrops. Skip candles, since the heat warps thin relief work and the open flame is a fire risk. Test the glow in a dark room and add a second small light if the shaded areas look flat. Snap your photo at dusk when the porch light and the pumpkin glow balance nicely.
Gather your supplies
Check things off as you get ready.
Work on a stable surface, keep your free hand out of the cutting path, and have an adult handle sharp tools.
Three levels of light
Leave intact
The main cheeks and forehead skin stay untouched and dark, framing the face.
Peel & shade
The raised teardrops, the tongue, and the area around the eyes are skin-peeled for a soft mid glow.
Cut through
Only the wide open mouth is cut fully through for the brightest light.
Carve the tongue as a raised relief shape and leave it connected to the lower and back edges of the mouth opening. Never free it into a floating piece. That built-in bridge of pumpkin flesh gives it all the support it needs while still letting light frame it.
Since this is a concept image, can a real pumpkin actually look this 3D?
Yes, the depth comes from relief shading rather than deep cuts, so it is very achievable on a real pumpkin. A thinner wall and a good loop tool let you terrace the features so they cast their own shadows. Just work patiently and check the depth against an inside light as you go.
What if my eye slits look too shallow to read?
Deepen them gradually with the tip of your knife or a small V gouge until the shadow line stands out. The squeezed-shut eyes rely on that dark groove, not on a cutout. Stop before you punch through the wall, since these should stay dark, not glow.
Your take belongs here, too.
Changed a detail? Made it simpler? Share a photo of your version and tell the community what worked.
 AI
AI




Comments (0)