Halloween Pumpkin Carving Contest · Starts October 1st · $500 in prizes
← Back to ideas
@ai_concepts
Sep 25, 2026
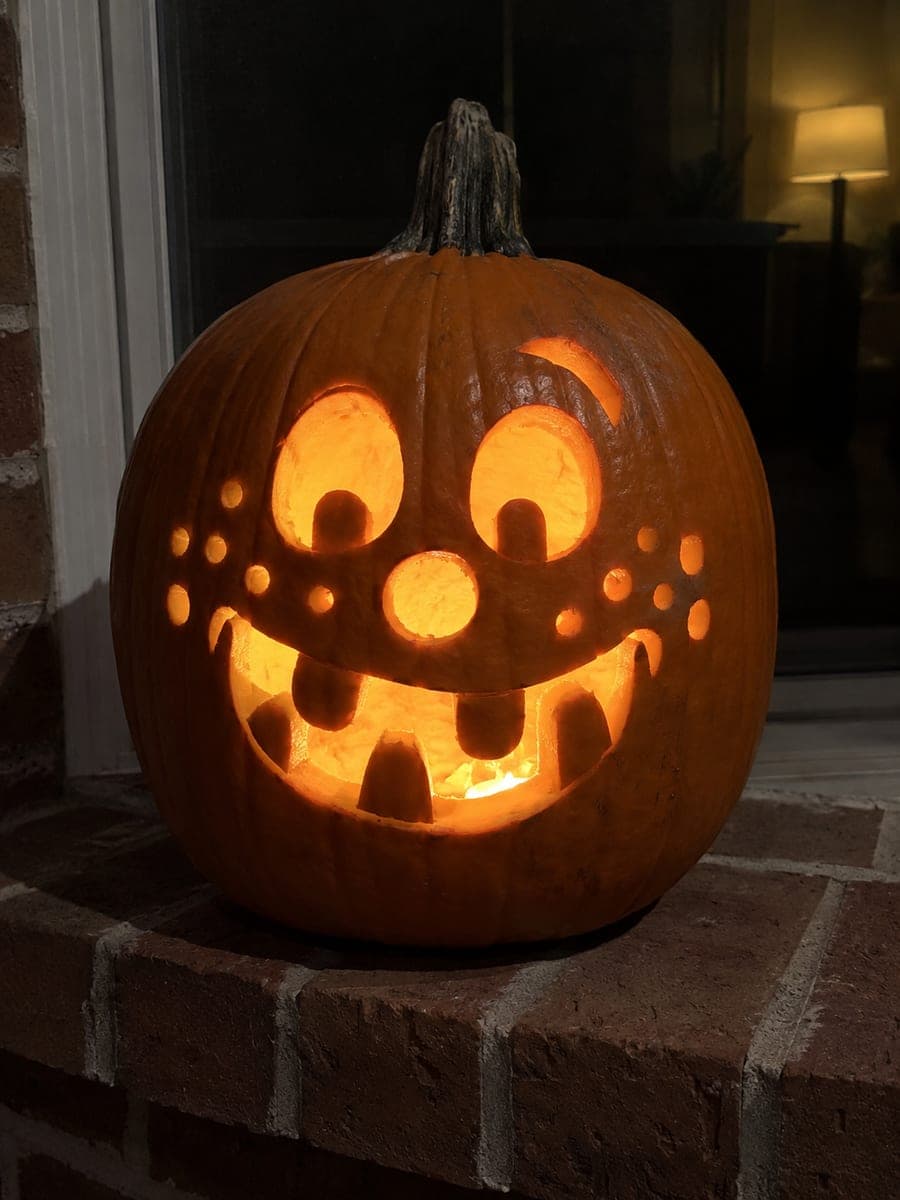
Freckle-Faced Goofy Pumpkin With Full-Width Pupil TabsAI
0

Report this carving

Tell us what is wrong. Reports are private.

Freckle-Faced Goofy Pumpkin With Full-Width Pupil Tabs

Uneven rounded eye holes each with a rounded-top rectangular pupil rooted along the full width of the lower rim, one raised brow, a round nose, a broad grin with six big alternating rooted teeth, and fourteen freckles make this a complex hard goofy pumpkin face idea. Full-width roots on the pupils mean the eye opening must be traced and confirmed before the pupil shape is cut inside it, since removing too much of the lower rim will sever the tab. Cut the brow and nose first, then the eyes, then the grin, and finish with the freckles.

No ratings yet · Sign in to rate
Comments (0)

  • No comments yet — be the first.

Save without an account. Sign in to like or comment.

Our tips for carving a similar design

Full-width bottom-rooted pupils are the engineering challenge here. The lower rim of each eye opening is the pupil root, so the eye boundary must be fully traced and confirmed before the pupil shape is cut inside it. Cut the single lifted brow and round nose first to establish the face geometry, then eyes, then the six-tooth grin, then the fourteen freckles last.

From pumpkin to porch

  1. Hollow and thin

    Hollow from the back and thin the wall to about 1.8 cm. The fourteen freckle holes and the retained pupil tabs need a consistent surface. Dry the face before marking.

  2. Transfer the layout

    Use a poking tool to mark both uneven rounded eye outlines with their bottom-rooted pupil positions, the one lifted brow slot, the round nose hole, the broad grin with six alternating tooth positions, and all fourteen freckle positions. Confirm all bridges, especially the pupil root widths.

  3. Cut brow, nose, and eyes

    Cut the lifted brow slot and the round nose hole first. Then cut each uneven rounded eye opening, followed by the pupil shape inside each eye, leaving the full lower rim intact as the root. Confirm each pupil tab is stable before moving on.

  4. Cut the six-tooth grin

    Cut the outer grin boundary first, then remove the alternating negative space between the six big teeth one gap at a time. Root each tooth along its full base. Work from the outer corners inward.

  5. Cut freckles

    Work through all fourteen round and oval freckle holes using an awl for starting points and a small detail blade for the shapes. Vary sizes slightly for an organic look. Space them so no freckle shares a wall thinner than 8 mm with a neighboring freckle or a grin edge.

  6. Light and display

    Insert an LED light and view the face straight-on. The bottom-rooted pupils should appear as dark rounded rectangles inside fully lit eye fields. The freckle constellation scatters small warm dots across the cheeks.

Written with AI to match this design

Gather your supplies

Check things off as you get ready.

Work on a stable surface, keep your free hand out of the cutting path, and have an adult handle sharp tools.

Three levels of light

  • Leave intact

    The intact forehead above the lifted brow, the brow slot zone, and all rind between freckle holes stay dark.

  • Peel & shade

    None.

  • Cut through

    The lifted brow slot, both uneven rounded eye openings (with bottom-rooted pupil tabs retained), the round nose, all gaps around the six alternating grin teeth, and all fourteen freckle holes are cut through.

Learn the carving basics

Before you start cutting

One eye is intended to be different from the other in this goofy design. How uneven should they be?

Make one eye noticeably rounder and the other more angular or irregular in outline. Eyes that differ only slightly in size read as a mistake. Eyes that differ in both size and shape read as a deliberate goofy design choice.

The full-width pupil root looks very similar to the bottom-rooted pupils in the sad designs. Is the carving technique the same?

Yes. The principle is identical: trace the complete outer eye boundary first, then cut the pupil shape inside it while leaving the lower rim fully attached. The difference here is that the pupils are rectangular with rounded tops, which requires clean straight cuts along the sides in addition to the curved bottom rim.

If I run out of time, which fourteen freckles can I skip?

Cut at least seven freckles, four on the cheekier side and three on the other. Freckles near the outer edges of the face are easiest to skip since they are decorative and contribute least to the central expression. Avoid skipping any freckle that sits directly below an eye, since that cluster is what most clearly reads as a freckle face.

Your take belongs here, too.

Changed a detail? Made it simpler? Share a photo of your version and tell the community what worked.

Share your pumpkin

More pumpkins like this

You've reached the end · 8 pumpkins
The Patch Report

Fresh pumpkins, in your inbox.

The best new carvings, ideas worth stealing, and how-tos for carving season. Short, seasonal, and gone by November.

A short email during carving season. Unsubscribe anytime. See our privacy policy.