@octoberoak
Sep 7, 2026

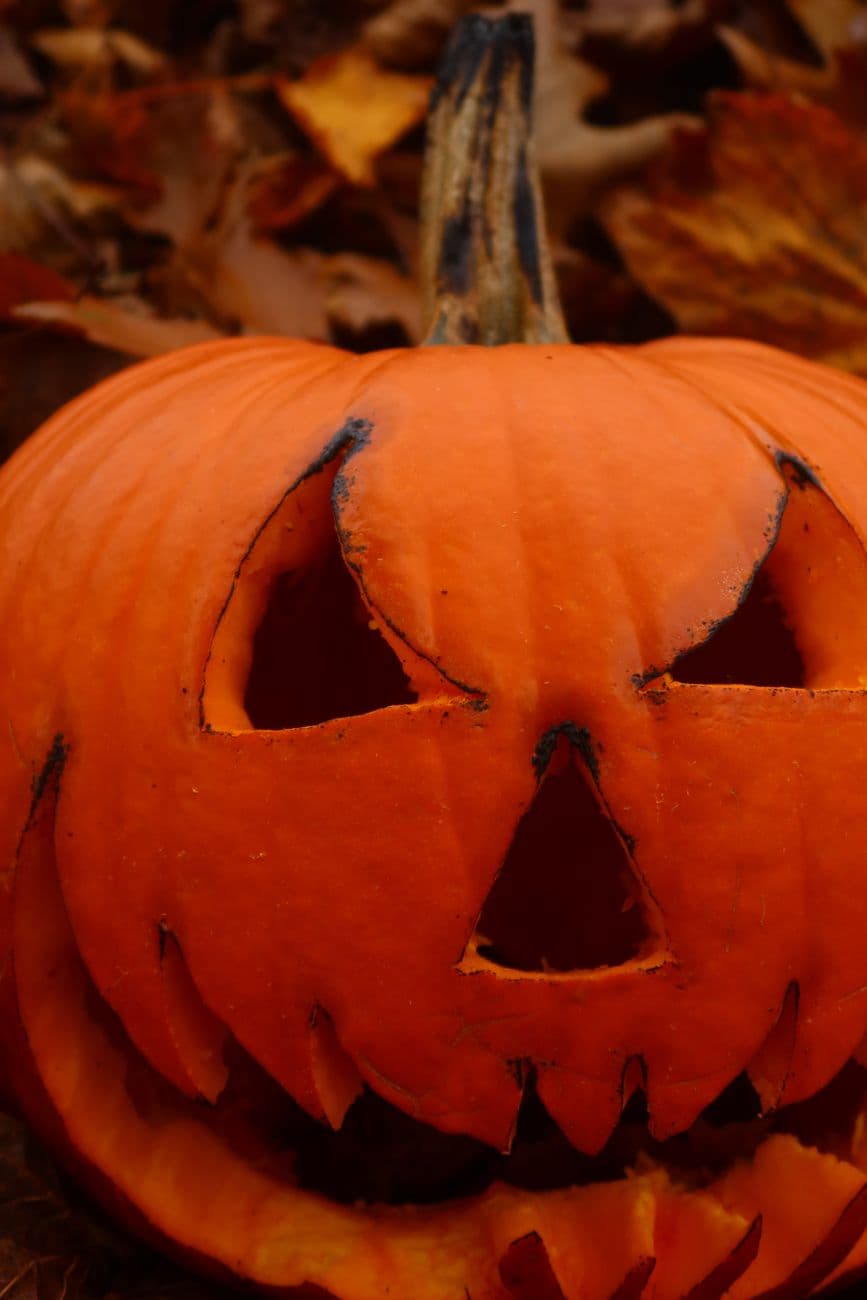
The trick here is a bold, cartoonish face built entirely from clean cutouts: triangle eyes, a small nose, and a wide zig-zag grin. Big simple shapes are forgiving to carve and glow brightly, so you get maximum personality with minimum fuss. Pick a large, round pumpkin so the face has room to spread out and look extra silly.
Written by PumpkinCarvingIdeas.com, inspired by @octoberoak's photo above. These are our suggestions, not instructions from the uploader, and this approach hasn't been tested on their exact carve.
Choose a big, round pumpkin with a smooth front area for the face. Cut a lid from the top or, if you want to wear or display it upright, cut a wide hole in the bottom instead so light and cords tuck away. Scoop out all the seeds and pulp, then scrape the front inner wall down to about one inch thick. A thinner wall is much easier to cut through cleanly.
Sketch or tape on a stencil with two triangle eyes, a small triangle or notch nose, and a wide grinning mouth. Keep the shapes large and spaced out so the pumpkin reads as friendly, not crowded. Poke holes along the outlines with a pin tool or push pin, or trace lightly with a washable marker. Step back and check the spacing before you cut anything.
An adult should handle all the sharp tools. Start with the smaller shapes, the eyes and nose, using a small serrated carving saw and gentle sawing strokes. Cut straight in, not at a steep angle, and let the tool do the work. Push each piece out from the inside with a fingertip so the edges stay crisp.
Save the big mouth for last since it removes the most wall and weakens the shell. Carve the outline of the grin, then leave the pointed teeth attached at both the top and bottom so they act as bridges and stay strong. Take your time on the zig-zag points and cut slowly around each corner. Removing the mouth last keeps the pumpkin sturdy while you work everything else.
Trim any ragged edges from the inside and rub a little petroleum jelly on the cut edges to slow drying. Drop in one or two battery LED lights or a string of fairy lights for an even, safe glow. Skip real candles, especially if anyone plans to wear or hold the pumpkin. Snap your photo at dusk when the grin really pops against the dark.
Check things off as you get ready.
Work on a stable surface, keep your free hand out of the cutting path, and have an adult handle sharp tools.
The full orange skin around the face stays untouched and dark for that classic pumpkin look.
Optional: peel a thin outline around the eyes or mouth if you want a soft glowing halo around the shapes.
The two triangle eyes, the nose, and the wide toothy grin are cut all the way through for the brightest light.
Leave each tooth attached to the pumpkin at both the top and bottom edge of the mouth so it forms a solid bridge. Avoid carving teeth as thin free-standing spikes. Thicker, shorter points hold up far better and still look playful.
For a normal display, a top lid is fine and traditional. If you want a clean upright face or plan to sit it over a light, cutting a wide hole in the bottom lets you set the pumpkin down over the LED and hide any cords. Bottom cutting also stops the classic sunken-lid look as the pumpkin ages.
Cut the mouth outline a little smaller than your final shape at first, then widen it in small passes until both sides match. It is easy to remove more pumpkin but impossible to add it back. Checking against the eyes as you go keeps everything balanced.
Changed a detail? Made it simpler? Share a photo of your version and tell the community what worked.
The best new carvings, ideas worth stealing, and how-tos for carving season. Short, seasonal, and gone by November.





Comments (0)