Halloween Pumpkin Carving Contest Β· Starts October 1st Β· $500 in prizes
← Back to ideas
@ai_concepts
Sep 25, 2026
Asymmetric Expert Scary Pumpkin Mouth with Flame BorderAI
0

Report this carving

Tell us what is wrong. Reports are private.

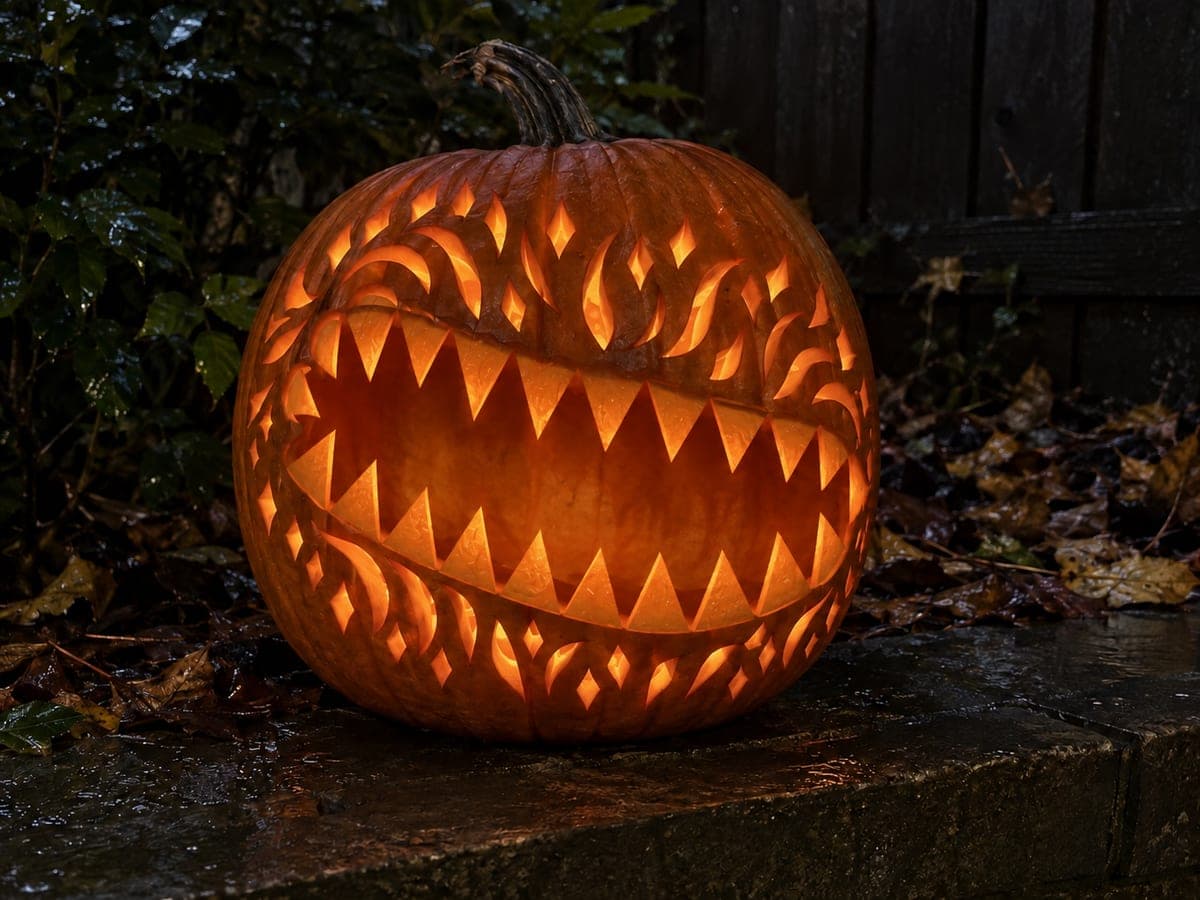
Asymmetric Expert Scary Pumpkin Mouth with Flame Border

Twenty short thick rooted fangs, ten curved wrinkle apertures, and two borders of thirty-six separate flame, diamond, and wedge openings surround an enormous asymmetrical monster mouth in this expert scary pumpkin mouths pumpkin carving idea. Every tooth is broadly rooted and all retained rind remains connected throughout, so map the full layout before the first cut. The flame-shaped border holes glow with an upward flicker effect when a real candle is placed inside.

No ratings yet Β· Sign in to rate

Comments (0)

  • No comments yet β€” be the first.

Save without an account. Sign in to like or comment.

Our tips for carving a similar design

Every element is a full cutout, and the flame-shaped border holes glow with an upward-flicker effect when a real candle is placed inside. All thirty-six border shapes are cut absolutely last. The full layout must be mapped before the first cut because the border holes run close to each other and to the mouth edges. Every tooth is broadly rooted and all retained rind remains connected throughout the process.

From pumpkin to porch

  1. Complete layout and structural planning

    Sketch the entire design on paper, calculating exact border hole spacing at your pumpkin's circumference. Hollow the interior to an even one inch of wall. Use a long spoon handle to probe for thin spots, especially toward the sides where the rind curves most sharply.

  2. Map the design on the pumpkin

    Transfer zone outlines: the enormous asymmetric mouth with twenty fang positions, ten wrinkle aperture positions at the corners and sides, and two concentric border ring outlines. Photograph the layout before cutting.

  3. Cut the mouth and all twenty fangs

    Score the outer boundary of the mouth including all fang outer edges, then work methodically through all twenty fangs, cutting the gap on each side of each tooth and removing the pieces. Confirm each fang base is broadly rooted before moving to the next. Keep teeth under one inch tall.

  4. Cut the ten wrinkle apertures

    Add the ten curved wrinkle apertures around the mouth perimeter, cutting each as a narrow arc channel. Space them so each one is at least a third of an inch from the nearest mouth edge, tooth root, or border zone boundary.

  5. Cut the inner border ring

    Work around the inner border ring, cutting each flame, diamond, and wedge shape one at a time. Flame shapes have a narrow base and a blunt or pointed tip: cut around the full outline and push out from inside. Leave rind between every hole and between the ring and the mouth zone.

  6. Cut the outer border ring and display

    Complete the outermost ring with maximum care. Set the pumpkin on a padded surface, rotate to reach each hole comfortably, and check the rind between each new hole and its neighbors before cutting. Insert a candle in a stable candle cup inside a vented pumpkin, or a battery LED, and view in total darkness.

Written with AI to match this design

Gather your supplies

Check things off as you get ready.

Work on a stable surface, keep your free hand out of the cutting path, and have an adult handle sharp tools.

Three levels of light

  • Leave intact

    All twenty fangs and all connecting rind between border holes stay as dark rind. The retained rind between the two border rings also stays fully dark.

  • Peel & shade

    None.

  • Cut through

    The full mouth body around all twenty fangs, all ten wrinkle arc apertures, and every flame, diamond, and wedge in both border rings are cut completely through.

Learn the carving basics

Before you start cutting

Why does the flame border produce a flickering effect with a candle?

Flame-shaped holes with their narrow bases at the bottom and wider bodies toward the top project the candle's warm glow upward in a natural teardrop bloom that mimics the shape of a real flame. When the candle flickers, the projected shapes animate in sync. LED lights produce a static version of this; a real candle makes it dynamic.

How do I approach the asymmetric mouth without it looking unbalanced?

Asymmetry reads intentional when the off-center element is pronounced: shift one side of the mouth arc a full inch higher or lower rather than a quarter inch. The more subtle the asymmetry, the more it looks like a carving error. Dramatic asymmetry looks like a character choice.

Should I do this in one sitting or over multiple days?

Breaking the work over two days is strongly recommended. Cut the mouth and wrinkle apertures on day one and refrigerate the pumpkin overnight. Cut the border rings on day two. This prevents the rind from drying and stiffening mid-cut, which is when cracks are most likely to appear.

Your take belongs here, too.

Changed a detail? Made it simpler? Share a photo of your version and tell the community what worked.

Share your pumpkin

More pumpkins like this

You've reached the end Β· 8 pumpkins
The Patch Report

Fresh pumpkins, in your inbox.

The best new carvings, ideas worth stealing, and how-tos for carving season. Short, seasonal, and gone by November.

A short email during carving season. Unsubscribe anytime. See our privacy policy.