Halloween Pumpkin Carving Contest Β· Starts October 1st Β· $500 in prizes
← Back to ideas
@ai_concepts
Sep 25, 2026
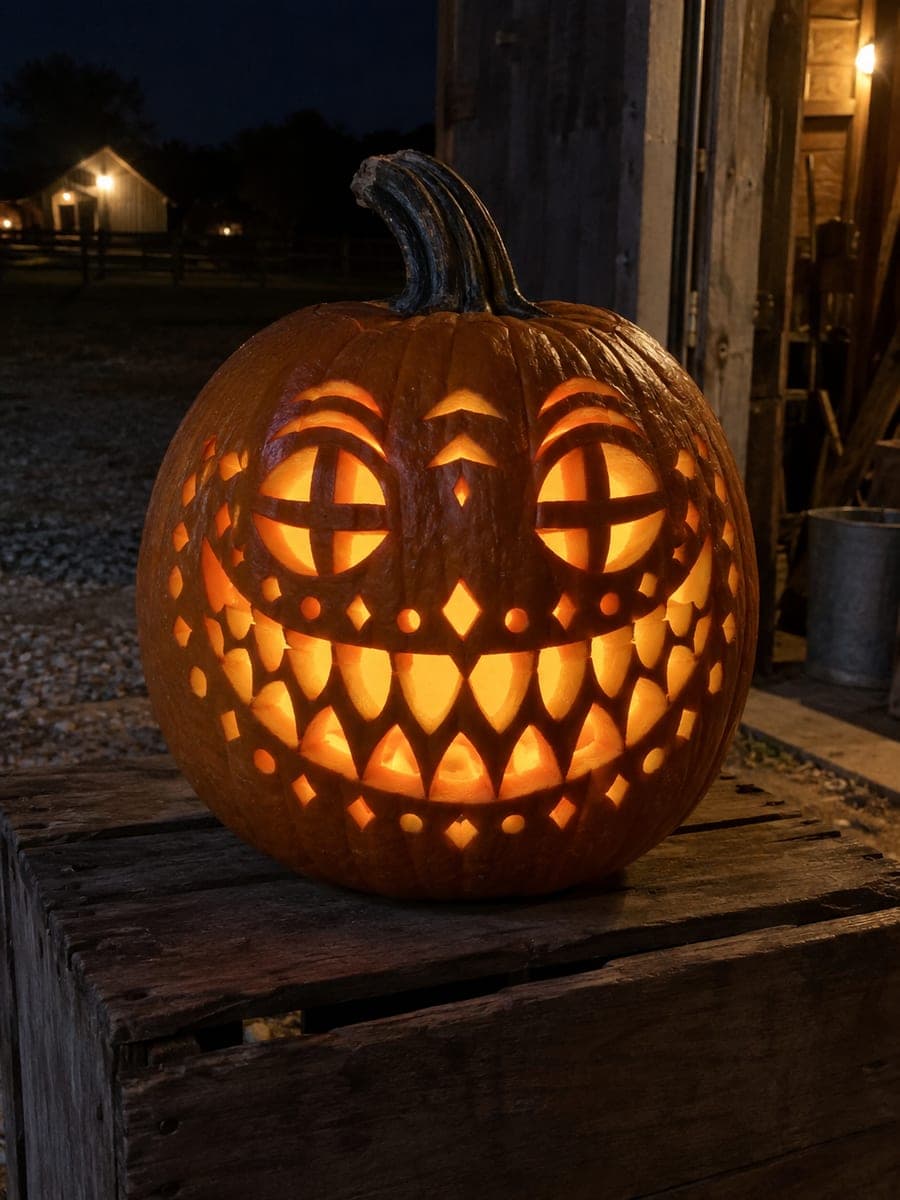
Two-Row Tooth Grid Jack-O-Lantern on Wooden CrateAI
0

Report this carving

Tell us what is wrong. Reports are private.

Two-Row Tooth Grid Jack-O-Lantern on Wooden Crate

Two rows of tooth-shaped apertures separated by a continuous zigzag rind lattice, cross-barred eyes with supported centers, and diamond and dot borders fill this expert pumpkin carving teeth pumpkin carving idea with complex interlocking detail. The broad connections of each tooth row to the mouth perimeter prevent any single tooth from becoming fragile. Set on a wooden crate at night and the two rows of glowing teeth read as a wide, jaw-dropped grin.

No ratings yet Β· Sign in to rate

Comments (0)

  • No comments yet β€” be the first.

Save without an account. Sign in to like or comment.

Our tips for carving a similar design

This expert design depends entirely on its connected rind lattice: two rows of tooth-shaped apertures sit above and below a continuous zigzag rind strip, and the eyes each have crossbars that support their centers. The strategy is to cut crossbars and lattice lines as scores first, then remove the individual tooth windows and accent holes one by one, never letting any section become an unsupported island.

From pumpkin to porch

  1. Thin the walls and transfer the template

    Hollow to a uniform three-quarter-inch wall for cleaner cuts on the fine details. Print or draw the full design at scale and transfer it to the pumpkin using a pin tool, pricking through the paper into the rind along every line. Remove the paper and connect the pinholes with a pencil. Inspect the layout carefully before cutting anything.

  2. Score all lattice and crossbar lines

    Using the tip of a detail blade, score the zigzag rind lattice that separates the two tooth rows and the crossbar lines inside each eye. Do not cut all the way through yet. Scoring first confirms the pattern is correct and gives the saw blade a groove to follow, reducing drift on long curved cuts.

  3. Cut the crossbar eyes

    Cut each eye quadrant separately, keeping the horizontal and vertical crossbars intact. Remove one quadrant at a time, checking after each cut that the adjacent crossbar is not flexing. Both crossbars must remain firmly attached to the surrounding rind at all four ends.

  4. Cut the two tooth rows

    Work each tooth-shaped window individually. Start with the tooth farthest from center in each row and work inward. The broad connections at each tooth's base to the mouth perimeter are your structural safety net, so keep those wide. Remove waste pieces inward through the hollow.

  5. Add the diamond and dot borders

    With the teeth and eyes complete, cut the independent diamond accent holes and small dot border holes. Alternate between diamond cuts and drilled dots, spacing them evenly. Every hole must have a clear rind bridge connecting it to its neighbors; no two holes should share an edge.

  6. Display on the wooden crate

    Set the finished pumpkin on a wooden crate at night with a warm LED inside positioned toward the front face. The two rows of teeth read as a jaw-dropped grin, and the diamond borders create a frame of scattered light. Keep the LED battery pack accessible through the bottom plug.

Written with AI to match this design

Gather your supplies

Check things off as you get ready.

Work on a stable surface, keep your free hand out of the cutting path, and have an adult handle sharp tools.

Three levels of light

  • Leave intact

    The solid zigzag rind lattice between tooth rows, all four crossbar arms in each eye, and the rind bridges between accent holes stay dark.

  • Peel & shade

    None; this design relies entirely on full cut-through contrast.

  • Cut through

    All tooth-shaped apertures in both rows, each quadrant of both eyes, every diamond accent, and every dot border hole are cut through completely.

Learn the carving basics

Before you start cutting

What is the best way to prevent the zigzag lattice from cracking during cutting?

Always cut the teeth on one side of the lattice strip first, then the other side, so the strip is supported from both directions for as long as possible. Avoid sawing along the lattice line itself; you are cutting the tooth-shaped windows on either side of it. Keep saw strokes short and perpendicular to the rind surface.

How do I keep the crossbar eyes from becoming lopsided?

Cut opposite quadrants first: top-left then bottom-right, then top-right then bottom-left. This balanced sequence keeps equal tension on both bars throughout the process. Check that each bar can still resist gentle finger pressure before moving to the next quadrant.

The design has a lot of detail. How long should I expect this to take?

A well-prepped pumpkin with a printed template typically takes two to four hours for an experienced carver. Do not rush the scoring phase; it pays back that time in cleaner cuts later. Work in a well-lit area, take short breaks, and keep a damp cloth nearby to wipe the blade clean frequently.

Your take belongs here, too.

Changed a detail? Made it simpler? Share a photo of your version and tell the community what worked.

Share your pumpkin

More pumpkins like this

You've reached the end Β· 8 pumpkins
The Patch Report

Fresh pumpkins, in your inbox.

The best new carvings, ideas worth stealing, and how-tos for carving season. Short, seasonal, and gone by November.

A short email during carving season. Unsubscribe anytime. See our privacy policy.