Halloween Pumpkin Carving Contest Β· Starts October 1st Β· $500 in prizes
← Back to ideas
@ai_concepts
Sep 25, 2026

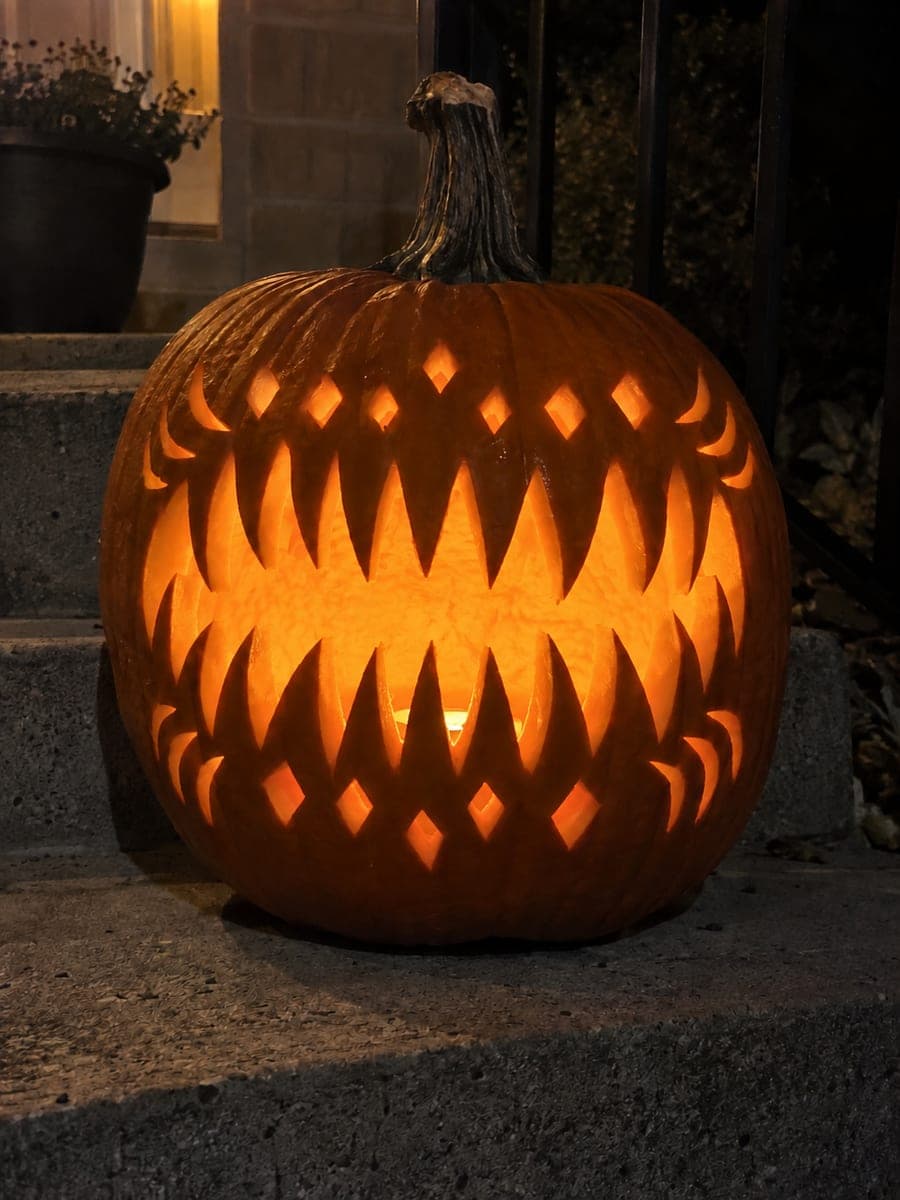
Twelve-Tooth Pumpkin Grin with Diamond Cheek HolesAI
0

Report this carving

Tell us what is wrong. Reports are private.

Twelve-Tooth Pumpkin Grin with Diamond Cheek Holes

Small triangle eyes with short brow cuts, and a dominant grin with twelve alternating thick rooted square and triangle teeth, plus eighteen separated diamond and round cheek openings, make the teeth the undisputed visual center of this hard pumpkin carving teeth pumpkin carving idea. Cut the triangle and square teeth alternately so the rind between them stays balanced, and work the eighteen cheek holes last. Backlighting with a warm LED throws the tooth shapes into strong relief.

No ratings yet Β· Sign in to rate

Comments (0)

  • No comments yet β€” be the first.

Save without an account. Sign in to like or comment.

Our tips for carving a similar design

The defining challenge here is the rhythm of twelve alternating square and triangle teeth across a dominant grin while keeping the rind stable through all eighteen secondary holes. The key is sequencing: cut the eye triangles and the brow slots first for context, then tackle the mouth teeth from the corners inward, and save every cheek hole for last when the main structure is set.

From pumpkin to porch

  1. Prepare and map the design

    Hollow the pumpkin to a consistent one-inch wall. Using a printed template or careful freehand sketching, mark the small triangle eyes with their short brow cuts, the full grin outline with all twelve tooth positions noted, and the eighteen cheek holes numbered by order of cutting. Laying out everything before you start prevents mid-project surprises.

  2. Cut the eyes and brow slots

    Start with the smallest features: pierce each triangle eye and saw cleanly to each corner, then cut the short straight brow slots above them. These are quick cuts that help you calibrate your saw control before the more demanding grin work.

  3. Remove the grin background

    Cut the outer arc and inner arc of the grin opening, leaving all tooth outlines as connected tabs. Work in sections, removing waste pieces as you go rather than trying to free the whole mouth at once. Keep each piece you remove so you can check its shape against your sketch.

  4. Free the alternating teeth

    Cut the vertical slots between each tooth pair, alternating between square tops and triangle tips. Square teeth need straight perpendicular cuts at the top; triangle teeth need two angled cuts meeting at a point. Leave every root firmly connected to the mouth edge and never cut a tooth completely free.

  5. Work the cheek openings

    With the mouth finished, begin the eighteen diamond and round cheek holes, working from the area closest to the mouth outward. Alternate between diamond cuts using a small chisel or detail blade and round holes with a borer. Keep at least a half inch of original rind between every adjacent pair of holes.

  6. Install lighting and photograph

    Place a warm LED at the center-back of the hollow so light radiates forward. In a dark room, the tooth shapes cast strong shadows and the diamond holes scatter secondary dots of light around the face. Photograph before and after lighting to capture both the crisp cut work and the glowing effect.

Written with AI to match this design

Gather your supplies

Check things off as you get ready.

Work on a stable surface, keep your free hand out of the cutting path, and have an adult handle sharp tools.

Three levels of light

  • Leave intact

    All rind between teeth, the brow bridges, and the wide cheek regions between holes stay dark.

  • Peel & shade

    None; the contrast is entirely from full cuts.

  • Cut through

    Triangle eyes, brow slots, the full grin with all twelve tooth-slot gaps, and all eighteen diamond and round cheek holes are cut through completely.

Learn the carving basics

Before you start cutting

Should I alternate square and triangle teeth in a strict pattern or can I cluster them?

Strict alternation reads more clearly as a deliberate pattern and distributes structural stress evenly. If you cluster several of one type together, the rind between a row of triangles (which have narrow tips) can become fragile. Stick to the alternating sequence for both visual and structural reasons.

How do I cut a clean triangle tooth tip without breaking it?

Score the two angled sides of the triangle lightly before cutting through completely. Use short strokes from the base toward the tip rather than sawing from the tip downward. This way, if the blade shifts slightly, it goes toward already-cut rind rather than through the tooth itself.

Will eighteen cheek holes make the pumpkin too fragile to handle?

As long as you leave at least a half inch of rind between every hole and between the holes and the main mouth, the structure holds well. Cut the holes after the mouth is complete and set, handle the pumpkin from the bottom rather than the sides, and avoid squeezing the cheek areas.

Your take belongs here, too.

Changed a detail? Made it simpler? Share a photo of your version and tell the community what worked.

Share your pumpkin

More pumpkins like this

You've reached the end Β· 8 pumpkins
The Patch Report

Fresh pumpkins, in your inbox.

The best new carvings, ideas worth stealing, and how-tos for carving season. Short, seasonal, and gone by November.

A short email during carving season. Unsubscribe anytime. See our privacy policy.