Halloween Pumpkin Carving Contest · Starts October 1st · $500 in prizes
← Back to ideas
@ai_concepts
Sep 25, 2026
Eight-Tooth Pumpkin Carving with Uneven Rooted TeethAI
0

Report this carving

Tell us what is wrong. Reports are private.

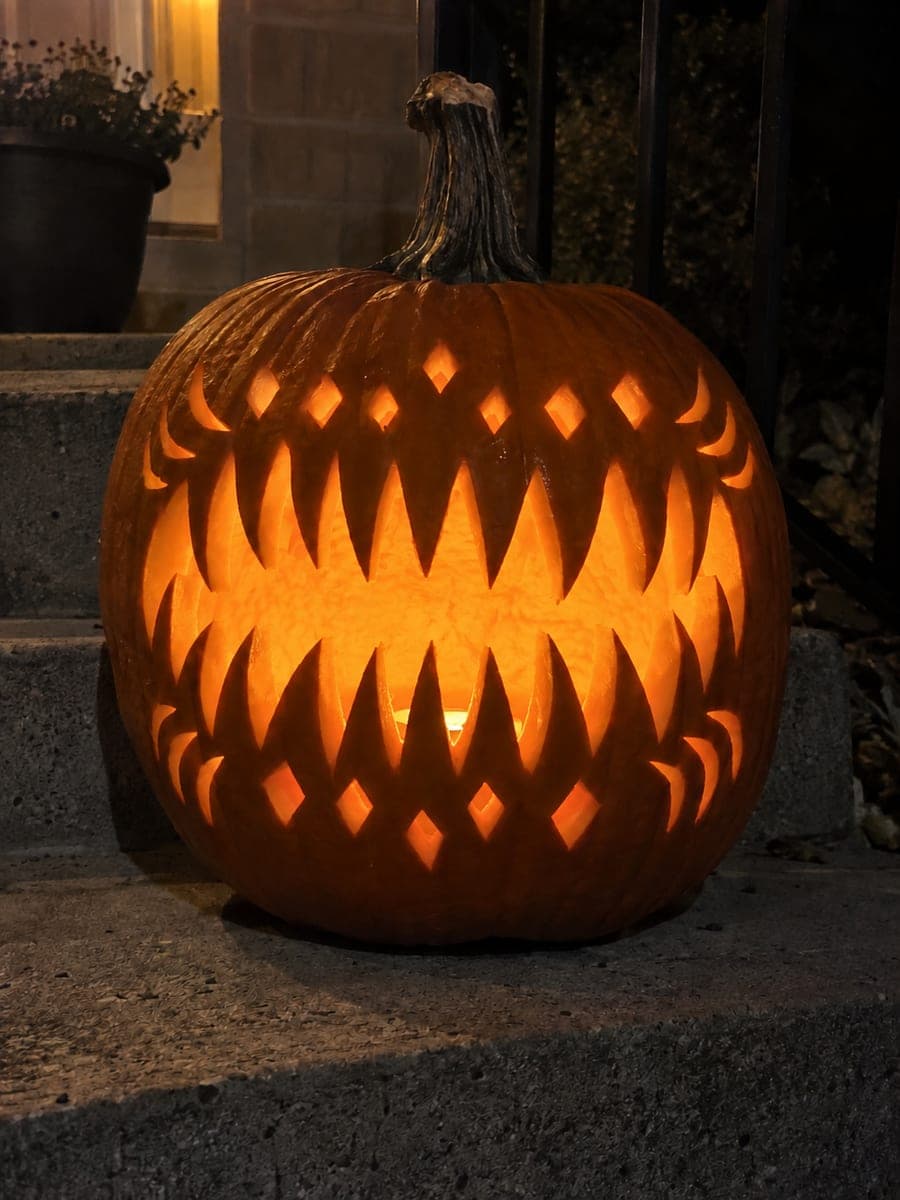
Eight-Tooth Pumpkin Carving with Uneven Rooted Teeth

A broad open mouth with eight alternating upper and lower rooted rectangular teeth of uneven sizes, two crescent eyes, and six round cheek holes make this medium pumpkin carving teeth pumpkin carving idea charming and off-kilter. Varying the tooth heights gives the grin a natural gap-toothed look; cut taller teeth with a slightly wider base so they stay put. Round cheek holes are simple with a step drill or borer.

No ratings yet · Sign in to rate

Comments (0)

  • No comments yet — be the first.

Save without an account. Sign in to like or comment.

Our tips for carving a similar design

The charm here is in the variation: eight rectangular teeth of different heights alternate between the upper and lower jaw to create a natural gap-toothed grin. Taller teeth need slightly wider bases to stay secure. The six round cheek holes are the easiest part and are best saved for last so they do not weaken the rind while you are working on the more demanding mouth.

From pumpkin to porch

  1. Hollow out the pumpkin

    Cut a lid at an angle so it seats without slipping in, then scoop the interior until the walls are about an inch thick. Wipe the face area dry and flat with a cloth. A consistently thick wall makes the teeth easier to cut cleanly and reduces the chance of a saw breaking through unexpectedly.

  2. Map the face layout

    Lightly sketch the two crescent eyes near the top third of the face. Below them, draw the broad mouth opening as a wide oval, then sketch eight rectangular teeth alternating top and bottom. Vary the tooth heights deliberately: tall teeth next to short ones look more natural. Mark where each root attaches to the mouth edge.

  3. Cut the mouth body

    Saw the outer perimeter of the mouth opening, leaving all tooth outlines intact as tabs attached to the edge. Remove the background waste pieces by pushing them inward. Work from the corners toward the center to keep the overall shape controlled.

  4. Shape the individual teeth

    Cut the narrow vertical slots between each tooth, freeing them from their neighbors while keeping each root connected to the mouth edge. Taller teeth should have slightly wider roots, so if you find a tall tooth looking narrow at the base, extend the root a little before completing the cuts beside it.

  5. Add the crescent eyes

    Pierce each crescent near its midpoint, then saw along the arc. Crescent cuts require smooth, continuous motion to avoid flat spots in the curve. Take your time and rotate the pumpkin rather than bending your wrist at awkward angles.

  6. Drill the cheek holes and light

    Use a step drill bit or a borer to make the six round cheek holes, three per side, outside the mouth area. Drill slowly to avoid cracking the rind. Insert a warm LED inside, set back toward the center, and enjoy how the scattered round holes add a glowing halo around the grinning mouth.

Written with AI to match this design

Gather your supplies

Check things off as you get ready.

Work on a stable surface, keep your free hand out of the cutting path, and have an adult handle sharp tools.

Three levels of light

  • Leave intact

    All rind between teeth, the cheeks above the mouth line, and the forehead area remain solid and dark.

  • Peel & shade

    None; all contrast comes from fully cut openings.

  • Cut through

    Both crescent eyes, the full mouth aperture with all eight tooth-slot gaps, and all six round cheek holes are cut through completely.

Learn the carving basics

Before you start cutting

How do I keep the alternating tooth heights consistent as I cut?

Mark each tooth's intended height with a horizontal pencil line before sawing. Cutting to a line is much easier than eyeballing the height mid-cut. Even if a tooth ends up slightly different from your sketch, small variations add character to the gap-toothed look.

Can I use a power drill for all the round holes?

Yes, a step drill bit set to a round hole diameter works well and is faster than a hand borer. Press firmly but move slowly so the bit does not skate across the rind. Pre-mark the center of each hole with a push pin to give the drill bit something to seat against.

The rind between adjacent teeth keeps cracking as I cut. What can I do?

Cracks usually happen when the saw blade binds against the narrow gap between teeth. Keep the blade moving at a steady pace without forcing it sideways, and widen the slot slightly rather than muscling through. Filling a small crack with a dab of petroleum jelly can slow browning but will not restore structural strength.

Your take belongs here, too.

Changed a detail? Made it simpler? Share a photo of your version and tell the community what worked.

Share your pumpkin

More pumpkins like this

You've reached the end · 8 pumpkins
The Patch Report

Fresh pumpkins, in your inbox.

The best new carvings, ideas worth stealing, and how-tos for carving season. Short, seasonal, and gone by November.

A short email during carving season. Unsubscribe anytime. See our privacy policy.