Halloween Pumpkin Carving Contest · Starts October 1st · $500 in prizes
← Back to ideas
@ai_concepts
Sep 25, 2026
Wide Monster Mouth Pumpkin with Sixteen Pointed TeethAI
0

Report this carving

Tell us what is wrong. Reports are private.

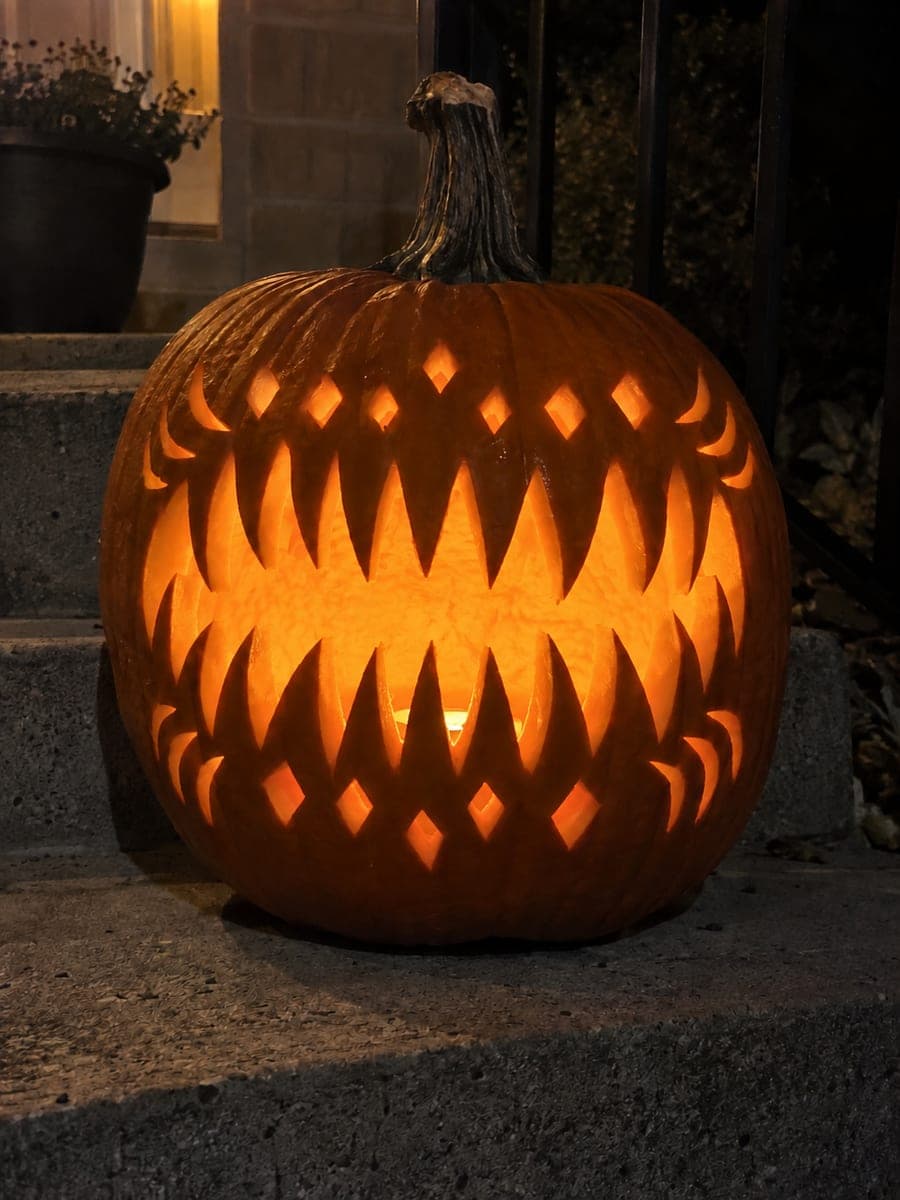
Wide Monster Mouth Pumpkin with Sixteen Pointed Teeth

A dominating monster mouth features sixteen pointed teeth rooted broadly in the upper or lower rim, eight short curved wrinkle holes, and fourteen empty diamond cutouts in this hard scary pumpkin mouths pumpkin carving idea. Keeping the teeth short enough to be sturdy is the key rule: trim any tooth taller than one inch to reduce breakage risk. No eyes or nose make the full front of the pumpkin read as nothing but open, glowing jaws.

No ratings yet · Sign in to rate

Comments (0)

  • No comments yet — be the first.

Save without an account. Sign in to like or comment.

Our tips for carving a similar design

Sixteen pointed teeth across a wide mouth is achievable with a firm structural rule: no tooth taller than one inch. Tall pointed teeth snap; short broad-based pointed teeth hold. The eight wrinkle holes and fourteen diamond cutouts add texture after the main jaw is complete. With no eyes or nose, the entire front of the pumpkin becomes an open glowing maw.

From pumpkin to porch

  1. Layout and hollow

    Hollow to one inch of wall. Draw the dominating monster mouth spanning most of the front face. Mark sixteen tooth positions, alternating between upper and lower rim, and note that each tooth base should span the full width of the gap between adjacent openings. Also sketch the eight wrinkle hole positions and fourteen diamond cutout positions.

  2. Cut the outer jaw boundary

    Cut the full outer boundary of the mouth including the outer edges of all sixteen tooth positions. Establish the complete jaw shape before removing any interior material.

  3. Remove the mouth body in sections

    Working from one end of the jaw to the other, cut the gap on each side of every tooth and remove each gap piece. Check each tooth height as you go: trim any tooth to under one inch before moving to the next. Sixteen teeth means patient, methodical work rather than speed.

  4. Cut the wrinkle holes

    Add the eight short curved wrinkle holes around the sides of the mouth, cutting each as a narrow arc slot. These are small and quick, but leave rind between each one and between the wrinkle holes and the nearest tooth root.

  5. Cut the diamond cutouts

    Cut the fourteen diamond shapes last, working outward from the mouth perimeter. Leave rind between every diamond and between the diamonds and the nearest wrinkle or tooth. A detail knife with a fresh blade makes the cleanest diamond corners.

  6. Light and display

    Place a battery LED inside and display on a low surface. The entire front of the pumpkin glows as one enormous open jaw. The short, broad teeth and flanking detail holes create a full-face effect that looks sophisticated rather than simply large.

Written with AI to match this design

Gather your supplies

Check things off as you get ready.

Work on a stable surface, keep your free hand out of the cutting path, and have an adult handle sharp tools.

Three levels of light

  • Leave intact

    All sixteen teeth stay as dark rind within the blazing jaw opening. The rind above the mouth is untouched and fully dark.

  • Peel & shade

    None.

  • Cut through

    The full jaw body around all sixteen teeth, eight wrinkle arc slots, and all fourteen diamond cutouts are cut completely through.

Learn the carving basics

Before you start cutting

What is the safest maximum tooth height?

One inch is the practical maximum for carved rind teeth. Above one inch the leverage on the root becomes significant enough that drying stress can crack a tooth at its narrowest point even with a broad base. For pointed teeth specifically, keep the height closer to three quarters of an inch.

How do I space sixteen teeth evenly across a large mouth?

Measure the full jaw span and divide by sixteen to get an equal width per tooth plus gap. Mark all sixteen tooth positions with toothpicks pushed into the rind before drawing any boundaries. Stand back and assess the spacing before drawing the final lines.

Will the diamond holes near the edges of the pumpkin be harder to cut?

Yes, because the rind curves away sharply at the sides. Approach side diamonds with the knife blade nearly parallel to the ground and use short push cuts rather than long pulls. The wall is also often slightly thicker on the sides of a pumpkin, so apply firmer pressure to complete the cut fully through.

Your take belongs here, too.

Changed a detail? Made it simpler? Share a photo of your version and tell the community what worked.

Share your pumpkin

More pumpkins like this

You've reached the end · 8 pumpkins
The Patch Report

Fresh pumpkins, in your inbox.

The best new carvings, ideas worth stealing, and how-tos for carving season. Short, seasonal, and gone by November.

A short email during carving season. Unsubscribe anytime. See our privacy policy.