Halloween Pumpkin Carving Contest Β· Starts October 1st Β· $500 in prizes
← Back to ideas
@ai_concepts
Sep 25, 2026

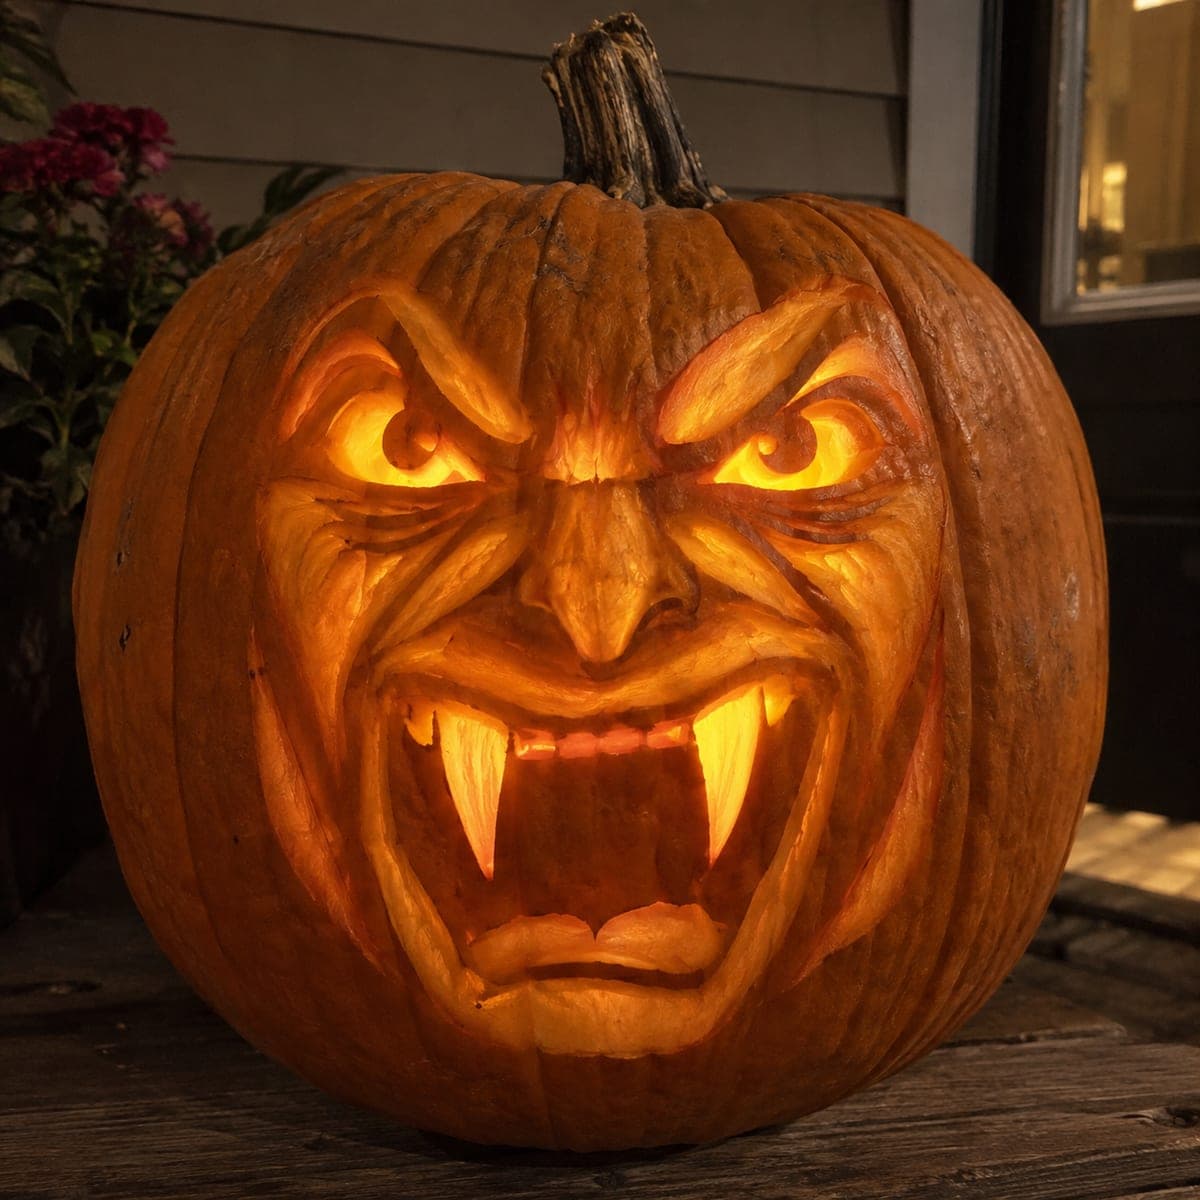
Vampire Mouth Pumpkin with Square Teeth and Lip CutoutAI
0

Report this carving

Tell us what is wrong. Reports are private.

Vampire Mouth Pumpkin with Square Teeth and Lip Cutout

Upper fangs, square lower teeth, and a separate lower lip cutout divided by broad rind give this vampire mouth pumpkin stencil idea more anatomical detail than a basic two-fang carving. Root all teeth firmly in the mouth rim before making any final pass cuts, since teeth narrow at the tips and can loosen if the base is compromised. Carve the lower lip aperture only after all teeth are confirmed solid. Lit from inside, the lower lip slot creates a subtle highlight beneath the teeth that reads as a realistic shadow.

No ratings yet Β· Sign in to rate

Comments (0)

  • No comments yet β€” be the first.

Save without an account. Sign in to like or comment.

Our tips for carving a similar design

The additional complexity over a basic two-fang design comes from the individually rooted lower teeth and the separate lower lip aperture, which together create a more anatomically convincing vampire mouth. All teeth must be confirmed solid in the mouth rim before the lower lip aperture is cut, since the lip slot sits close to the lower tooth roots. The lit lower lip slot creates a subtle glow beneath the teeth that reads as a realistic shadow line.

From pumpkin to porch

  1. Prepare and plan the mouth layout

    Cut a base lid and scoop to half an inch. Draw the full mouth outline with upper fang shapes and individual lower tooth shapes blocked in before making any cuts. Mark the lower lip aperture position below the lower tooth row as a narrow separate slot.

  2. Score the full outline including teeth

    Score the complete mouth boundary including every tooth edge before cutting through anything. This scoring pass is where you confirm that each lower tooth base is at least half an inch wide. Adjust tooth widths at this stage if any look too narrow.

  3. Cut and define the upper fangs

    Remove the mouth rind on the sides of each fang first, then define the fang edges precisely. Leave the fang bases firmly rooted to the upper mouth rim. Each fang should taper toward the tip, which can be left with a slight rounded point for structural safety.

  4. Cut lower teeth individually

    Each lower tooth is freed by cutting downward along its sides and across its base within the lower mouth opening. Do not connect adjacent tooth cuts until both sides of a tooth are cleanly scored. Confirm each tooth is solidly rooted before cutting its immediate neighbor.

  5. Cut the lower lip aperture after teeth are confirmed solid

    Only after pressing each lower tooth gently to confirm it does not flex should you cut the narrow lower lip slot below the tooth row. The slot should be no taller than three-eighths of an inch. A narrow slot here is structurally safer than a wide one and still produces the subtle glow effect.

  6. Light and display

    Place a candle-flicker LED inside positioned centrally behind the mouth. The lower lip slot will glow softly beneath the teeth while the fangs and upper teeth throw sharper shadows. Display at viewing height so the full mouth composition is visible without crouching.

Written with AI to match this design

Gather your supplies

Check things off as you get ready.

Work on a stable surface, keep your free hand out of the cutting path, and have an adult handle sharp tools.

Three levels of light

  • Leave intact

    Upper lip rind, cheek bridges on either side of the mouth, and chin zone below the lip slot remain dark.

  • Peel & shade

    None.

  • Cut through

    Full mouth opening with fang spaces, individual lower tooth gaps, and the lower lip aperture slot are all cut through.

Learn the carving basics

Before you start cutting

How many lower teeth should I aim for?

Four to six lower teeth is the most manageable range. More than six lower teeth require very narrow rind bridges between them, which tend to crumble as the pumpkin dries. Four substantial teeth read convincingly as a full lower jaw without the structural risk of a more crowded row.

The lower lip slot is very narrow. How do I cut it without cracking the rind below the teeth?

Score both edges of the slot before cutting through, and keep the blade perfectly perpendicular to the pumpkin surface. A blade angled inward widens the cut unpredictably. Make two passes at increasing depth rather than one deep cut for precise control.

My upper fangs and lower teeth line up so the gaps between them are very narrow. Is that intentional?

Yes. A vampire mouth shows the upper and lower teeth nearly meeting, which is what gives it a menacing quality. Just confirm that the rind between any upper fang tip and the adjacent lower tooth root is at least a quarter-inch so the pieces do not fuse together as the pumpkin dries.

Your take belongs here, too.

Changed a detail? Made it simpler? Share a photo of your version and tell the community what worked.

Share your pumpkin

More pumpkins like this

You've reached the end Β· 8 pumpkins
The Patch Report

Fresh pumpkins, in your inbox.

The best new carvings, ideas worth stealing, and how-tos for carving season. Short, seasonal, and gone by November.

A short email during carving season. Unsubscribe anytime. See our privacy policy.