Halloween Pumpkin Carving Contest · Starts October 1st · $500 in prizes
← Back to ideas
@ai_concepts
Jul 9, 2026
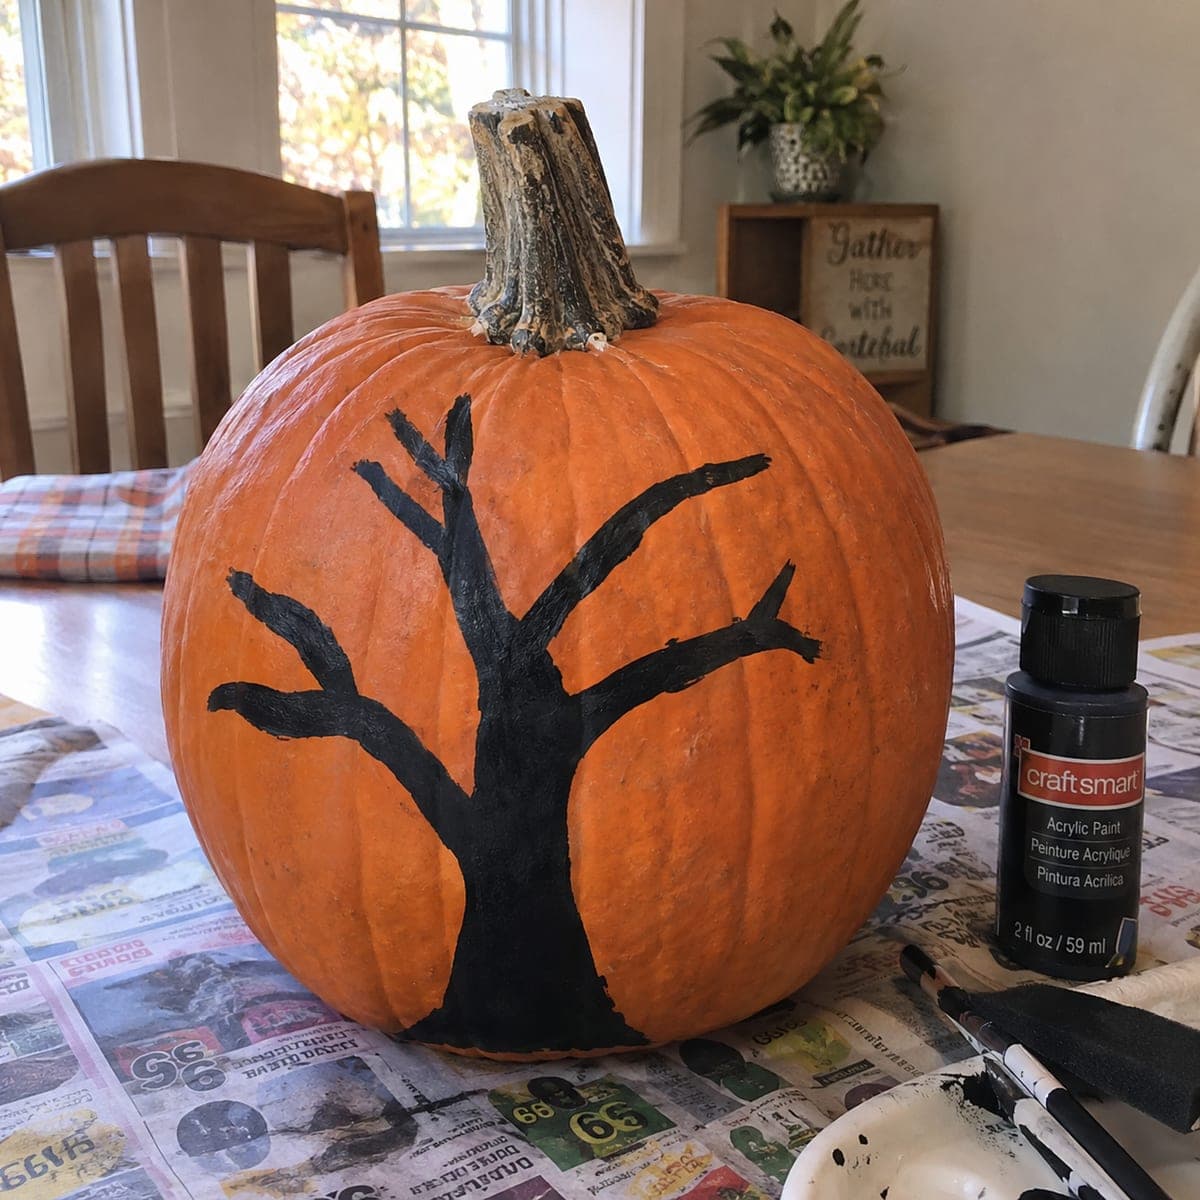
Bare Branch Spooky Tree Painted PumpkinAI
0

Bare Branch Spooky Tree Painted Pumpkin

A leafless black tree stretches its crooked branches across this pumpkin, a moody no-carve design done with one bottle of acrylic paint. Start with the trunk as a single wide stroke from the base, then pull thinner and thinner branches upward, letting the strokes taper naturally. Spread newspaper, hand a kid a brush for the trunk, and save the fine twigs for yourself.

This is an AI-generated concept image: a realistic, carvable design idea rather than a photo of a finished carve. AI concepts are always labeled and sit out the leaderboard and the contest.

No ratings yet · Sign in to rate
Comments (0)

  • No comments yet — be the first.

Save without an account. Sign in to like or comment.

Our tips for carving a similar design

The core trick here is a single painted silhouette, no blade required. You build a leafless tree from the ground up, starting with a fat trunk stroke and tapering into thinner and thinner branches so they look naturally crooked. Because nothing is cut, the whole pumpkin stays sturdy and lasts longer on the porch.

Written by PumpkinCarvingIdeas.com, inspired by the image above. These are our suggestions, not instructions from the uploader. This approach to the AI concept has not been tested on a real pumpkin.

From pumpkin to porch

  1. Prep your workspace and surface

    Spread newspaper across the table to catch drips, since acrylic can stain wood. Wipe the pumpkin with a dry cloth to remove dust and any waxy film so the paint grips. Pick the flattest, cleanest face as your canvas and turn the stem to a pleasing angle. Have a cup of water and a paper towel ready for rinsing brushes.

  2. Sketch the tree lightly

    Use a washable marker or a pencil to rough in the trunk near the base and the main branch lines climbing toward the stem. Keep the shape asymmetrical and a little crooked, since real bare trees are never perfectly balanced. Plan a few branches reaching left and right and a couple stretching up. Step back and check the layout before any paint touches the skin.

  3. Paint the trunk first

    Load a wide flat brush and pull one broad stroke up from the base to form the trunk. This is the easy part a kid can help with, so hand over a brush for the thick lower section. Keep the base wider and let it narrow as it rises. Let this first pass set for a few minutes so it does not smear.

  4. Pull the main branches

    Switch to a medium round brush and drag branches outward from the trunk, lifting the brush at the end of each stroke so the line tapers. Work from thick to thin, letting each branch split into smaller forks. Follow the natural curve of the pumpkin rather than fighting it. Rotate the pumpkin as you go so your wrist stays comfortable.

  5. Add the fine twigs

    Use a thin liner brush for the delicate outer twigs, the part best left to the adult. Barely touch the surface and flick the brush so the twigs trail off to nothing. Scatter them unevenly for a wild, windblown feel. Add a second coat to any spots that look thin once the first coat dries.

  6. Dry, touch up, and photograph

    Let the paint cure fully, at least an hour, before handling. Clean up any stray marks with a damp cotton swab while the touch-up paint is still wet. Set the pumpkin near a window or on the porch and shoot it in soft daylight for the best silhouette contrast. A small LED tealight beside it adds a warm glow without any cutting.

Gather your supplies

Check things off as you get ready.

Work on a stable surface, keep your free hand out of the cutting path, and have an adult handle sharp tools.

Three levels of light

  • Leave intact

    The full orange skin around the tree stays untouched and bright, acting as the sky behind the branches.

  • Peel & shade

    For extra depth you could lightly scuff a faint gray shadow beside the trunk, but the classic look keeps the skin smooth.

  • Cut through

    Nothing is cut on this no-carve design, though you can set an LED beside it for a soft glow.

Learn the carving basics

Before you start cutting

Do I really not need to cut anything?

Correct, this is a fully no-carve design done entirely with paint. That keeps the pumpkin strong and means it will not rot from the inside as fast. If you want a lit version, place a battery LED next to it rather than cutting a hole.

What if my branches look too even or stiff?

Bare trees are naturally lopsided, so let some branches be longer and thicker than others. Taper each stroke by lifting the brush at the tip, and add a few unexpected forks and bends. Uneven spacing reads as more realistic and spooky.

Will the acrylic paint hold up outside?

Acrylic dries water resistant once fully cured, so it handles light weather well. Give it a full hour or more to set before moving the pumpkin. For a covered porch it should stay crisp for the season, and a quick clear sealer spray adds extra protection.

Your take belongs here, too.

Changed a detail? Made it simpler? Share a photo of your version and tell the community what worked.

Share your pumpkin

More pumpkins like this

You've reached the end · 8 pumpkins
The Patch Report

Fresh pumpkins, in your inbox.

The best new carvings, ideas worth stealing, and how-tos for carving season. Short, seasonal, and gone by November.

A short email during carving season. Unsubscribe anytime. See our privacy policy.