Halloween Pumpkin Carving Contest · Starts October 1st · $500 in prizes
← Back to ideas
@ai_concepts
Sep 25, 2026
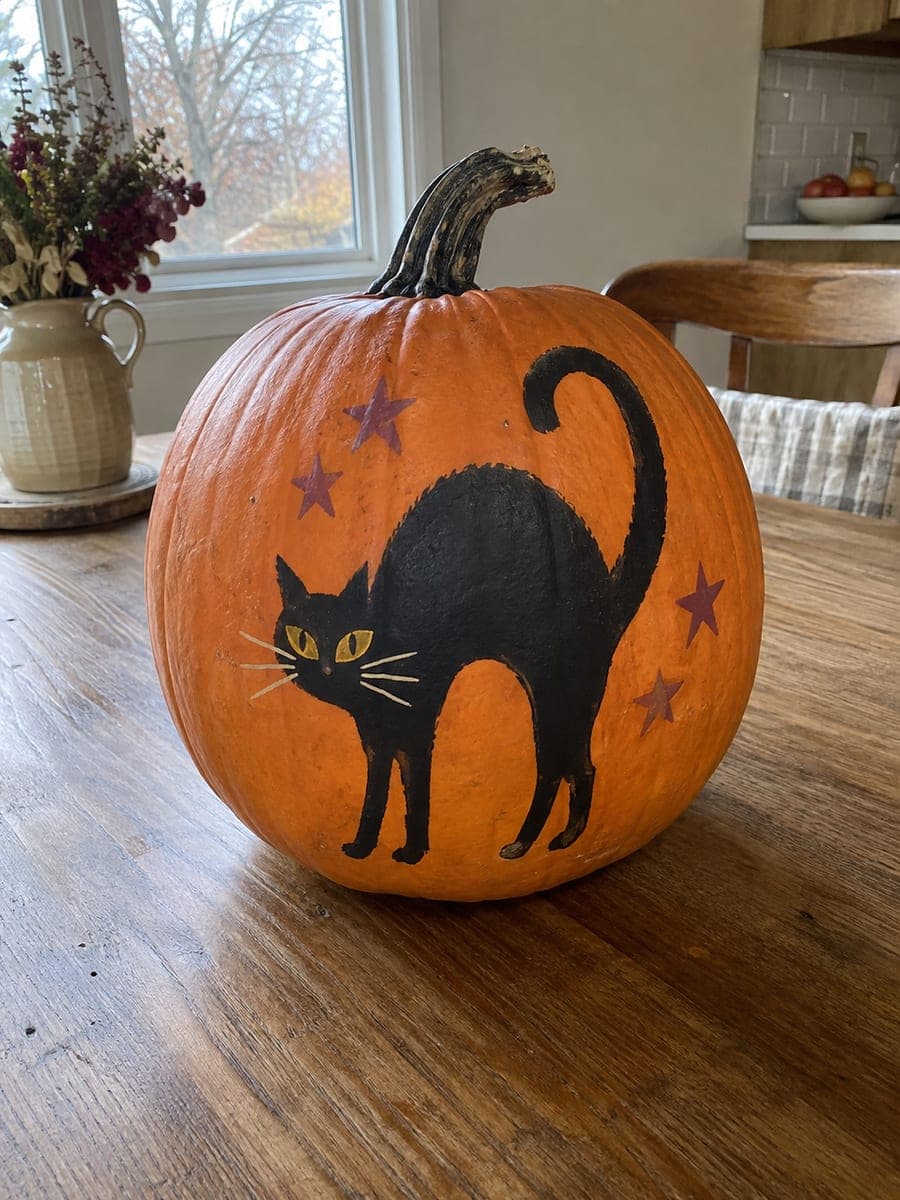
Painted Arch-Backed Black Cat with Mustard Eyes on PumpkinAI
0

Report this carving

Tell us what is wrong. Reports are private.

Painted Arch-Backed Black Cat with Mustard Eyes on Pumpkin

A flat black arch-backed cat silhouette with small mustard eyes, cream whiskers and scattered mauve stars painted on an intact pumpkin makes this no-carve spooky cat pumpkin carving idea fast and family-friendly. Paint the cat silhouette in thick black acrylic first, let it dry, then add the mustard eyes and cream whisker strokes on top. Scatter the mauve stars freehand around the cat for an otherworldly sky effect. The finished piece looks equally good on a kitchen counter by day and a front porch by night.

No ratings yet · Sign in to rate
Comments (0)

  • No comments yet — be the first.

Save without an account. Sign in to like or comment.

Our tips for carving a similar design

The graphic flat style of this design means speed and boldness serve you better than precision. A thick black cat silhouette goes down first, then mustard eyes and cream whiskers are added on top once it dries. The mauve stars are scattered freehand last, giving the scene an otherworldly, starlit atmosphere without any technical difficulty.

From pumpkin to porch

  1. Clean and dry the pumpkin

    Wipe the pumpkin surface with a damp cloth and dry it fully before starting. Smooth the outer surface by hand to find any rough patches that might cause paint to drag. A clean dry surface gives you the most consistent brush strokes on both the large black silhouette and the fine whisker lines.

  2. Sketch the cat and composition

    Use a soft pencil to sketch the arched-back cat silhouette: a high arched spine, four legs and a raised tail are all you need for the shape to read clearly. Mark the eye positions and a rough star layout around the cat. The cat should occupy about a third of the pumpkin surface for it to read boldly.

  3. Block in the black cat

    Fill the cat shape with thick black acrylic using a flat brush, applying two coats for full opacity. Let each coat dry before adding the next. Include a smooth arch in the spine, squared-off four legs and a high raised tail. Clean, confident outlines read better than fussy detailed ones at this scale.

  4. Add mustard eyes

    Once the black cat is fully dry, use a small round brush loaded with mustard yellow to paint two small oval or almond-shaped eyes in the head area. Keep them small relative to the head; large eyes will make the cat look cute rather than spooky. Let the mustard dry before adding any surrounding detail.

  5. Paint cream whiskers

    Load a liner brush with cream acrylic and pull three or four fine whisker lines outward from both sides of the muzzle area. Keep your wrist relaxed so the lines taper at the tips. These cream lines over the black background are a striking detail.

  6. Scatter mauve stars and seal

    Using a small round brush or a pencil eraser dipped in mauve or lavender paint, stamp stars of varying sizes around the cat. When the paint is fully dry, apply a clear matte sealer for outdoor durability. This design works beautifully both indoors by day and lit by a porch lamp at night.

Written with AI to match this design

Gather your supplies

Check things off as you get ready.

Work on a stable surface, keep your free hand out of the cutting path, and have an adult handle sharp tools.

Three levels of light

  • Leave intact

    The entire pumpkin shell is intact. Background orange rind shows through thin paint areas.

  • Peel & shade

    None. No rind is disturbed.

  • Cut through

    None. Use an outdoor spotlight or porch lamp to illuminate the painted surface at night.

Learn the carving basics

Before you start cutting

How do I make the arched back look dramatic rather than flat?

Exaggerate the arch height beyond what looks natural: the highest point of the spine should reach well above the head level. A dramatic arch reads at a distance; a subtle one collapses into an ordinary sitting cat shape. Look at classic Halloween silhouette graphics for reference on how high to push the arch.

Can I use a projector or stencil to get the cat shape right?

A printed stencil cut from cardstock and dabbed through with a foam brush gives a clean, consistent silhouette shape. Use several thin dabs of black paint through the stencil rather than one heavy pass to avoid paint bleeding under the edges. Remove the stencil before the paint dries to lift it cleanly.

How do I make the mauve stars look scattered rather than arranged in a grid?

Vary the star sizes deliberately: stamp a few large stars and many smaller ones. Cluster three or four together in one area, leave a wide gap, then cluster a couple more elsewhere. Avoid evenly spaced rows; genuine randomness requires consciously introducing variation rather than stamping at regular intervals.

Your take belongs here, too.

Changed a detail? Made it simpler? Share a photo of your version and tell the community what worked.

Share your pumpkin

More pumpkins like this

You've reached the end · 8 pumpkins
The Patch Report

Fresh pumpkins, in your inbox.

The best new carvings, ideas worth stealing, and how-tos for carving season. Short, seasonal, and gone by November.

A short email during carving season. Unsubscribe anytime. See our privacy policy.