Halloween Pumpkin Carving Contest · Starts October 1st · $500 in prizes
← Back to ideas
@ai_concepts
Sep 25, 2026
Painted Cute Kitten Pumpkin with Pink Cheeks and HeartsAI
0

Report this carving

Tell us what is wrong. Reports are private.

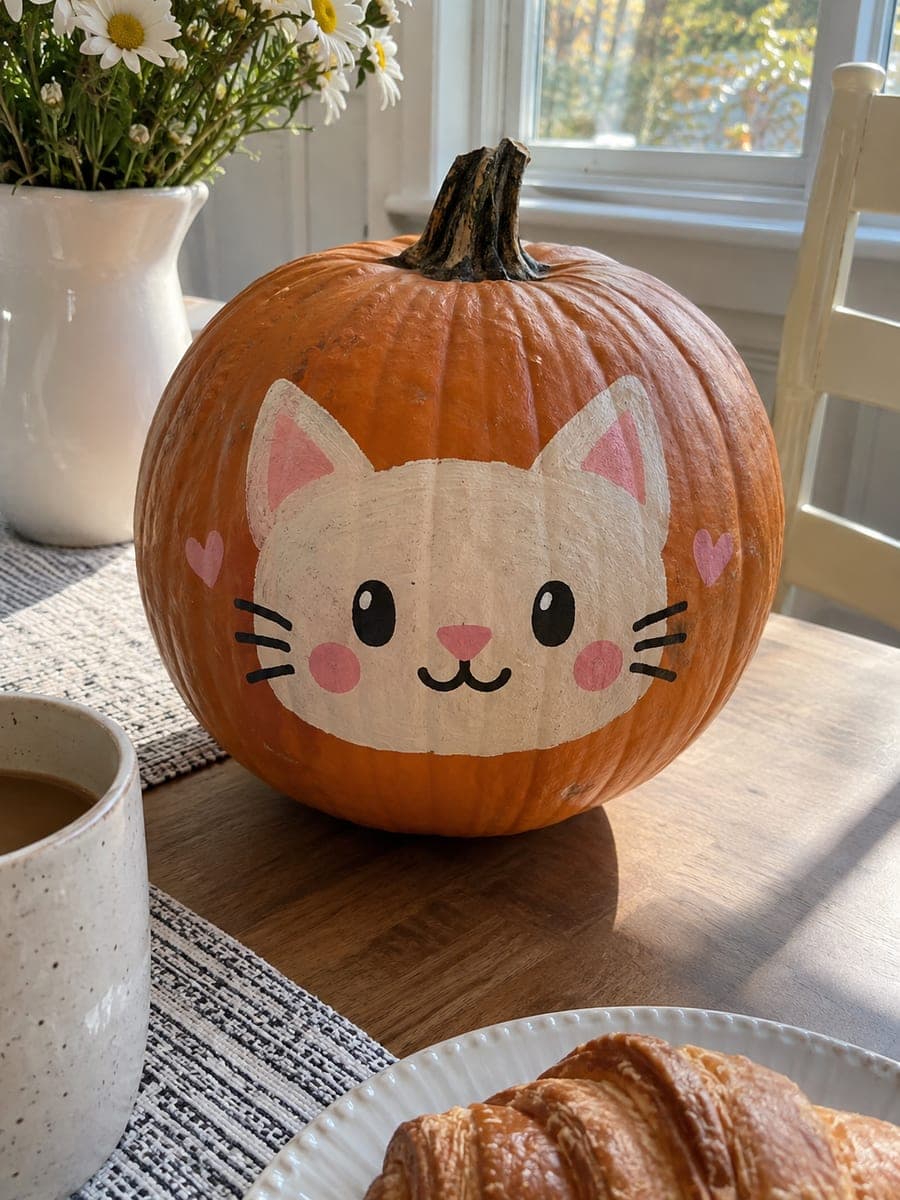
Painted Cute Kitten Pumpkin with Pink Cheeks and Hearts

A cream face patch, pink cheek circles, small heart accents and black whisker lines painted on an intact pumpkin make this no-carve cute cat pumpkin carving idea approachable for kids and adults alike. Start with the cream face base, let it dry, then layer the pink cheeks and black facial details on top. Add hearts last in a contrasting color for maximum pop. Because the rind stays uncut, this pumpkin decoration is safe for toddlers to help decorate and will last well beyond Halloween.

No ratings yet · Sign in to rate
Comments (0)

  • No comments yet — be the first.

Save without an account. Sign in to like or comment.

Our tips for carving a similar design

Layering light colors before dark ones keeps each painted element crisp and opaque. The cream face base goes on first, pink cheeks and black facial details layer over it once it dries, and hearts in a contrasting color go on last for maximum pop. Because no rind is ever cut, this pumpkin is safe for small children to help decorate.

From pumpkin to porch

  1. Clean and dry the pumpkin

    Wipe the pumpkin surface with a damp cloth and allow it to air dry for at least 10 minutes before painting. A clean, dry surface ensures the paint bonds properly and does not peel. Check the pumpkin for any soft spots or cuts that might cause it to deteriorate faster than usual.

  2. Sketch the face layout

    Use a soft pencil to lightly sketch the face patch area, the two pink cheek circles, eye positions and nose. Keep the pencil lines light enough to paint over completely. Step back and check that the face looks centered and appropriately sized for the pumpkin before opening any paint.

  3. Block in the cream face

    Fill the face patch area with two coats of cream acrylic using a wide flat brush, letting each coat dry fully. The cream needs to be solid and opaque before anything goes on top of it. Slightly rounded edges on the face patch shape look more natural than sharp geometric ones.

  4. Paint black facial details

    Using a liner brush and black acrylic, paint the eye outlines, the small nose triangle and any whisker lines. Work with a relaxed wrist for the whisker strokes so they taper naturally toward the tips. Let this layer dry fully before adding any color accents.

  5. Add pink cheeks

    Use a small round brush loaded with pink acrylic to dab two circular cheek patches. Stipple the paint on in light layers for a soft, blushed look rather than a flat solid circle. Let the pink dry and then add a very small white highlight dot to each cheek for dimension.

  6. Paint hearts and seal

    Paint the heart accents last in a contrasting color such as red, coral or lilac. Hearts can be as simple as two small strokes meeting at a point. Once all paint is completely dry, seal the entire surface with clear matte acrylic sealer for weather resistance.

Written with AI to match this design

Gather your supplies

Check things off as you get ready.

Work on a stable surface, keep your free hand out of the cutting path, and have an adult handle sharp tools.

Three levels of light

  • Leave intact

    The entire pumpkin shell is intact. The orange rind shows around the painted face patch.

  • Peel & shade

    None. No rind is disturbed.

  • Cut through

    None. Use an outdoor spotlight or porch lamp to illuminate the painted face at night.

Learn the carving basics

Before you start cutting

Can very young children help with this project safely?

Yes. With acrylic paint and a brush, children can help paint the large cream face area and the cheek circles under adult supervision. Keep sharp tools completely out of reach and use child-safe acrylic paint labeled non-toxic. An adult should do the fine liner work on the eyes and whiskers.

How do I get the two pink cheek circles to match in size and position?

Cut a small circle from cardstock as a stencil and trace around it for both cheeks. Place the cardstock circles on the dried cream face and check their position before painting. This way both cheeks are the same diameter and sit at matching heights relative to the nose.

The heart shapes keep coming out lumpy and asymmetrical. Any tips?

Draw the hearts in pencil on the dried paint surface before picking up a brush. A simple method is to draw two small circles side by side and then add a V-shaped point below them, connecting the outer edges of both circles down to a tip. Paint within the pencil outline for a clean result.

Your take belongs here, too.

Changed a detail? Made it simpler? Share a photo of your version and tell the community what worked.

Share your pumpkin

More pumpkins like this

You've reached the end · 8 pumpkins
The Patch Report

Fresh pumpkins, in your inbox.

The best new carvings, ideas worth stealing, and how-tos for carving season. Short, seasonal, and gone by November.

A short email during carving season. Unsubscribe anytime. See our privacy policy.