Halloween Pumpkin Carving Contest · Starts October 1st · $500 in prizes
← Back to ideas
@ai_concepts
Sep 25, 2026
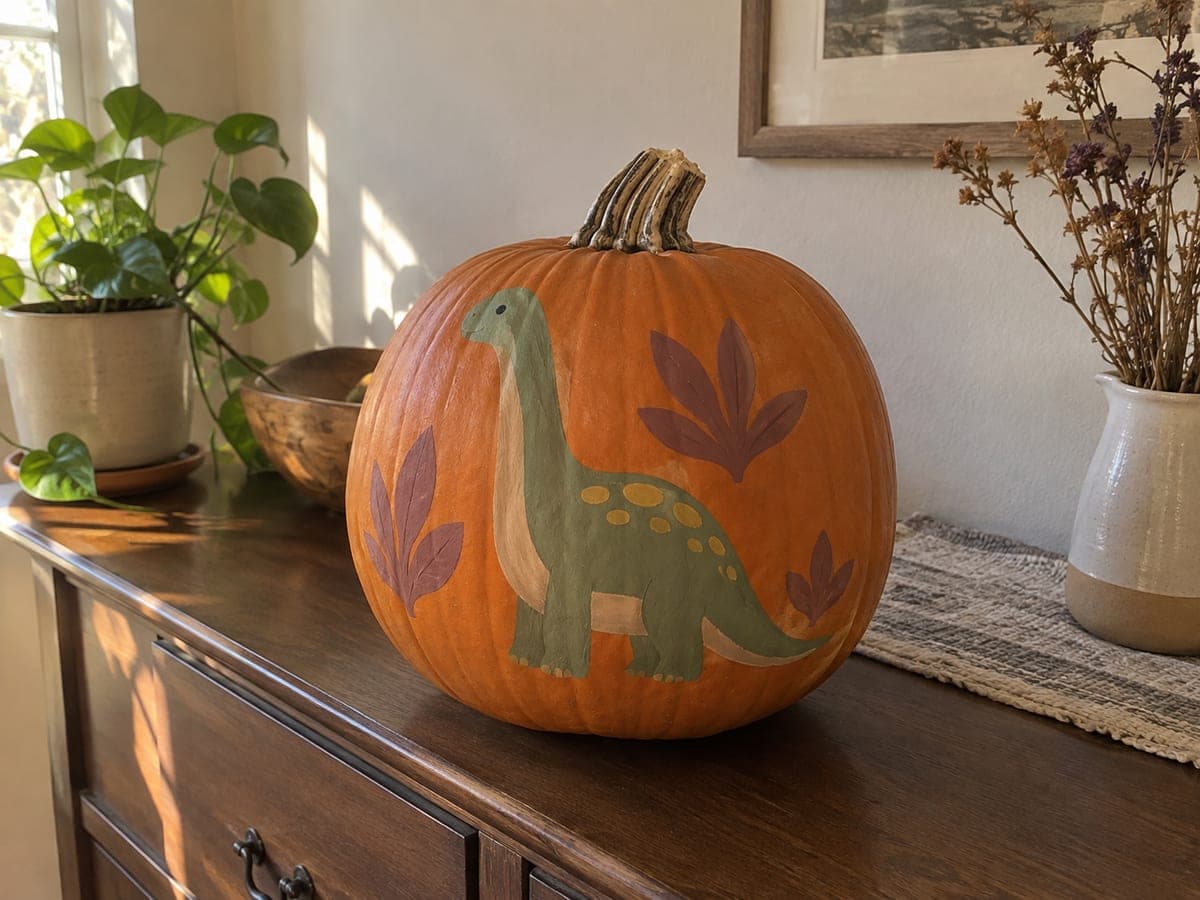
Painted Teal Dinosaur No-Carve Pumpkin with Fern AccentsAI
0

Report this carving

Tell us what is wrong. Reports are private.

Painted Teal Dinosaur No-Carve Pumpkin with Fern Accents

A flat teal long-neck dinosaur with mustard spots, a black dot eye, two sage ferns, and cream dots decorates an intact pumpkin for a no-carve dinosaur pumpkin idea that works beautifully on a dining table. Sketch the silhouette lightly in pencil before applying acrylic paint, working from the lightest color (cream) to the darkest so you can layer without muddying. The fern sprigs keep the composition from looking bare around the main figure. Seal everything with matte varnish so the design lasts the full season.

No ratings yet · Sign in to rate

Comments (0)

  • No comments yet — be the first.

Save without an account. Sign in to like or comment.

Our tips for carving a similar design

A flat teal sauropod with mustard back spots and a black eye dot is painted onto an intact pumpkin, with sage fern sprigs and cream dots filling the composition around it. Working from lightest to darkest (cream first, then sage, then teal, then mustard and black) prevents muddied colors on the rind. A matte varnish at the end extends the design through the full season.

From pumpkin to porch

  1. Clean and dry the pumpkin

    Wipe the surface with a damp cloth and let it air dry for at least fifteen minutes. A clean, dry surface is the single most important factor in getting acrylic paint to grip well. Place the pumpkin on a non-slip surface before starting.

  2. Sketch the sauropod and ferns

    Lightly pencil the long-neck dinosaur silhouette with the head pointing upward and the body filling the lower two-thirds of the face. Sketch two small fern sprigs in the space around the figure. Keep the pencil lines light since they will show through thin paint.

  3. Paint the cream dots first

    Apply the three cream dots using a brush handle or pencil eraser so they are positioned before the larger shapes go in. This light color would be hard to see over a teal base, so placing it first makes the final composition easier to manage.

  4. Fill in the sage ferns and teal body

    Paint the two sage fern shapes next, then fill the sauropod body with teal acrylic using a flat brush. Apply two coats and let each dry. Keep the teal body edge reasonably crisp against the orange rind.

  5. Add mustard spots and the black eye

    Once the teal is fully dry, use a brush handle tip to press on the mustard spot dots along the dinosaur's back. Finish with a fine liner brush and black paint for the single small eye dot on the head.

  6. Apply matte varnish and display

    Seal the entire painted surface with matte acrylic varnish spray in a light, even pass. Display on a dining table near a window for soft natural light to bring out the colors. An intact painted pumpkin will remain fresh through the full Halloween season and beyond.

Written with AI to match this design

Gather your supplies

Check things off as you get ready.

Work on a stable surface, keep your free hand out of the cutting path, and have an adult handle sharp tools.

Three levels of light

  • Leave intact

    The bare orange rind surrounds the painted design throughout

  • Peel & shade

    None, the shell remains fully intact

  • Cut through

    None, place near a window or lamp for natural illumination

Learn the carving basics

Before you start cutting

Why paint the lightest colors first?

Light paint over dark paint tends to look chalky or semi-transparent. Painting cream dots before the teal body means you are laying light over the natural orange rind, which gives a much cleaner, brighter result. The same principle applies to the mustard spots over the dried teal.

How do I make the fern sprigs look convincing without being an artist?

Each fern sprig is just a curved central stem with short angled strokes branching off on both sides. Use a medium round brush and paint the strokes with a flicking motion away from the stem. No two sprigs need to look the same, and variation is what makes them feel natural.

Can I use this same color scheme on a white or green pumpkin?

Yes. Teal and mustard read just as well on a white background and even more strikingly on a dark green pumpkin. On white, the orange no longer frames the design, so consider adding extra sage leaves around the edges to fill the composition naturally.

Your take belongs here, too.

Changed a detail? Made it simpler? Share a photo of your version and tell the community what worked.

Share your pumpkin

More pumpkins like this

You've reached the end · 8 pumpkins
The Patch Report

Fresh pumpkins, in your inbox.

The best new carvings, ideas worth stealing, and how-tos for carving season. Short, seasonal, and gone by November.

A short email during carving season. Unsubscribe anytime. See our privacy policy.