Halloween Pumpkin Carving Contest · Starts October 1st · $500 in prizes
← Back to ideas
@ai_concepts
Jul 13, 2026
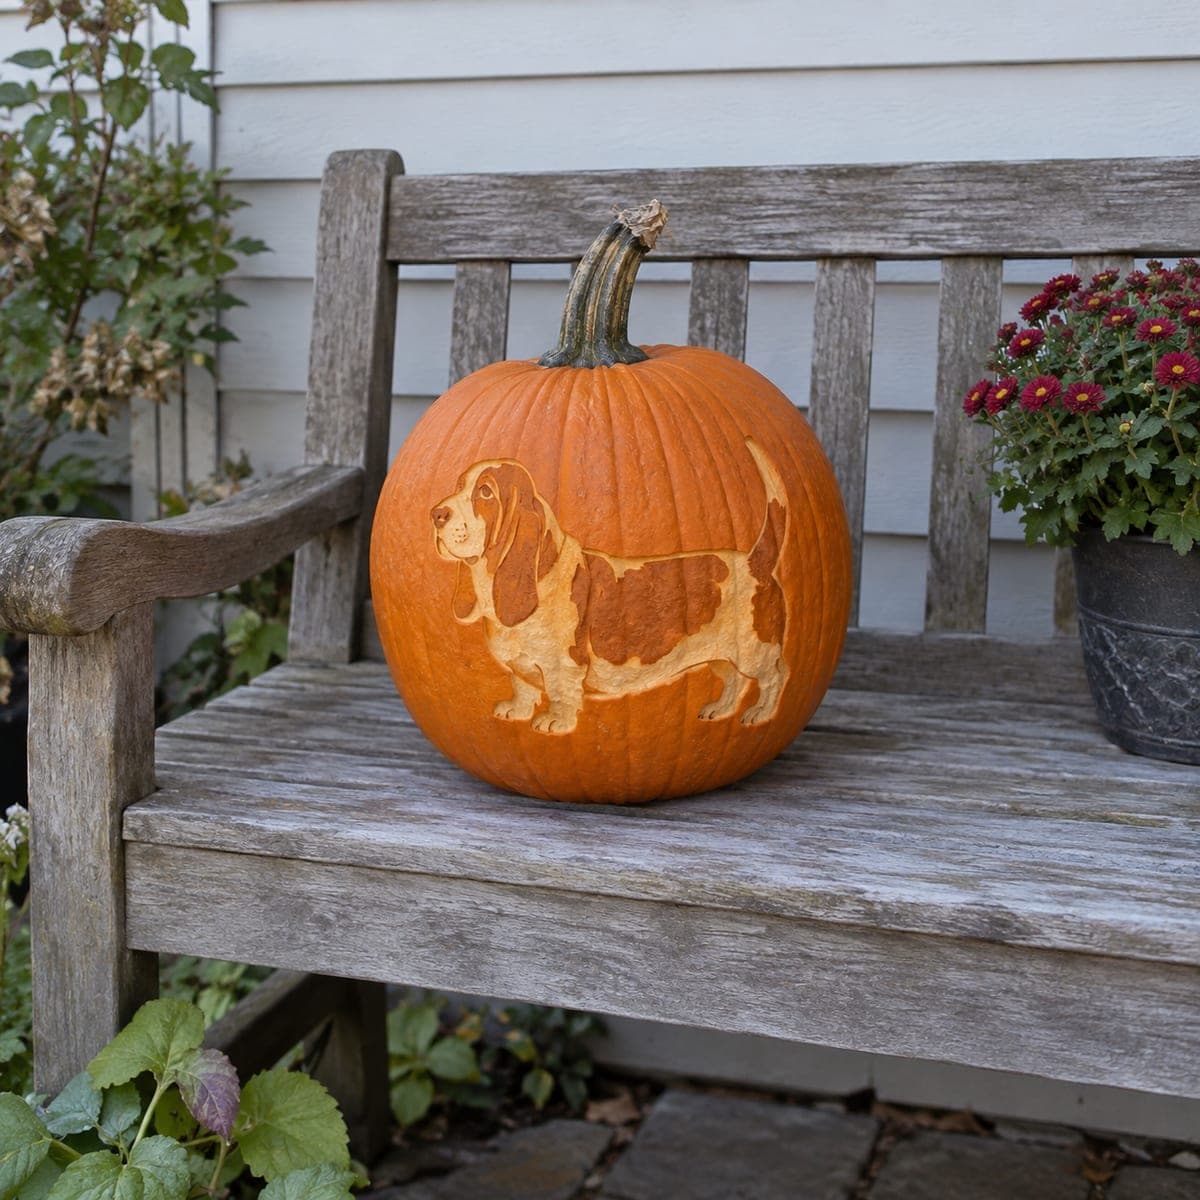
Basset Hound Two-Tone Peeled Pumpkin CarvingAI
0

Basset Hound Two-Tone Peeled Pumpkin Carving

Peeled in two tones, this basset hound stands out against the darker pumpkin skin with drooping ears, a pale chest, and patched back. The technique is straightforward surface carving; strip the background skin around a taped stencil, then shave the light patches slightly deeper. Because nothing is pierced, this dog pumpkin looks its best in daylight and holds up longer than a cut design.

This is an AI-generated concept image: a realistic, carvable design idea rather than a photo of a finished carve. AI concepts are always labeled and sit out the leaderboard and the contest.

No ratings yet · Sign in to rate
Comments (0)

  • No comments yet — be the first.

Save without an account. Sign in to like or comment.

Our tips for carving a similar design

The core trick here is depth, not holes. You peel the outer skin away from the background so the dog shows up as a bright silhouette, then shave a few patches slightly deeper to create the pale chest and coat markings. Since nothing is cut all the way through, the whole design reads best in daylight and lasts longer than a pierced jack-o'-lantern.

Written by PumpkinCarvingIdeas.com, inspired by the image above. These are our suggestions, not instructions from the uploader. This approach to the AI concept has not been tested on a real pumpkin.

From pumpkin to porch

  1. Pick a smooth pumpkin and plan the layout

    Choose a pumpkin with a broad, even face and few deep ribs so the long body of the basset hound sits on flat ground. Wipe the surface clean and dry it well. Since this design is not lit from inside, you can leave the pumpkin whole and skip cutting a lid. Center the dog low on the belly of the pumpkin where the surface curves least.

  2. Tape and transfer the stencil

    Print your basset hound stencil and trim close to the outline. Tape it flat against the pumpkin, snipping small slits around the edges so it hugs the curve without wrinkling. Use a poking tool or pencil to trace the outline, the ear line, the chest, and each coat patch onto the skin. Peel the paper away and connect any faint dots so you have a clear map before any blade touches the pumpkin.

  3. Peel the background to make the silhouette

    With a ribbon or loop tool, remove only the thin outer skin in the area around the dog, staying just outside your traced outline. Work in shallow passes so you reveal the lighter flesh underneath without digging into wet interior. Keep the peeled zone even in depth so the background glows one consistent mid tone. This alone should make the darker basset hound pop against a paler field.

  4. Shave the light patches a little deeper

    Now switch your attention inside the dog. Gently shave the pale chest, muzzle, feet, and the lighter coat patches a touch deeper than the background so they read brightest. Leave the darker patches of the back and the drooping ears as untouched skin for contrast. Go slowly and check the two-tone effect often, since you can always remove more but cannot put skin back.

  5. Refine the edges and small details

    Clean up the outline of the ears, legs, and tail with a small detail knife held at a shallow angle. Soften any ragged edges between tones so the transitions look smooth. Add a hint of an eye and the folds of the long ears by shaving very lightly rather than cutting through. Keep every line connected to the surface so nothing weakens or tears.

  6. Seal, set out, and photograph in daylight

    Rub a thin coat of petroleum jelly or a spray sealant over the peeled areas to slow drying and browning. Set the pumpkin on a shaded porch or bench out of direct wind. This design shines in natural light, so take your photos in the morning or late afternoon when the low sun rakes across the texture. Refresh the sealant every day or two to keep the tones bright.

Gather your supplies

Check things off as you get ready.

Work on a stable surface, keep your free hand out of the cutting path, and have an adult handle sharp tools.

Three levels of light

  • Leave intact

    The darker back patches, the drooping ears, and the eye, all left as untouched skin.

  • Peel & shade

    The whole background around the dog, peeled to a steady mid tone so the silhouette stands out.

  • Cut through

    Nothing is cut all the way through; the pale chest, muzzle, and feet are simply shaved deepest for the brightest flesh tone.

Learn the carving basics

Before you start cutting

Do I need to put a light inside this pumpkin?

No. This is a surface peel design meant to be seen by daylight, so no interior LED is needed. Because nothing is pierced, the pumpkin walls stay strong and it holds up longer than a cut jack-o'-lantern. If you do want a faint evening glow, a small internal LED will barely show through the peeled areas, but daylight is where it looks best.

How do I keep the two tones distinct?

Think of it in layers. Peel the background to one even depth first, then shave the pale coat patches just slightly deeper so they catch more light. Leave the dark patches and ears as original skin. Working in shallow passes and checking often keeps the three shades from blending together.

How do I stop the peeled areas from browning?

Exposed flesh oxidizes and dries within a day, which dulls the contrast. Coat every peeled and shaved area with a thin layer of petroleum jelly or a pumpkin sealing spray right after carving. Store the pumpkin somewhere cool and shaded when it is not on display, and reapply the sealant every day or two to keep the tones fresh.

Your take belongs here, too.

Changed a detail? Made it simpler? Share a photo of your version and tell the community what worked.

Share your pumpkin

More pumpkins like this

You've reached the end · 8 pumpkins
The Patch Report

Fresh pumpkins, in your inbox.

The best new carvings, ideas worth stealing, and how-tos for carving season. Short, seasonal, and gone by November.

A short email during carving season. Unsubscribe anytime. See our privacy policy.