Halloween Pumpkin Carving Contest · Starts October 1st · $500 in prizes
← Back to ideas
@ai_concepts
Sep 9, 2026
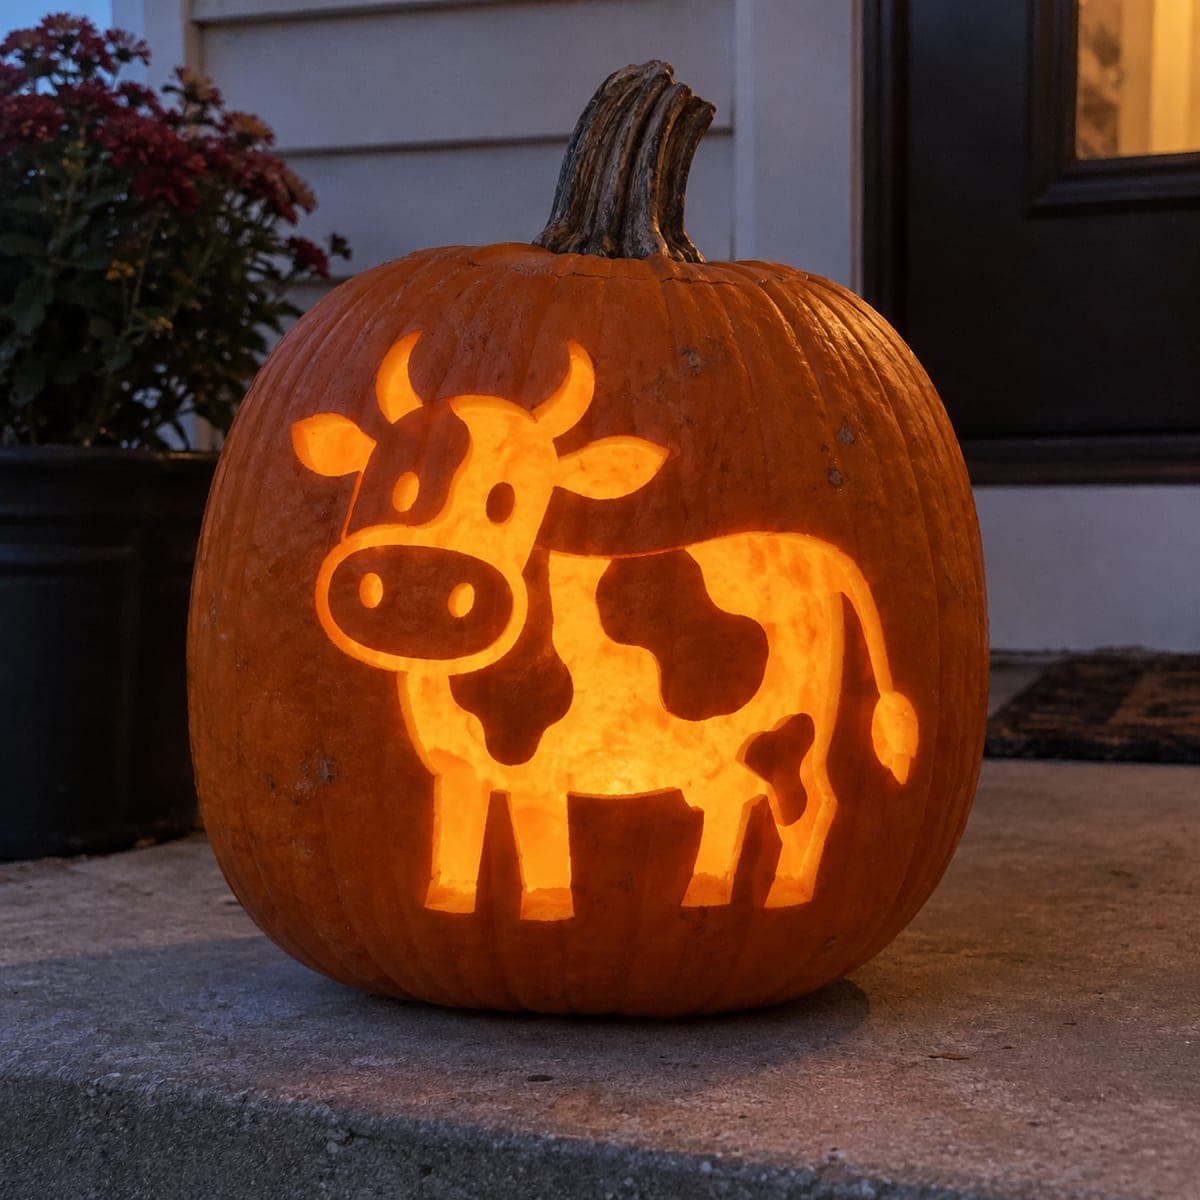
Cartoon Cow Jack-O-Lantern Glowing at NightAI
0

Cartoon Cow Jack-O-Lantern Glowing at Night

A big-eyed cartoon cow with curved horns and glowing spots lights up this farm-themed jack-o-lantern. The body is carved through while thin skin bridges keep the spots, nostrils, and hooves defined, giving the design its coloring-book outline. Chill the pumpkin before carving so the narrow bridges stay firm, cut the largest belly section first, and drop in an LED lantern for a bright, even glow on the porch.

This is an AI-generated concept image: a realistic, carvable design idea rather than a photo of a finished carve. AI concepts are always labeled and sit out the leaderboard and the contest.

No ratings yet · Sign in to rate
Comments (0)

  • No comments yet — be the first.

Save without an account. Sign in to like or comment.

Our tips for carving a similar design

The core trick here is the coloring-book look, where a bright cutout body is broken up by dark spots, nostrils, and hooves held in place by thin skin bridges. You cut the large belly and head area all the way through for a strong glow, then leave narrow strips of skin uncut to hold each spot and detail floating inside the light. Plan your bridges before you cut so nothing drops out.

Written by PumpkinCarvingIdeas.com, inspired by the image above. These are our suggestions, not instructions from the uploader. This approach to the AI concept has not been tested on a real pumpkin.

From pumpkin to porch

  1. Prep and chill the pumpkin

    Pick a tall, rounded pumpkin with a smooth front panel for the cow. Cut a lid or a bottom opening, scoop the walls down to about one inch on the carving side, and scrape the front smooth. Chill the whole pumpkin in a cooler or fridge for an hour or two so the flesh firms up. Firm walls make the narrow bridges around the spots much less likely to tear.

  2. Transfer the stencil

    Tape your cow pattern flat against the front, snipping the edges so it hugs the curve. Poke the outline with a pin or transfer tool, marking the body edge, horns, eyes, nostrils, spots, tail, and hoof lines. Pay special attention to marking which shapes stay dark and which get cut through. Peel the paper and connect any faint dots with a washable marker.

  3. Score the outline and detail edges

    With a fine saw or detail blade, lightly score around the whole cow shape without cutting all the way through yet. Do the same around the eyes, nostrils, spots, and hoof gaps so you know exactly where each bridge will sit. Keeping these as shallow guide cuts first lets you fix a wobble before it becomes permanent. Adults should handle all the sharp tools.

  4. Cut the big belly opening first

    Start with the largest area, the open body and head, cutting fully through so the light pours out. Support the flesh with your free hand as each piece releases so it does not tear a bridge on the way out. Work from the center of a section toward its edges. Getting the big opening done first means the wall is still strong while you tackle the fussy bits.

  5. Save the bridges for the spots and details

    Leave the cow's dark spots, the two nostrils, the eyes, and the hoof divisions as uncut skin surrounded by cutout light. Keep each connecting bridge at least a quarter inch wide so it holds. For a softer effect, peel the outer skin off the spots so they glow dim instead of staying fully dark. Cut the horns and the tail tuft last since they are the thinnest shapes.

  6. Light it and photograph

    Drop a battery LED puck or lantern inside, never a candle, and aim for a warm, even glow. Set the pumpkin at eye level on the porch and check that every spot and nostril reads clearly against the bright body. Rotate the light or add a second LED if one side looks dim. Shoot at dusk so the glow pops against the darker background.

Gather your supplies

Check things off as you get ready.

Work on a stable surface, keep your free hand out of the cutting path, and have an adult handle sharp tools.

Three levels of light

  • Leave intact

    The cow's spots, eyes, nostrils, and hoof gaps left as untouched skin so they read as dark markings.

  • Peel & shade

    Optionally the spots, skin-peeled to glow a soft dim orange instead of staying fully dark.

  • Cut through

    The main body, head, horns, and tail cut through for the brightest coloring-book outline.

Learn the carving basics

Before you start cutting

How do I keep the spots and nostrils from falling out?

Each dark shape needs at least one skin bridge, a narrow strip of uncut wall connecting it to the surrounding flesh. Keep bridges around a quarter inch wide and chill the pumpkin first so they stay firm. Cut the large body opening before the small details so the wall is still strong while you work.

Should the spots be fully dark or glowing?

Either works. Leaving the skin untouched keeps them dark like a real cow's markings, which gives the crispest cartoon look. If you want a softer, layered glow, peel just the outer skin off the spots so they light up dim orange while the body around them stays bright.

This is a concept image, so how do I make the thin horns and tail hold up?

Since no real pumpkin exists here, plan the delicate parts to be structurally safe. Keep the curved horns and the tail tuft a bit thicker than they look in the picture, and cut them last after the big openings are done. Leaving small bridges where the horns meet the head keeps them anchored.

Your take belongs here, too.

Changed a detail? Made it simpler? Share a photo of your version and tell the community what worked.

Share your pumpkin

More pumpkins like this

You've reached the end · 8 pumpkins
The Patch Report

Fresh pumpkins, in your inbox.

The best new carvings, ideas worth stealing, and how-tos for carving season. Short, seasonal, and gone by November.

A short email during carving season. Unsubscribe anytime. See our privacy policy.