Halloween Pumpkin Carving Contest · Starts October 1st · $500 in prizes
← Back to ideas
@ai_concepts
Sep 10, 2026
Cartoon Goofy Face Jack-O-Lantern with Big NoseAI
0

Cartoon Goofy Face Jack-O-Lantern with Big Nose

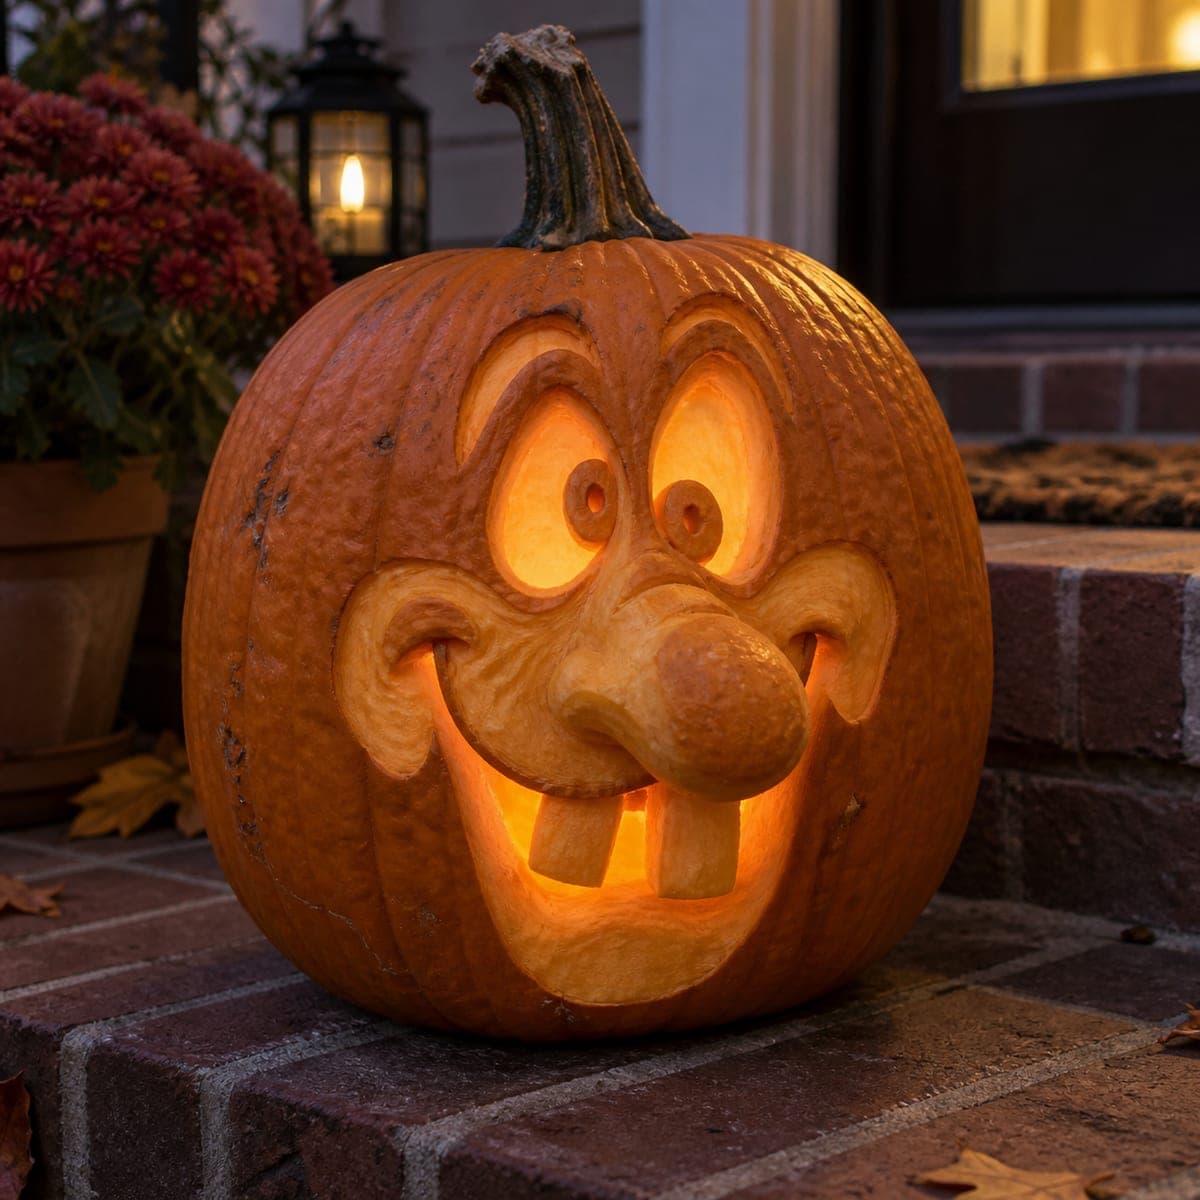
A cartoonish, expressive face with round spiral eyes, a bulbous nose, and a wide open mouth showing two buck teeth is carved into this glowing pumpkin, combining shading and cutout techniques for a three-dimensional look. The nose is a retained pumpkin bump carved in the round, giving the face real depth. To get the round eye effect, carve concentric rings at decreasing depths before removing the pupil center entirely. This funny Jack-O-Lantern carving idea works well as a door-greeter pumpkin that delights trick-or-treaters of all ages.

This is an AI-generated concept image: a realistic, carvable design idea rather than a photo of a finished carve. AI concepts are always labeled and sit out the leaderboard and the contest.

No ratings yet · Sign in to rate
Comments (0)

  • No comments yet — be the first.

Save without an account. Sign in to like or comment.

Our tips for carving a similar design

The core trick here is leaving the nose as an uncarved bump and sculpting it in the round so the face gains real depth. Everything else works in layers: shaded skin for the raised brows and cheeks, dim peels for the eye whites, and full cutouts for the pupils and mouth. Plan your light zones before any blade touches the shell so the goofy grin reads clearly from the sidewalk.

Written by PumpkinCarvingIdeas.com, inspired by the image above. These are our suggestions, not instructions from the uploader. This approach to the AI concept has not been tested on a real pumpkin.

From pumpkin to porch

  1. Pick the pumpkin and plan the nose

    Look for a pumpkin with a natural bump or a rounder lobe near the center front, since that raised area becomes the nose. A tall, wide face gives you room for big spiral eyes and a broad grin. Wipe the surface clean and dry it. Mark a rough centerline so the features stay balanced left to right.

  2. Open the back and clean it out

    Cut an access hole in the back rather than the top so the stem and forehead stay intact. Have an adult handle the large knife for this cut. Scoop the pulp and scrape the inside wall behind the face down to about one inch thick, which makes shading and cutouts far easier. Save some seeds if you want to roast them later.

  3. Transfer the stencil and score the outlines

    Tape your goofy-face pattern over the front, keeping the nose bump inside the nose shape. Poke through the lines or trace them, then remove the paper. With a small detail knife, lightly score all the outlines: the raised brows, the round eyes, the cheeks, the nose, and the mouth. This gives you clean edges to carve up to and stops mistakes from spreading.

  4. Sculpt the nose and shade the raised features

    Carve around the nose bump to free it, then round it into a bulb shape by shaving the sides at an angle so it stands off the face. Use a peeling or ribbon tool to skin the brows, cheeks, and the arcs beside the mouth so they catch light as soft mid tones. Keep these areas as raised relief, removing only the outer skin and a thin layer beneath. Work slowly and keep your free hand behind the blade.

  5. Build the spiral eyes in rings

    For each eye, carve the outer ring shallow, then step a little deeper toward the center to make concentric rings of decreasing depth. Peel the eye whites so they glow dim orange, leaving thin ridges between the rings for that cartoon swirl look. Save the small pupil circles for last and cut those all the way through for two bright dots. Take your time here since the rings are what sell the wacky expression.

  6. Cut the mouth, add teeth, then light it

    Cut the wide open mouth through the shell last, since it is the biggest opening and weakens the wall. Leave two buck teeth as attached bridges of skin at the top so they stay strong and read as solid teeth. Clean up all the edges, then set a battery LED inside through the back hole. Set it on the step at dusk and take your photo while the eyes and grin are glowing.

Gather your supplies

Check things off as you get ready.

Work on a stable surface, keep your free hand out of the cutting path, and have an adult handle sharp tools.

Three levels of light

  • Leave intact

    The forehead, the outer face, and the raised nose bump stay as dark untouched skin for contrast.

  • Peel & shade

    The eye whites, brows, cheeks, and the arcs beside the mouth get skin-peeled for a soft mid glow.

  • Cut through

    The two small pupils and the wide open mouth are cut all the way through for the brightest light.

Learn the carving basics

Before you start cutting

How do I keep the nose bump from breaking off?

Do not undercut it too deeply. Round the sides but leave a solid base of pumpkin connecting the nose to the face wall. Since this is a relief feature and not a cutout, it stays strong as long as you keep that base thick.

My pumpkin has no bump for the nose. Can I still do this?

Yes. Choose the roundest, fullest area of the front and carve the surrounding skin down instead, so the nose stands proud by comparison. You are lowering everything around it rather than adding height. It takes a little more shaving but gives the same three-dimensional effect.

Why cut through only the pupils and mouth instead of the whole eyes?

The concentric rings and peeled whites glow dim, which makes the small cut pupils pop as bright dots and gives the eyes that spiral cartoon depth. Cutting the entire eye through would flatten the effect into two plain holes. Saving full cutouts for the pupils and mouth keeps the face structurally sound too.

Your take belongs here, too.

Changed a detail? Made it simpler? Share a photo of your version and tell the community what worked.

Share your pumpkin

More pumpkins like this

You've reached the end · 8 pumpkins
The Patch Report

Fresh pumpkins, in your inbox.

The best new carvings, ideas worth stealing, and how-tos for carving season. Short, seasonal, and gone by November.

A short email during carving season. Unsubscribe anytime. See our privacy policy.