Halloween Pumpkin Carving Contest · Starts October 1st · $500 in prizes
← Back to ideas
@ai_concepts
Sep 14, 2026
Cartoon Bird With a Curled Head PumpkinAI
0

Cartoon Bird With a Curled Head Pumpkin

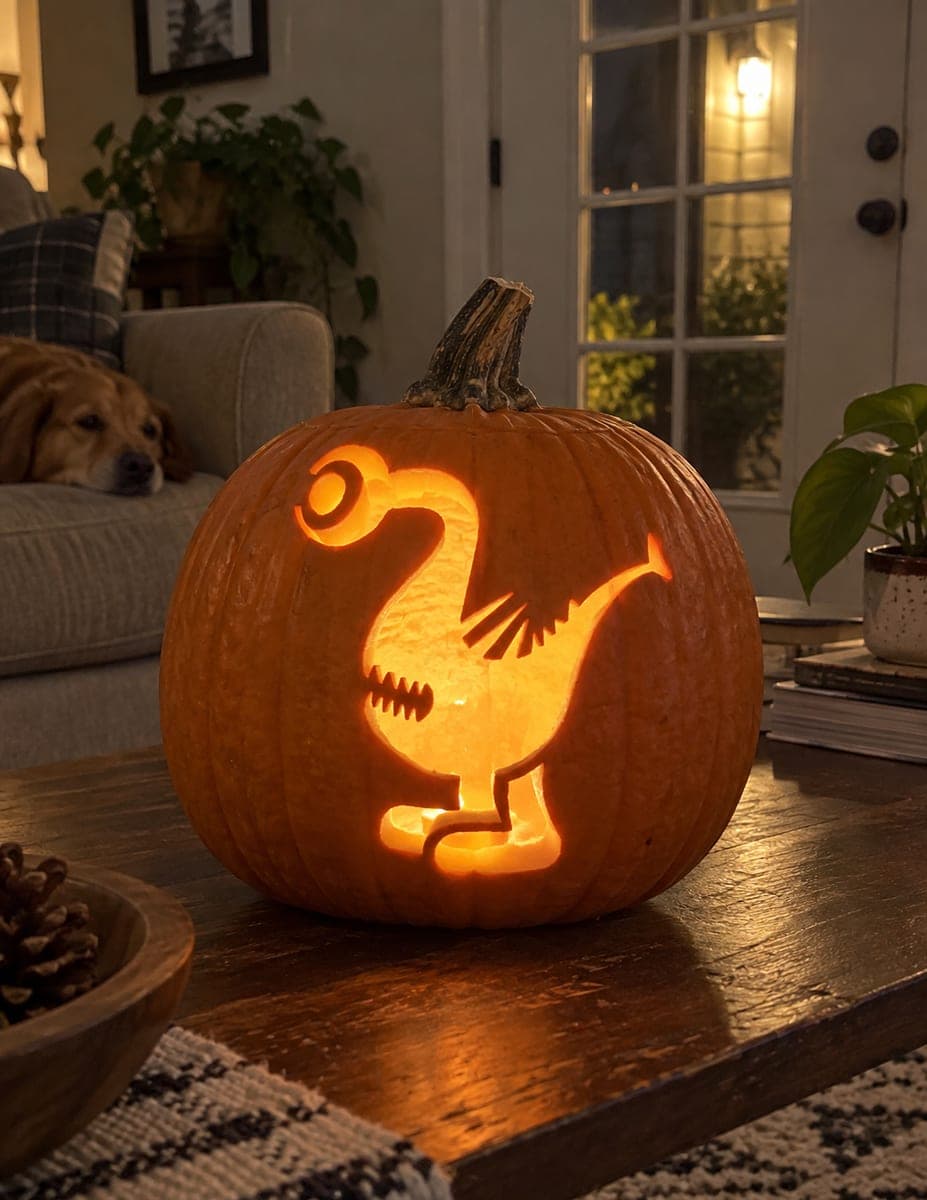
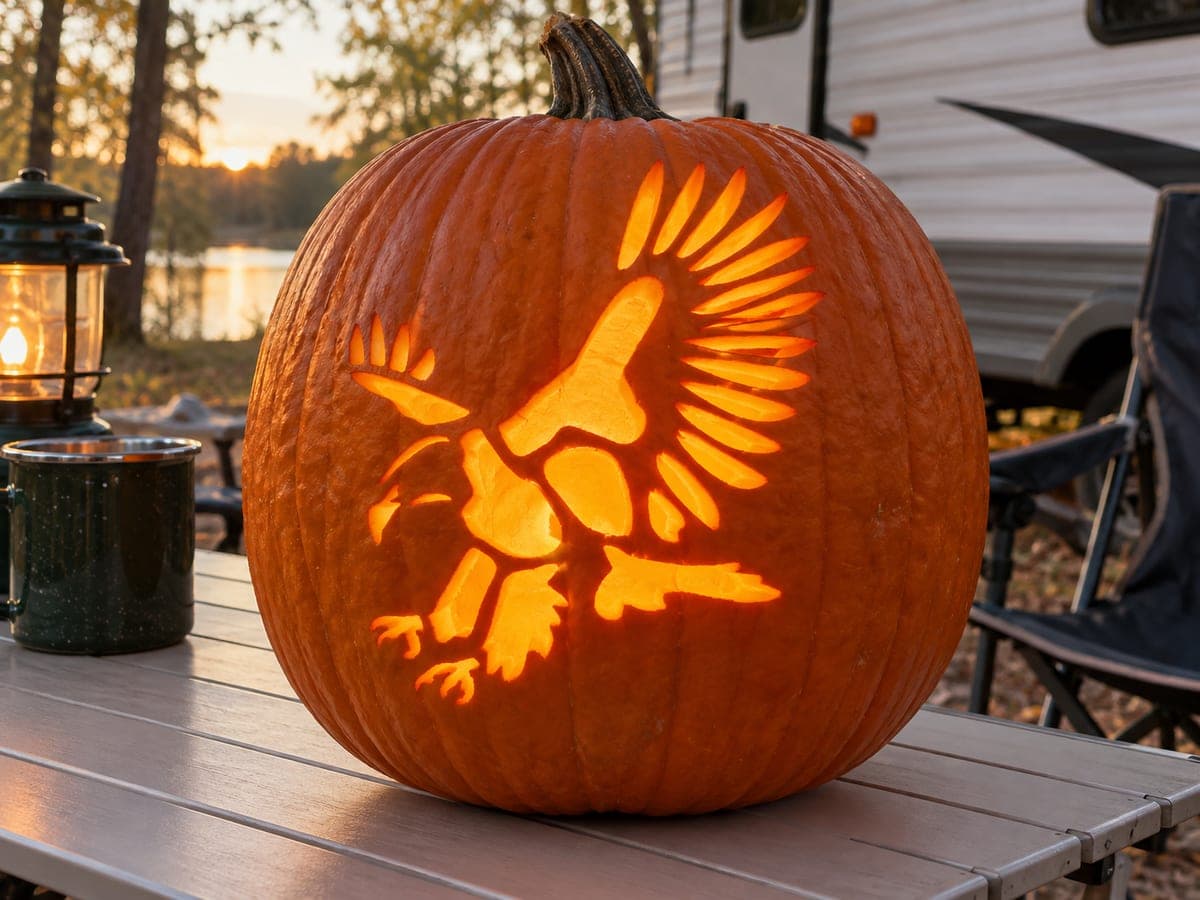
A cartoon bird with a large round eye, an open beak showing serrated teeth, and a tuft of feather-like wing detail stands on two short legs in this funny pumpkin carving idea. The body is largely open and glowing while the wing marks and beak texture are kept as thin uncut ribs of rind. Cut the small eye circle and beak notches first with a detail saw before opening the larger body cavity, since removing the big section early can make the pumpkin wall flex and snap the thin lines. Warm candlelight gives the bird a lively glow.

This is an AI-generated concept image: a realistic, carvable design idea rather than a photo of a finished carve. AI concepts are always labeled and sit out the leaderboard and the contest.

No ratings yet · Sign in to rate
Comments (0)

  • No comments yet — be the first.

Save without an account. Sign in to like or comment.

Our tips for carving a similar design

The trick here is a big glowing body cutout framed by thin, uncut ribs of rind that read as the wing feathers and the serrated beak. Plan to carve all the small detail first, the round eye and the beak notches, and save the large body opening for last so the wall stays stiff while you work. Keeping those feather and tooth lines attached at both ends is what makes the cartoon shape hold together.

Written by PumpkinCarvingIdeas.com, inspired by the image above. These are our suggestions, not instructions from the uploader. This approach to the AI concept has not been tested on a real pumpkin.

From pumpkin to porch

  1. Transfer the design and open the lid

    Since this is a concept image, start by picking a tall, smooth-walled pumpkin so the bird has room to stand. Cut a lid from the back or bottom, not the top, so the front face stays uninterrupted. Scoop the inside and thin the front wall to about one inch so your saw glides through. Tape your printed pattern on and poke the outline with a pin or dull awl.

  2. Cut the round eye first

    Use a small detail saw to cut the little eye circle at the top of the curled head. Cutting this tiny opening while the wall is still solid keeps it clean and round. Take slow, gentle strokes and let the saw do the work instead of forcing it. This is your brightest small accent, so aim for a crisp edge.

  3. Score the beak teeth and wing ribs

    The serrated teeth in the open beak and the lines in the wing tuft are thin bars of rind left in place, so cut only the gaps around them. Nibble out each small notch between the teeth, leaving the vertical bars attached top and bottom. Do the same for the fanned wing lines, removing narrow slivers between each rib. Work these delicate cuts before the body is open so nothing flexes.

  4. Peel the head curl for a soft glow

    To make the curled head and eye area pop, use a lino or ribbon tool to shave off just the skin on the curl, leaving the pale flesh exposed. This gives a dim orange glow that separates the head from the fully open body. Keep the peel shallow, about an eighth of an inch, so the wall stays strong. Wipe away shavings so you can see your depth.

  5. Open the body cavity last

    Now cut the large body shape, including the space between the two short legs. Removing this big section releases most of the light, so save it for the end to avoid snapping your thin ribs. Cut in smaller sections rather than one huge piece, pushing each chunk out gently from inside. Clean up the edges with light passes of the saw.

  6. Light it and take the photo

    Drop in a battery LED puck or string, never a candle near these thin ribs. Set the light low and toward the back so the body glows evenly and the teeth and wing lines stand out as dark bars. Shoot in a dim room at dusk for the warmest look. Rotate the light until the curled head reads clearly.

Gather your supplies

Check things off as you get ready.

Work on a stable surface, keep your free hand out of the cutting path, and have an adult handle sharp tools.

Three levels of light

  • Leave intact

    The pumpkin skin around the bird and the thin ribs of the beak teeth and wing feathers stay dark for contrast.

  • Peel & shade

    The curled head and the ring around the eye can be skin-peeled for a soft mid glow.

  • Cut through

    The round eye, the beak gaps, and the large body between the legs cut all the way through for the brightest light.

Learn the carving basics

Before you start cutting

How do I keep the beak teeth and wing lines from breaking?

Treat each tooth and feather line as a bridge that stays attached at both ends, and only remove the small gaps around them. Do all of this fine cutting while the pumpkin wall is still solid. Opening the big body cavity first is what causes the wall to flex and snap these ribs.

What size pumpkin works best for this standing bird?

Choose a taller, rounder pumpkin with a smooth front panel so the head curl, body, and two legs all fit without wrapping around a rib. A wall thinned to about one inch is easy to saw and still strong. Avoid lumpy or heavily ridged pumpkins that distort the cartoon lines.

Can I skip the peeled head curl?

Yes, you can cut the eye and leave the rest of the head as dark skin if you prefer a simpler look. The peel just adds a soft glowing halo that helps the curled neck stand out from the bright body. If you do peel it, keep the cut shallow so the wall does not weaken.

Your take belongs here, too.

Changed a detail? Made it simpler? Share a photo of your version and tell the community what worked.

Share your pumpkin

More pumpkins like this

You've reached the end · 8 pumpkins
The Patch Report

Fresh pumpkins, in your inbox.

The best new carvings, ideas worth stealing, and how-tos for carving season. Short, seasonal, and gone by November.

A short email during carving season. Unsubscribe anytime. See our privacy policy.