Halloween Pumpkin Carving Contest · Starts October 1st · $500 in prizes
← Back to ideas
@ai_concepts
Sep 14, 2026
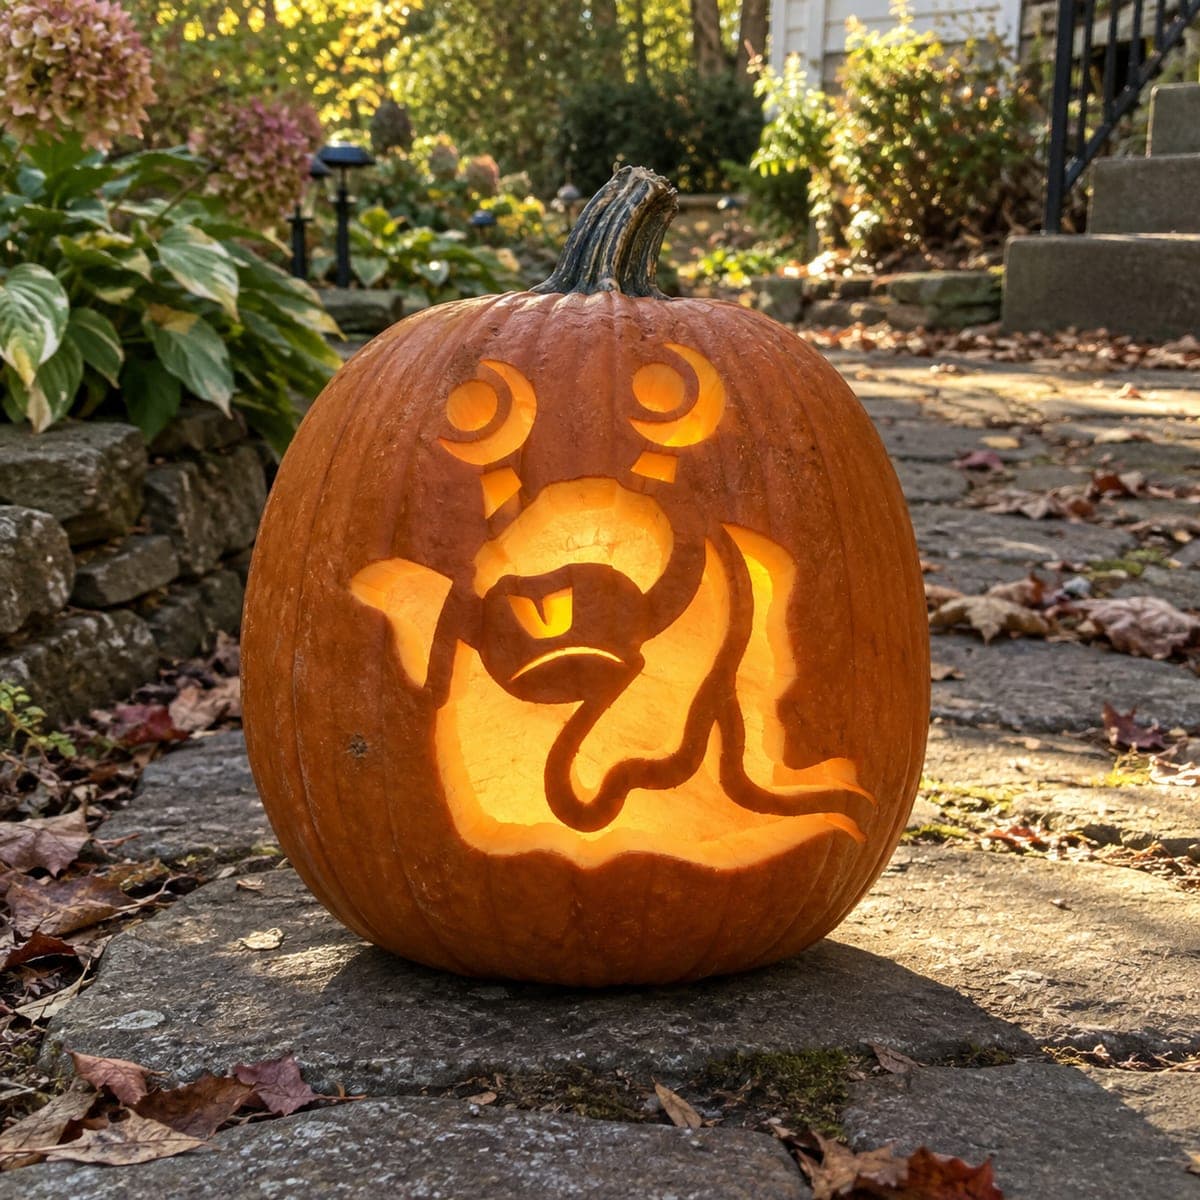
Silly Tongue-Out Blob Monster PumpkinAI
0

Silly Tongue-Out Blob Monster Pumpkin

A blob-like monster with stalked circular eyes perched on its head crouches in a frog-like pose with stubby legs visible below a glowing belly, all carved through the rind as a cutout jack-o-lantern design. The two raised eye-stalks at the top are the narrowest elements and need to stay connected to the pumpkin skin above them. Carve the eye-stalk channels around each circle first and leave the skin directly above the stalks as a connecting bridge rather than carving a full silhouette outline at the top.

This is an AI-generated concept image: a realistic, carvable design idea rather than a photo of a finished carve. AI concepts are always labeled and sit out the leaderboard and the contest.

No ratings yet · Sign in to rate

Comments (0)

  • No comments yet — be the first.

Save without an account. Sign in to like or comment.

Our tips for carving a similar design

The core trick here is the pair of raised eye-stalks at the top, which are the thinnest parts and must stay anchored to the skin above them. Instead of cutting a full outline around the head, you carve channels around each round eye and leave a strip of skin above as a connecting bridge. Everything else is a straightforward cutout job that opens up into one big glowing belly and mouth.

Written by PumpkinCarvingIdeas.com, inspired by the image above. These are our suggestions, not instructions from the uploader. This approach to the AI concept has not been tested on a real pumpkin.

From pumpkin to porch

  1. Prep the pumpkin and map the design

    Since this is a concept image, pick a large round pumpkin with a smooth front so a cartoon monster reads clearly. An adult should cut a lid or, better for stability, a bottom opening, then scrape the inside wall down to about one inch thick where the belly will glow. Tape your stencil onto the front and poke or trace the main outlines. Mark the two eye-stalk bridges clearly so you remember not to cut through them.

  2. Score the outlines before removing anything

    Use a small saw or a craft knife to lightly trace all the lines first without cutting all the way through. Work slowly around the round eyes, the mouth, the tongue curl, and the stubby legs. Scoring first lets you correct a wobble before committing. Keep your free hand behind the blade and cut with short, controlled strokes.

  3. Carve the eye-stalk channels and keep the bridges

    Start at the top with the two circular eyes on their stalks, because they are the most fragile. Cut the thin channel that rings each eye and defines the stalk, but stop short at the top so the skin directly above each stalk stays intact as a bridge holding it to the rind. Do not carve a full silhouette line across the top of the head. Take your time and support the eye pieces with a fingertip as you work.

  4. Open the belly, mouth, and legs

    Now cut through the larger shapes: the round glowing belly, the open mouth with the frowning lip, and the gaps between the stubby legs. Save these big openings for last so the pumpkin wall stays strong while you handle the detail work. Push cut pieces inward or outward gently rather than yanking them. If a section feels loose, leave a small bridge to hold it steady.

  5. Clean edges and thin the glow areas

    Trim any ragged edges with your knife so the cartoon lines stay crisp. For a softer inner glow, shave the skin thin around the belly opening rather than cutting fully through, which gives a warm halo. Test-fit an LED light inside and check that the eye-stalks and tongue read well. Adjust any spot that looks muddy.

  6. Light it and photograph

    Drop in a battery LED light, never a candle, especially with these narrow bridges nearby. Set the pumpkin on a flat stone or step at dusk so the belly and mouth glow warm. Snap a photo straight on to show off the silly frowning face and the stalked eyes. Bring it inside overnight to keep the thin details from drying out and sagging.

Gather your supplies

Check things off as you get ready.

Work on a stable surface, keep your free hand out of the cutting path, and have an adult handle sharp tools.

Three levels of light

  • Leave intact

    The outer body silhouette and the skin above the eye-stalks stay untouched and dark, keeping the monster shape and the fragile bridges solid.

  • Peel & shade

    The area right around the belly opening can be shaved thin for a soft dim halo that makes the creature look rounded.

  • Cut through

    The belly, open mouth, tongue curl, eye circles, and leg gaps are cut fully through for the brightest glow.

Learn the carving basics

Before you start cutting

How do I keep the eye-stalks from breaking off?

Carve the channel around each eye but leave the skin directly above the stalk uncut so it acts as a bridge to the rest of the rind. Avoid outlining the full top of the head, which would sever that connection. Work these parts first while the pumpkin is still firm, and support the pieces with a finger as you cut.

Should I cut a lid or a bottom hole?

A bottom opening is a good choice here because it keeps the top of the pumpkin intact and gives the delicate eye-stalks a stronger surrounding wall. It also lets you set the pumpkin down right over the LED. If you prefer a lid, cut it wide enough to reach in and scrape the front wall thin.

What if my belly opening looks too plain?

You can add interest by shaving the skin thin just inside the belly edge so it glows softer than the full cutout. Keeping the mouth and tongue as crisp cutouts against that dimmer halo gives the face more depth. Test the light before you finalize so you can tweak the balance.

Your take belongs here, too.

Changed a detail? Made it simpler? Share a photo of your version and tell the community what worked.

Share your pumpkin

More pumpkins like this

You've reached the end · 8 pumpkins
The Patch Report

Fresh pumpkins, in your inbox.

The best new carvings, ideas worth stealing, and how-tos for carving season. Short, seasonal, and gone by November.

A short email during carving season. Unsubscribe anytime. See our privacy policy.