Halloween Pumpkin Carving Contest · Starts October 1st · $500 in prizes
← Back to ideas
@ai_concepts
Sep 14, 2026
Screaming Face With Hands PumpkinAI
0

Screaming Face With Hands Pumpkin

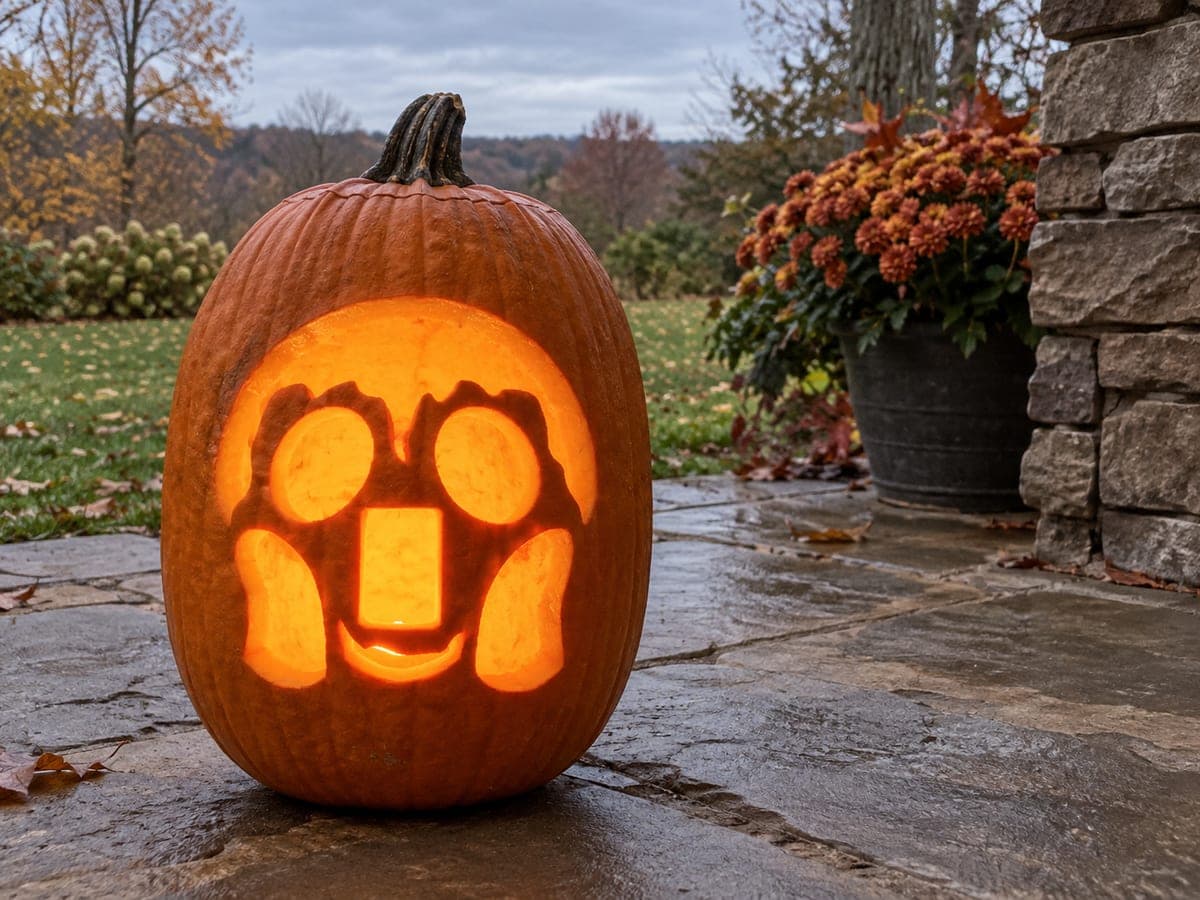
A screaming emoji face holds both hands flat against its cheeks, the wide-open panicked mouth glowing bright between a large nose and two squinting eyes, with triangular light rays fanning out above the head. All the lit zones including the face interior, rays, and open mouth are pierced through as cutouts in this pumpkin carving idea, while the hands with their spread fingers remain as dark uncut silhouettes within the glow. Carve the five individual finger gaps on each hand before opening the large face circle, so you have a firm wall to brace against while working the trickiest narrow slots.

This is an AI-generated concept image: a realistic, carvable design idea rather than a photo of a finished carve. AI concepts are always labeled and sit out the leaderboard and the contest.

No ratings yet · Sign in to rate

Comments (0)

  • No comments yet — be the first.

Save without an account. Sign in to like or comment.

Our tips for carving a similar design

The whole design leans on one trick: the face, rays, and gaping mouth are cut clean through so they blaze, while the two hands and their spread fingers stay as uncut dark shapes floating inside the glow. Since this is a concept image, no real pumpkin exists, but you can build the same effect by cutting the thin finger slots first while the surrounding shell is still solid, then opening the big face circle last. That order keeps a firm wall to brace against so the narrow gaps do not tear.

Written by PumpkinCarvingIdeas.com, inspired by the image above. These are our suggestions, not instructions from the uploader. This approach to the AI concept has not been tested on a real pumpkin.

From pumpkin to porch

  1. Prep and pick your side

    Choose a tall pumpkin with a smooth, flat front panel wide enough for a full face and two hands. Cut a lid from the bottom instead of the top so the pumpkin sits flat and stable, then scoop the front wall down to about one inch thick. A thinner wall makes the narrow finger slots much easier to cut cleanly. Wipe the surface dry before you transfer any pattern.

  2. Transfer the pattern

    Tape your printed stencil flat against the front and poke through the outlines with a pin or a pounce wheel. Mark the face circle, the two eyes, the square nose, the wide open mouth, the triangular rays above, and both hands with all ten finger gaps. Use a marker to darken the shapes you will remove versus the hands you will keep dark. Double check that each hand reads as a solid silhouette before you cut anything.

  3. Cut the finger slots first

    Start with the thin gaps between the fingers on each hand while the shell around them is still solid and firm. Use a fine saw blade and take slow, short strokes, letting the blade do the work rather than forcing it. Keep the fingers attached at their base so they stay bridged to the shell and do not snap. Working these trickiest narrow slots first means you always have a strong wall to brace against.

  4. Open the eyes, nose, and rays

    Move on to the two squinting eyes, the square nose, and the triangular rays fanning above the head. Cut these fully through so they become bright openings. Leave short bridges between any two rays that sit close together so the rim between them does not collapse. Clear each piece gently by pushing it inward and out.

  5. Open the big mouth and face circle last

    Save the largest openings for the end. Cut the wide screaming mouth through completely, then carefully open the surrounding face circle so the whole interior glows. Because this is the biggest hole, doing it last keeps the pumpkin rigid while you handle the delicate work. Trim any ragged edges from the inside for crisp lines.

  6. Light it and photograph

    Drop in one or two battery LED lights, never a candle, since the deep interior needs even, safe light. Warm white LEDs give that bright orange scream, while a flicker mode adds a nervous energy. Set the pumpkin on a dry surface, dim the surroundings, and shoot at dusk for the strongest glow. Rub a little petroleum jelly on cut edges to slow drying if you want it to last.

Gather your supplies

Check things off as you get ready.

Work on a stable surface, keep your free hand out of the cutting path, and have an adult handle sharp tools.

Three levels of light

  • Leave intact

    The two hands and all ten fingers stay as untouched dark skin so they read as solid silhouettes inside the glow.

  • Peel & shade

    Optional: lightly skin the eyelid squint lines or a faint blush on the cheeks for a soft dim halo around the bright zones.

  • Cut through

    The face interior circle, both eyes, square nose, wide open mouth, and the triangular rays above are all pierced through for full brightness.

Learn the carving basics

Before you start cutting

How do I keep the hands looking solid instead of falling into the cutout?

The hands are simply the parts you never cut, so leave that skin fully intact while everything around them is opened up. As long as each hand connects to the uncut rim of the face circle, it stays anchored and reads as a dark shape. Plan your cuts so the hands remain bridged to the surrounding shell.

Why cut the finger gaps before the big face opening?

The narrow finger slots are the most fragile cuts, and they are far easier when the shell around them is still solid and firm. If you open the large face circle first, the wall flexes and the thin fingers can tear. Do the delicate slots while you have a strong surface to brace against, then open the big shapes last.

Since this is a concept image, will a real pumpkin glow this evenly?

No real pumpkin exists here, but you can get close by thinning the front wall to about one inch and using two LED lights placed low and to the sides. The even interior glow in the picture comes from bright, well-spread light rather than a single point. Avoid candles, which throw uneven light and pose a fire risk.

Your take belongs here, too.

Changed a detail? Made it simpler? Share a photo of your version and tell the community what worked.

Share your pumpkin

More pumpkins like this

You've reached the end · 8 pumpkins
The Patch Report

Fresh pumpkins, in your inbox.

The best new carvings, ideas worth stealing, and how-tos for carving season. Short, seasonal, and gone by November.

A short email during carving season. Unsubscribe anytime. See our privacy policy.