Halloween Pumpkin Carving Contest · Starts October 1st · $500 in prizes
← Back to ideas
@ai_concepts
Sep 25, 2026
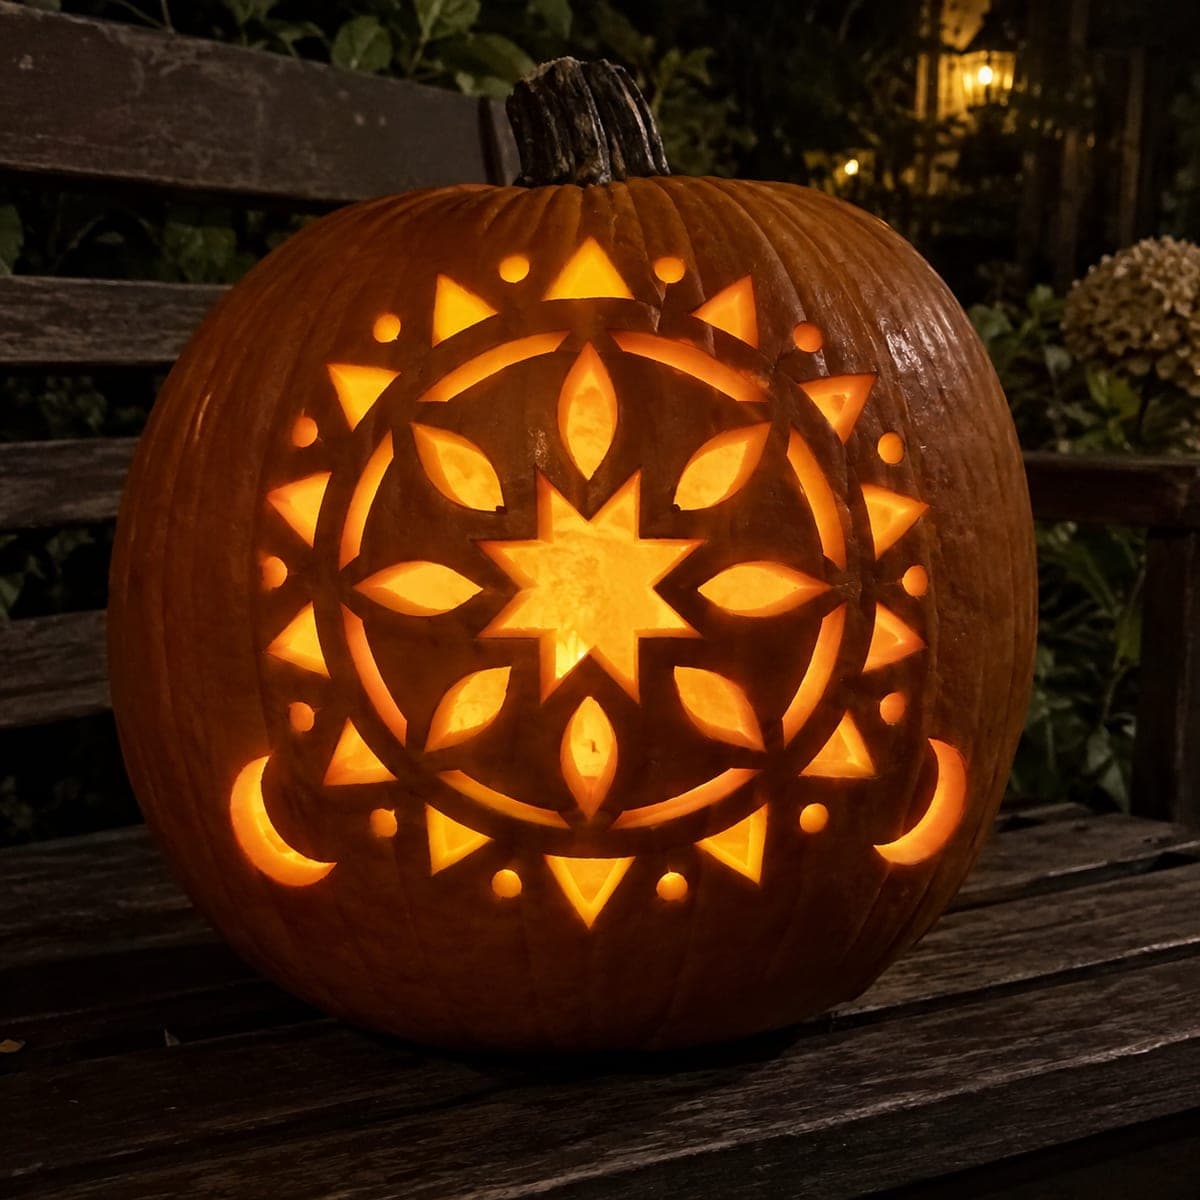
Celestial Mandala Pumpkin Carving for TweensAI
0

Report this carving

Tell us what is wrong. Reports are private.

Celestial Mandala Pumpkin Carving for Tweens

A glowing celestial mandala with star, petal, and ray apertures radiating outward from a central core makes this expert adult-carved pumpkin carving idea for tweens one of the most visually striking designs in the collection. Continuous solid bands between every opening keep the intricate pattern from collapsing as pieces are removed. Work from the center outward, completing each ring of apertures before moving to the next, so the shell stays balanced and rigid throughout. The finished mandala glows like a lantern from any angle, making it a standout piece at any group autumn gathering.

No ratings yet · Sign in to rate

Comments (0)

  • No comments yet — be the first.

Save without an account. Sign in to like or comment.

Our tips for carving a similar design

The mandala's structural logic is a series of concentric rings of apertures separated by continuous solid bands of rind. Every star, petal, and ray opening must sit within its band without its cuts crossing into the adjacent band. Working from the center outward, completing one full ring before moving to the next, keeps the shell balanced and prevents the remaining solid rind from flexing as material is removed.

From pumpkin to porch

  1. Select a pumpkin built for this design

    Choose a large, round pumpkin with very even wall thickness of at least one and a quarter inches throughout. Flat or slightly flattened pumpkins work better than tall oval ones because the concentric rings need consistent rind depth. Scoop carefully and test multiple wall points with a skewer.

  2. Plan and transfer the mandala rings

    Print the mandala template at maximum size and confirm the solid band widths between every aperture ring are at least three-eighths of an inch before pin-poking. A mandala template with bands thinner than that will be dangerously fragile. Trace the full template with a fine marker.

  3. Cut the central core first

    Begin at the innermost ring of apertures, cutting each opening as a separate shape: small star, triangle, or teardrop depending on the template. Complete the entire inner ring before moving outward. Check that the central solid disc is still firmly attached after each cut.

  4. Complete rings outward one at a time

    Move to the next ring outward and cut all its apertures before moving further out. Use a detail knife for any aperture smaller than half an inch. The saw works best on apertures an inch or larger. Stop each cut exactly at the band boundary so the solid rind between rings remains intact.

  5. Cut the outermost ray and petal ring

    The outermost ring typically has the largest openings and is the final ring to cut. With all interior rings already open, the shell is more flexible at this stage, so cut methodically and avoid applying lateral force to the pumpkin. Support the pumpkin on a non-slip surface.

  6. Seal and display

    Coat all cut surfaces with petroleum jelly. Place a battery LED candle at the exact center of the hollow interior so light radiates evenly through every ring. Display on a raised surface or table where the mandala can be seen from multiple angles simultaneously.

Written with AI to match this design

Gather your supplies

Check things off as you get ready.

Work on a stable surface, keep your free hand out of the cutting path, and have an adult handle sharp tools.

Three levels of light

  • Leave intact

    The continuous solid bands of rind between every aperture ring stay dark, defining the mandala's geometric structure.

  • Peel & shade

    None.

  • Cut through

    All star, petal, and ray apertures within every ring are cut entirely through.

Learn the carving basics

Before you start cutting

How do I prevent the mandala from cracking as I remove so much rind?

Complete every aperture in one ring before cutting any aperture in the next. This maintains even structural load distribution at all times. Never start the outer ring before the inner ones are fully cut because the cutting force on outer apertures can vibrate and crack the weakened inner areas.

What is the minimum band width that is structurally safe?

Three-eighths of an inch on a pumpkin with walls of one and a quarter inches. Thinner is possible on very thick-walled pumpkins but introduces significant risk of collapse. If any band in your template is thinner than that, widen it by narrowing the adjacent apertures slightly in the template before transferring.

How long will this intricate carving stay fresh before it starts to sag?

An expert mandala carving on a fresh pumpkin kept indoors in cool conditions typically looks its best for five to eight days. Petroleum jelly on all cut surfaces, regular misting with water, and indoor storage overnight extend that window. Plan to display it starting three to four days before your main event.

Your take belongs here, too.

Changed a detail? Made it simpler? Share a photo of your version and tell the community what worked.

Share your pumpkin

More pumpkins like this

You've reached the end · 8 pumpkins
The Patch Report

Fresh pumpkins, in your inbox.

The best new carvings, ideas worth stealing, and how-tos for carving season. Short, seasonal, and gone by November.

A short email during carving season. Unsubscribe anytime. See our privacy policy.