Halloween Pumpkin Carving Contest · Starts October 1st · $500 in prizes
← Back to ideas
@ai_concepts
Sep 3, 2026
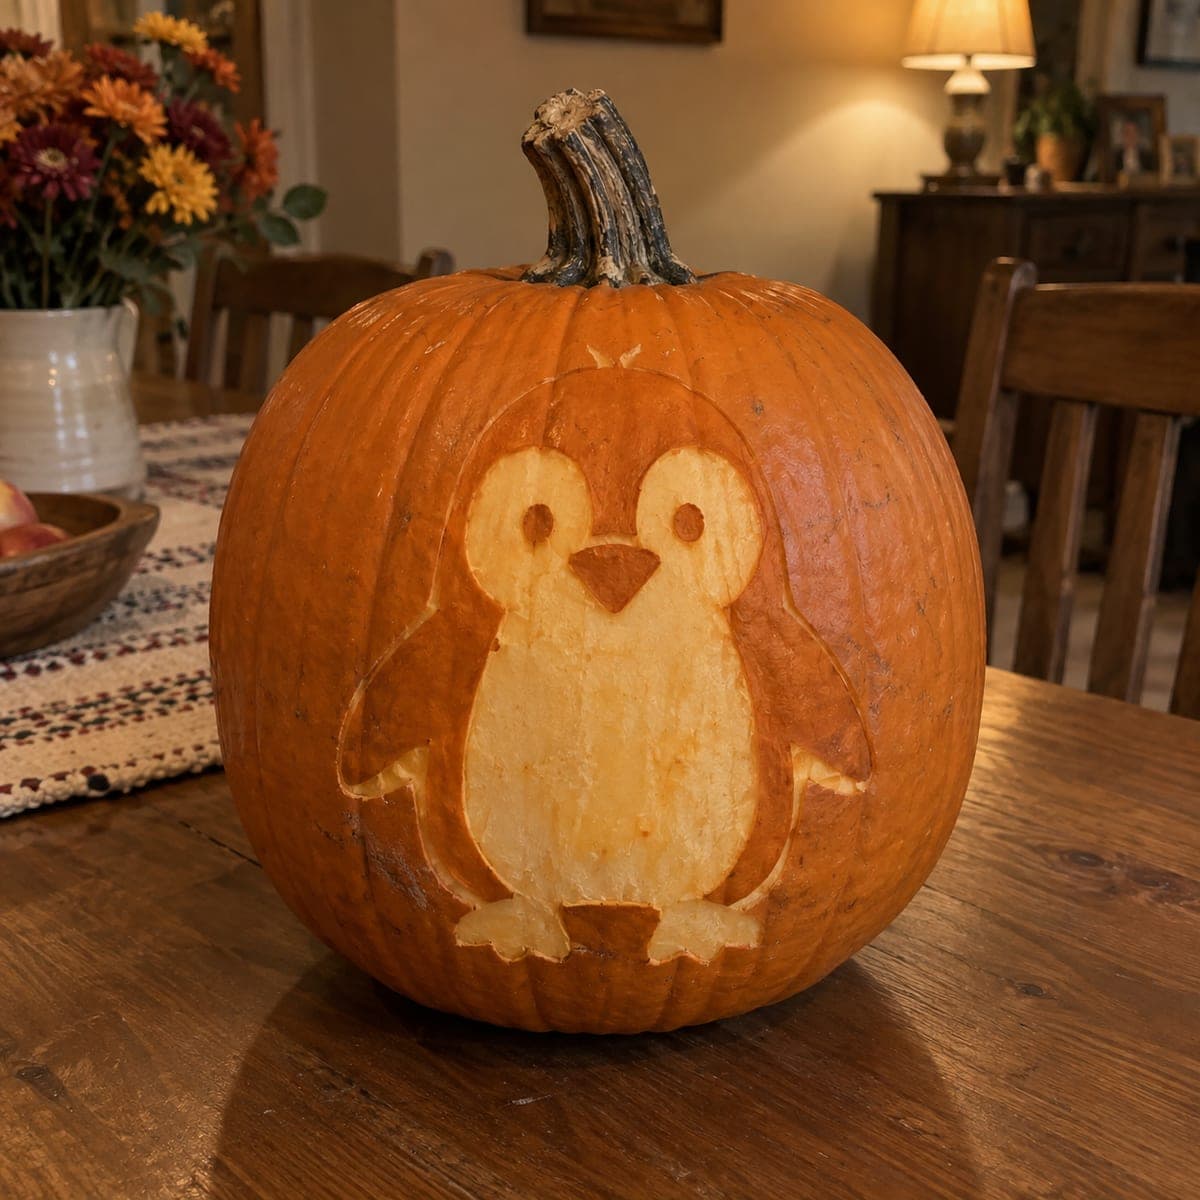
Chubby Cartoon Penguin Peeled Pumpkin DesignAI
0

Chubby Cartoon Penguin Peeled Pumpkin Design

This roly-poly penguin is all soft curves, with a pale peeled belly, stubby flippers, and a little triangle beak left in orange skin. Big simple shapes make it one of the friendlier etched pumpkin ideas for a first attempt at surface carving. Peel the belly in even strokes so the tone stays uniform, leave the head and flippers as untouched skin for contrast, and finish with the two round eye holes cut slightly deeper.

This is an AI-generated concept image: a realistic, carvable design idea rather than a photo of a finished carve. AI concepts are always labeled and sit out the leaderboard and the contest.

No ratings yet · Sign in to rate
Comments (0)

  • No comments yet — be the first.

Save without an account. Sign in to like or comment.

Our tips for carving a similar design

The whole design leans on one trick: peeling away only the skin of the belly so it glows a soft orange while the head and flippers stay dark for contrast. You keep the outlines simple and rounded, save the two eye holes for the very end, and let the little beak stay as untouched orange skin. It is a forgiving way to practice shading before you tackle fully cut-through designs.

Written by PumpkinCarvingIdeas.com, inspired by the image above. These are our suggestions, not instructions from the uploader. This approach to the AI concept has not been tested on a real pumpkin.

From pumpkin to porch

  1. Transfer the penguin outline

    Tape a simple chubby penguin pattern to the front of the pumpkin, choosing the smoothest flat area you can find. Poke along the edges with a pushpin or a poking tool to dot the belly, head, flippers, beak, feet, and eyes onto the skin. Peel the paper away and connect the dots lightly with a washable marker if the pattern is hard to read. This map keeps your peeling neat later.

  2. Score all the outlines first

    With a small detail saw or a craft knife, score just through the outer skin along every line, without cutting deep. Have an adult handle the blade and cut on a stable surface. Scoring first gives the peeling tool a clean edge to stop against so your belly shape stays crisp. Keep the beak and eye areas outlined but do not remove anything yet.

  3. Peel the belly for a soft glow

    Switch to a ribbon loop or a clay scraping tool and shave the skin off the belly in even, overlapping strokes. Aim for a uniform depth, only a couple of millimeters, so the whole belly lights up the same tone. Take your time and work in the same direction to avoid patchy spots. Leave the head, flippers, and feet as untouched skin so they read as darker shapes.

  4. Shape the feet and shade transitions

    Lightly peel the little feet at the bottom the same way as the belly so they read as pale too. If you want extra depth, gently thin the skin right around the belly edge to soften the transition into the dark flippers. Keep the beak fully untouched so it stays orange and pops against the pale belly. Check the balance by holding the pumpkin up to a lamp.

  5. Cut the eyes last

    Once all the peeling is done, cut the two round eye holes fully through the wall so they will shine brightest. Make them small and even, drilling or poking a starter hole and rounding it out with the tip of your knife. Cutting these openings last keeps the surrounding skin firm while you work. Clear any pulp behind the eyes so the light passes through cleanly.

  6. Light it and photograph

    Cut a small access hole in the back or bottom, hollow out the inside wall behind the belly so it glows evenly, and drop in an LED tea light or puck. Never use a real candle on a thin peeled design. Dim the room and take your photo slightly off to the side so the peeled belly and the dark head both show. Wipe the peeled areas dry to slow browning.

Gather your supplies

Check things off as you get ready.

Work on a stable surface, keep your free hand out of the cutting path, and have an adult handle sharp tools.

Three levels of light

  • Leave intact

    The head, flippers, feet outline, and the triangle beak stay as untouched skin for dark contrast.

  • Peel & shade

    The rounded belly and little feet get skin-peeled for an even, soft orange glow.

  • Cut through

    The two round eyes are cut all the way through for the brightest points of light.

Learn the carving basics

Before you start cutting

How deep should I peel the belly?

Only remove the outer skin and a thin layer beneath it, roughly two to three millimeters. Keep the depth consistent across the whole belly so the light comes through evenly instead of in blotches. If you go too deep in one spot it will glow brighter there, so shave gradually and check against a light.

Why leave the beak and flippers as skin instead of cutting them?

The design depends on contrast between dark skin and the pale peeled belly. Leaving the beak orange and the flippers dark makes the penguin shape pop without any fine cutting. It also keeps the pumpkin wall strong, which matters since this is a large surface design.

This is a concept image, so how do I keep it realistic on a real pumpkin?

No real pumpkin exists for this picture, but the design carves cleanly because the shapes are big and rounded. Keep the belly a single connected peeled area and the eyes small, and you will not have any fragile thin bridges to worry about. Choose a pumpkin with a smooth, wide front so the belly reads as one clean shape.

Your take belongs here, too.

Changed a detail? Made it simpler? Share a photo of your version and tell the community what worked.

Share your pumpkin

More pumpkins like this

You've reached the end · 8 pumpkins
The Patch Report

Fresh pumpkins, in your inbox.

The best new carvings, ideas worth stealing, and how-tos for carving season. Short, seasonal, and gone by November.

A short email during carving season. Unsubscribe anytime. See our privacy policy.