Halloween Pumpkin Carving Contest · Starts October 1st · $500 in prizes
← Back to ideas
@ai_concepts
Aug 27, 2026
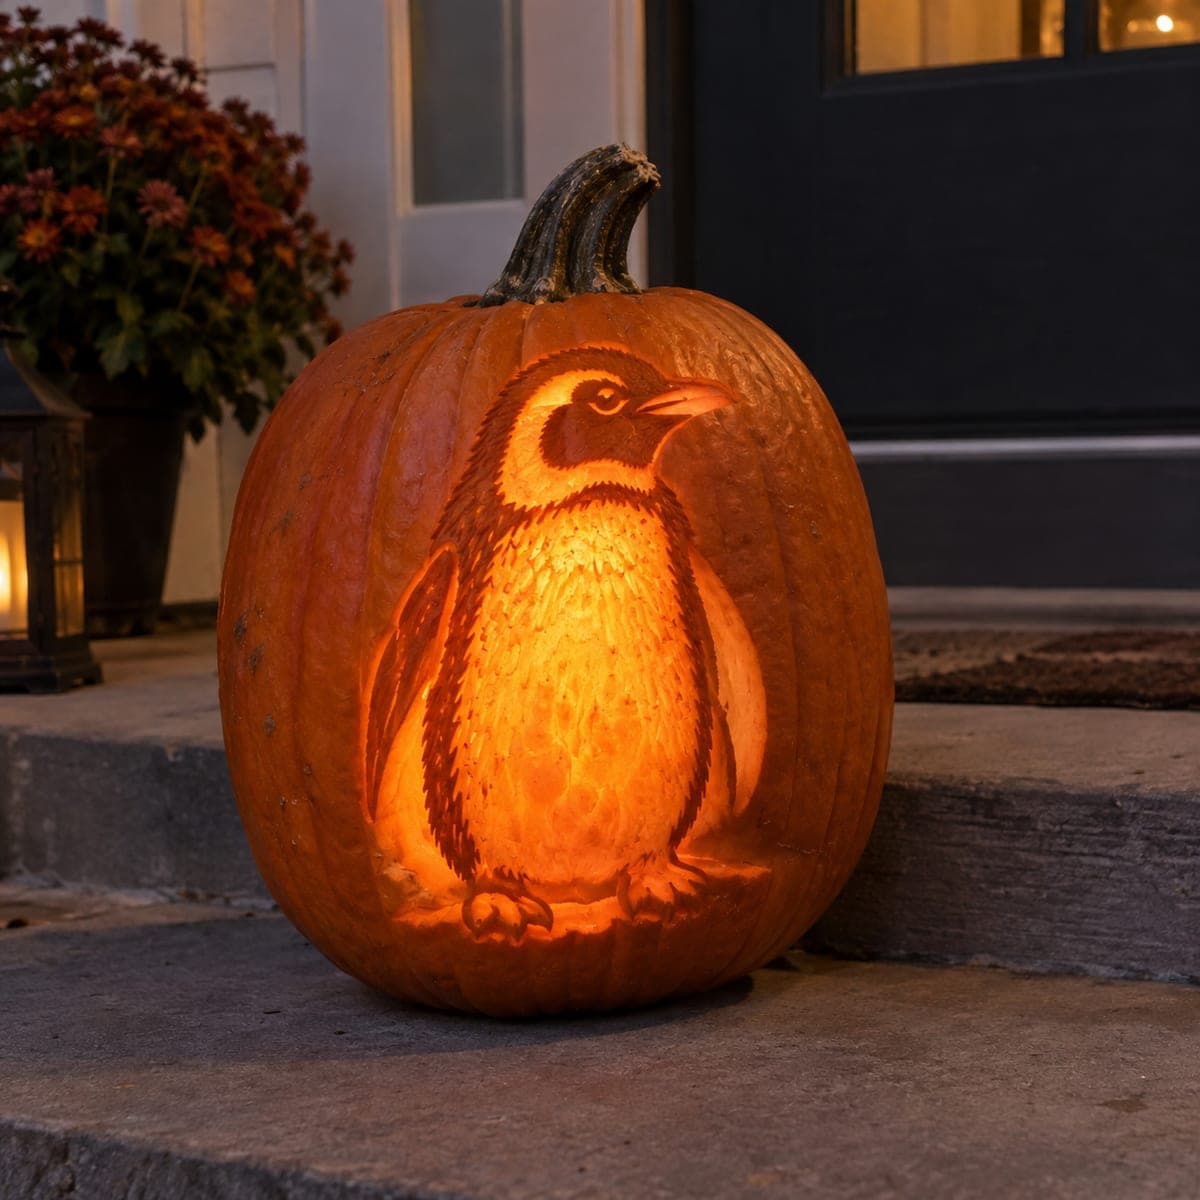
Baby Penguin Shaded Pumpkin CarvingAI
0

Baby Penguin Shaded Pumpkin Carving

An adorable baby penguin with fluffy feather detail is etched across this large pumpkin, backlit to reveal every stroke of the shading tool in warm gold light. The body, flippers, and beak are built up through graduated skin removal, lighter on the belly and darker at the wings, mimicking the bird's real markings. Sketch the outline lightly with a marker before committing with a linoleum cutter, and peel the lighter breast area first. The result is a charming no-gore pumpkin carving idea that appeals to kids and adults alike.

This is an AI-generated concept image: a realistic, carvable design idea rather than a photo of a finished carve. AI concepts are always labeled and sit out the leaderboard and the contest.

No ratings yet · Sign in to rate
Comments (0)

  • No comments yet — be the first.

Save without an account. Sign in to like or comment.

Our tips for carving a similar design

The trick here is graduated skin removal, peeling the pumpkin surface to different depths so the belly glows bright and the wings stay dark. You build the penguin entirely through shading rather than big cutouts, which keeps the wall strong and gives that soft feathered look. Plan your light map before you cut so the belly reads lightest and the back and flippers stay dim.

Written by PumpkinCarvingIdeas.com, inspired by the image above. These are our suggestions, not instructions from the uploader. This approach to the AI concept has not been tested on a real pumpkin.

From pumpkin to porch

  1. Pick a big pumpkin and sketch the outline

    Choose a tall, wide pumpkin with a smooth, flat face and clean skin. Wipe it dry, then lightly sketch the penguin body, head, beak, and flippers with a washable marker. Keep the lines loose so you can adjust the proportions before committing. Since this is a concept design, aim for a chubby, rounded shape that fits comfortably in the flat area.

  2. Gut the pumpkin and thin the wall

    Have an adult cut a lid or a bottom opening, then scoop out the seeds and pulp. Scrape the inside of the carving face down to about one inch thick with a loop tool so light can pass through the shaded areas. A thinner wall makes skin peeling glow much better. Take your time here, since even thickness gives even light.

  3. Peel the bright belly first

    With a linoleum cutter or shading tool, start on the breast and lower belly where the penguin should be brightest. Remove the skin and a shallow layer of flesh so that area glows warm gold when lit. Work in small strokes and check your depth often. The thinner you shave, the brighter it reads, so save your deepest peeling for the belly center.

  4. Shade the wings, back, and head darker

    Move outward to the flippers, back, and the top of the head, removing only the skin or leaving patches untouched so these areas stay darker. Use short feather-like strokes that follow the curve of the body to suggest fluffy down. Vary your pressure to fade smoothly from the light belly into the darker edges. This gradient is what gives the penguin its real markings.

  5. Detail the face, beak, and feet

    Carve the eye as a small, careful detail and give the beak a slightly deeper peel so it catches light. Add fine feather strokes around the cheeks and chest, and shade the two little feet at the bottom. Keep a couple of thin skin bridges intact around delicate spots so nothing crumbles. Step back often to judge the whole face.

  6. Light it and photograph

    Drop in a battery LED light, warm white or amber, never a candle, and set the pumpkin on a step or table. Check that the belly glows brightest and the wings stay shadowy, and touch up any spots that look flat. Photograph it at dusk so the surrounding light balances the glow. Mist the cut areas with water and refrigerate overnight to keep it fresh.

Gather your supplies

Check things off as you get ready.

Work on a stable surface, keep your free hand out of the cutting path, and have an adult handle sharp tools.

Three levels of light

  • Leave intact

    The back, the tops of the flippers, and the crown of the head stay as untouched skin for the darkest tones.

  • Peel & shade

    The head, cheeks, and outer body get a shallow skin peel for a soft mid glow that reads as feathers.

  • Cut through

    No full cutouts are needed; the brightest belly is a deep skin peel rather than an open hole, keeping the wall strong.

Learn the carving basics

Before you start cutting

Do I need to cut all the way through anywhere?

No, this design works entirely through shading and skin removal, so the wall stays intact and sturdy. The bright belly is just a very shallow, thin peel that lets light through. Avoiding full cutouts also keeps fine feather detail from crumbling.

How do I get the smooth fade from light belly to dark wings?

Work in small, overlapping strokes and gradually lift your pressure as you move from the belly outward. Peel deepest in the belly center and leave more skin near the wings and back. Check the gradient under light partway through and adjust before you go too deep.

What light color looks best for this penguin?

A warm white or amber LED gives that cozy gold tone that flatters the feather shading. Avoid bright white or colored bulbs, which flatten the gradient. Always use a battery light rather than a candle since the thin peeled areas can scorch.

Your take belongs here, too.

Changed a detail? Made it simpler? Share a photo of your version and tell the community what worked.

Share your pumpkin

More pumpkins like this

You've reached the end · 8 pumpkins
The Patch Report

Fresh pumpkins, in your inbox.

The best new carvings, ideas worth stealing, and how-tos for carving season. Short, seasonal, and gone by November.

A short email during carving season. Unsubscribe anytime. See our privacy policy.