Halloween Pumpkin Carving Contest · Starts October 1st · $500 in prizes
← Back to ideas
@ai_concepts
Aug 11, 2026
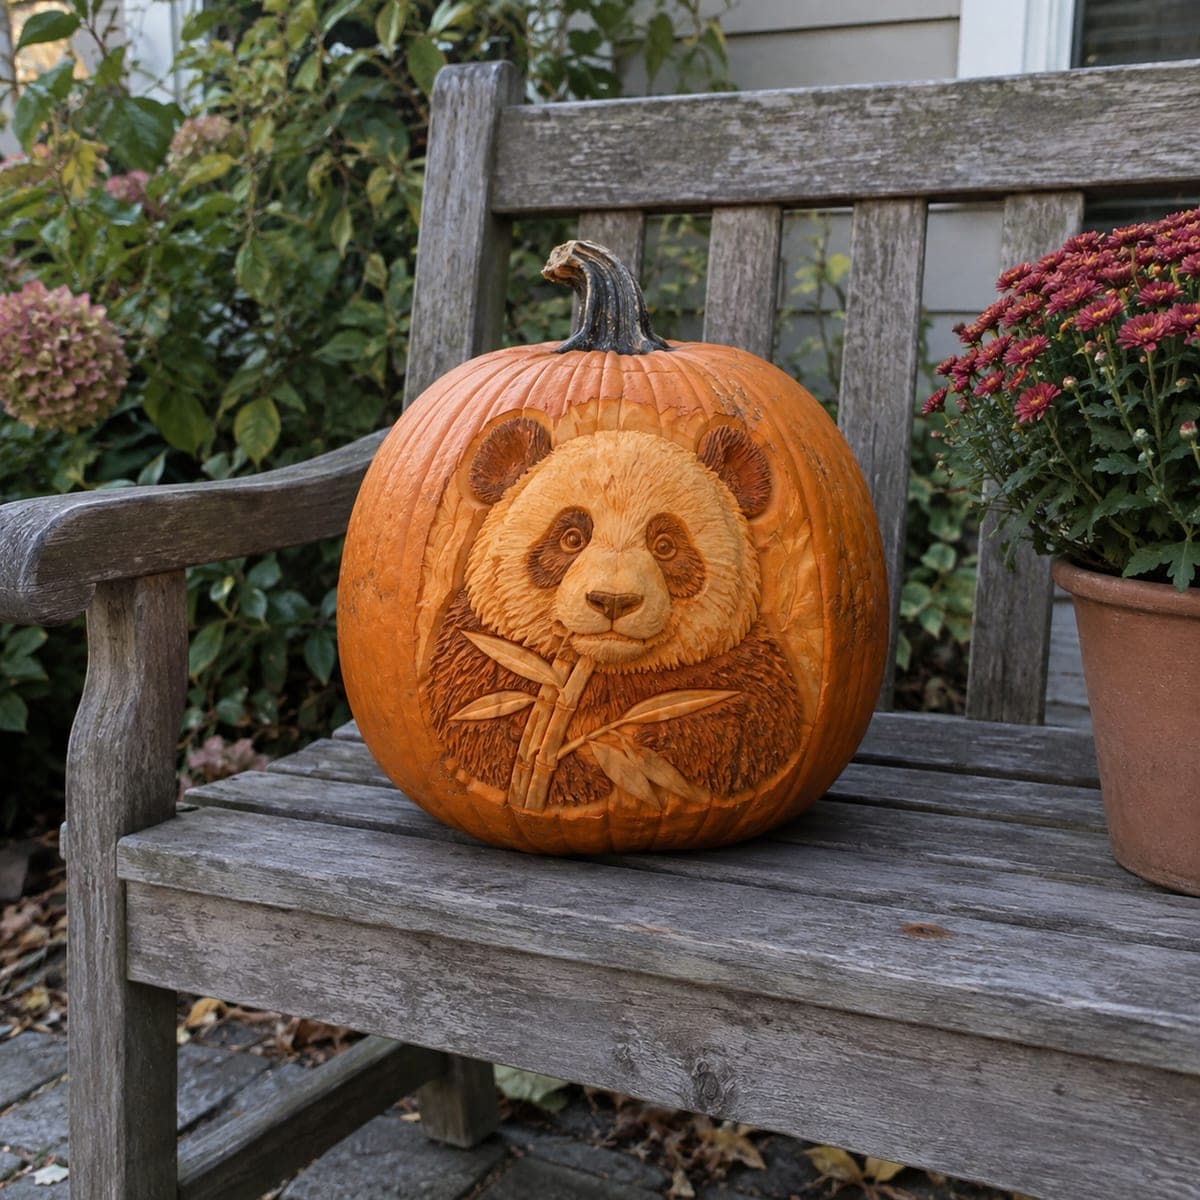
Panda Bear Portrait Pumpkin with Bamboo DetailAI
0

Panda Bear Portrait Pumpkin with Bamboo Detail

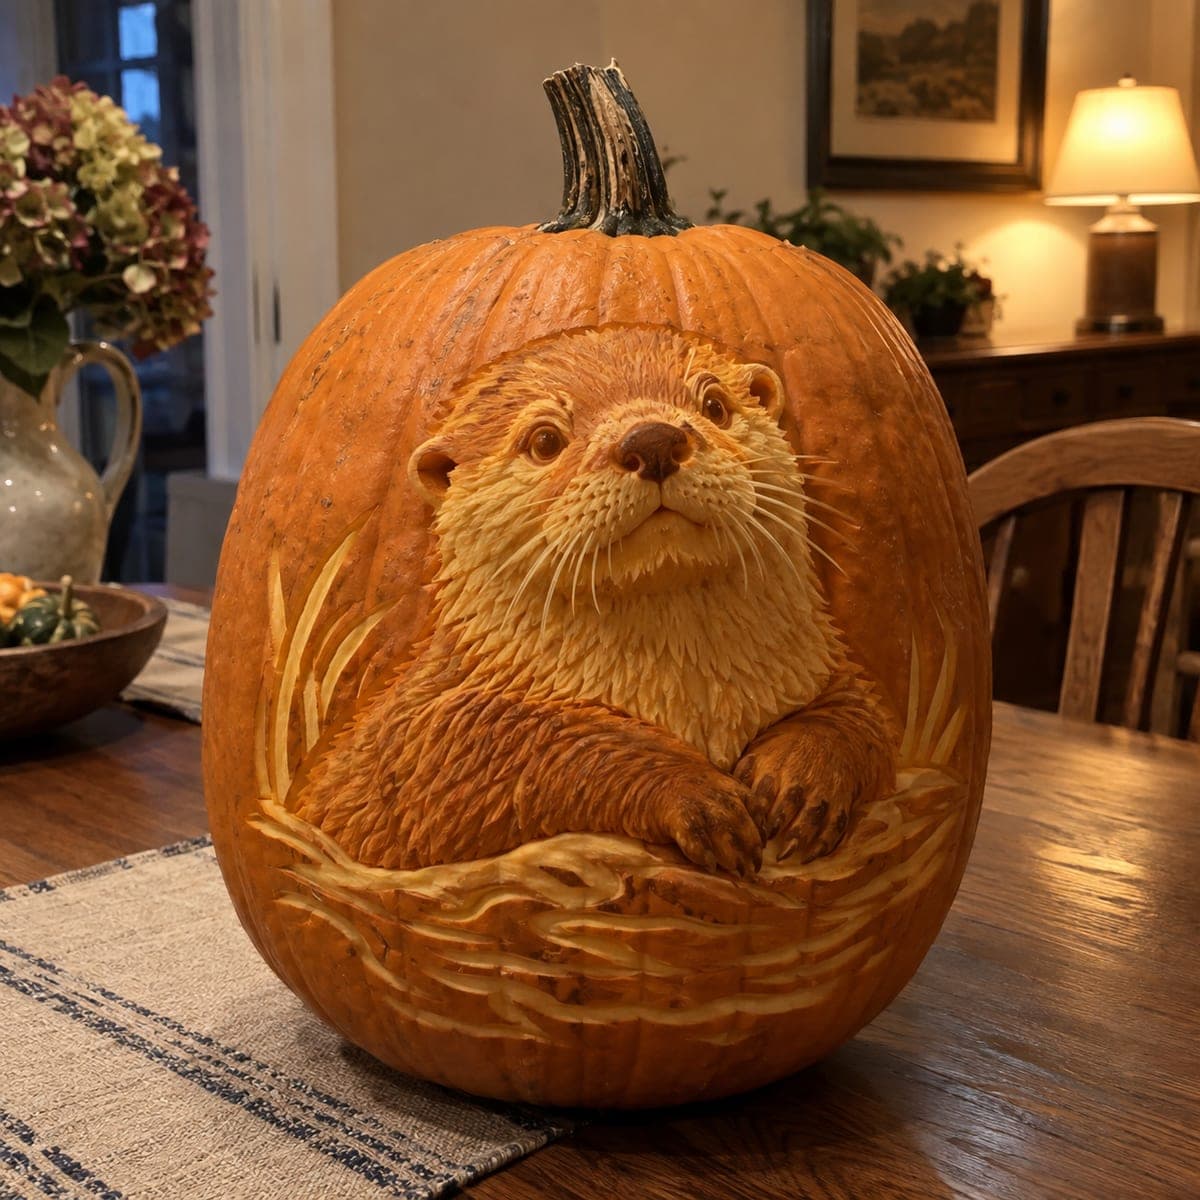
A giant panda face surrounded by bamboo stalks is etched in rich, layered relief across this pumpkin, with fur texture rendered in fine scraping strokes. The shading technique uses a linoleum-style loop tool to peel the skin at varying depths, creating the panda's distinctive dark eye patches and fluffy cheeks. Work the lighter fur areas first and leave the darkest patches untouched for maximum contrast. Display in natural daylight so the tonal depth reads clearly without backlighting.

This is an AI-generated concept image: a realistic, carvable design idea rather than a photo of a finished carve. AI concepts are always labeled and sit out the leaderboard and the contest.

No ratings yet · Sign in to rate
Comments (0)

  • No comments yet — be the first.

Save without an account. Sign in to like or comment.

Our tips for carving a similar design

This design is a surface relief portrait, meaning almost nothing is cut all the way through. The core trick is peeling the pumpkin skin at different depths so the flesh reads as light fur, mid tones, and dark patches under plain daylight. Plan it like a drawing: map the lightest fur first, then deepen the shadows, and leave the darkest patches as untouched skin for punch.

Written by PumpkinCarvingIdeas.com, inspired by the image above. These are our suggestions, not instructions from the uploader. This approach to the AI concept has not been tested on a real pumpkin.

From pumpkin to porch

  1. Prep the pumpkin and pick a flat face

    Choose a large pumpkin with a broad, smooth front and few ribs so your shading stays even. Since this is a relief piece, do not cut a lid or gut it heavily; a light scrape inside the front wall to thin it slightly is enough. Wipe the surface clean and let it dry. Work at a table with good overhead light so you can read tones as you go.

  2. Transfer the panda and bamboo outline

    Tape your stencil over the front and poke or trace the main shapes: the face, ears, eye patches, nose, cheeks, chest, and the bamboo stalk crossing the lower area. Mark which zones are darkest, such as the eye patches, ears, and outer shoulders. A light dusted or pen guide helps you keep the fur boundaries clean. Double check symmetry of the eyes before you cut anything.

  3. Peel the lightest fur first

    Using a linoleum-style loop or ribbon tool, shave the brightest areas like the muzzle, cheeks, and the pale ring of the face down to fresh light flesh. Work in short curved strokes that follow the direction fur would grow. Keep these passes shallow and consistent so the tone stays uniform and bright. Save yourself room to go deeper later, since you can always remove more but never add it back.

  4. Build mid tones and shadow depth

    Move to the medium zones, the chest and the shaded sides of the face, and scrape a little deeper so they sit visibly darker than the muzzle. Vary your pressure to suggest fluffy edges where light and dark fur meet. Round the nose and brow slightly for a gentle three dimensional bulge. Step back often to judge contrast, because relief reads by depth, not by holes.

  5. Carve the bamboo and leave the darks

    Shape the bamboo stalk in crisp facets so it stands cleaner and smoother than the soft fur around it, giving the eye a focal point. Leave the eye patches, the inside of the ears, and the nose as untouched skin for the deepest darks. If you want a small amount of glow, you may cut a few narrow slits fully through only inside the ear cores or behind the bamboo, keeping them thin and bridged so nothing collapses. Cut any true openings last.

  6. Seal, light, and photograph

    Rub cut edges with a little petroleum jelly to slow drying and hold detail longer. This portrait is built for daylight, so display it on a shaded porch or bench where soft natural light rakes across the relief and reveals the tones. A low LED tucked to the side can add a gentle lift at dusk; skip candles entirely. Photograph in the morning or late afternoon when angled light shows the depth best.

Gather your supplies

Check things off as you get ready.

Work on a stable surface, keep your free hand out of the cutting path, and have an adult handle sharp tools.

Three levels of light

  • Leave intact

    The eye patches, inner ears, and nose stay as untouched skin for the darkest tone.

  • Peel & shade

    The face, cheeks, chest, and bamboo are skin-peeled at varying depths for the light and mid fur tones.

  • Cut through

    Optional thin bridged slits inside the ear cores or behind the bamboo for a faint glow, cut last.

Learn the carving basics

Before you start cutting

Should I light this from inside like a normal jack-o-lantern?

No, this is a relief carving meant to be read by surface light, not backlight. Strong internal light would wash out the shading and flatten the panda. Display it in daylight or with a soft side LED so the peeled depths cast the shadows that make the face pop.

How do I keep the fur looking soft instead of scratchy?

Use a loop tool and pull short curved strokes that follow the direction the fur grows, especially around the cheeks and chest. Vary your depth slightly at the edges where light and dark fur meet so the boundary looks fuzzy rather than sharp. Practice a few strokes on the back of the pumpkin first to find your pressure.

This looks hard. How do I avoid ruining the contrast?

Always remove the least material first and go deeper in stages, because you cannot put flesh back once it is gone. Keep the darkest patches, like the eye markings, completely untouched from the start. Step back every few minutes to compare tones, since relief reads by depth differences rather than by cut openings.

Your take belongs here, too.

Changed a detail? Made it simpler? Share a photo of your version and tell the community what worked.

Share your pumpkin

More pumpkins like this

You've reached the end · 8 pumpkins
The Patch Report

Fresh pumpkins, in your inbox.

The best new carvings, ideas worth stealing, and how-tos for carving season. Short, seasonal, and gone by November.

A short email during carving season. Unsubscribe anytime. See our privacy policy.